
Good morning SCT friends! Thank you so much for stopping by for day ONE of our 10th birthday celebration! Each day for the next 10 days we are celebrating this great milestone with our design team, our industry partners and YOU! Join us as we share beautiful birthday inspired projects from our design team and we'll also be sharing the "loot bag" our partners have put together for a lucky reader too! And, be sure to read to the end for a fun challenge where someone will win an additional $250 prize! We have over $2,500 in prizes to giveaway so "woot, woot", raise the roof and let's get our 10th birthday party started!
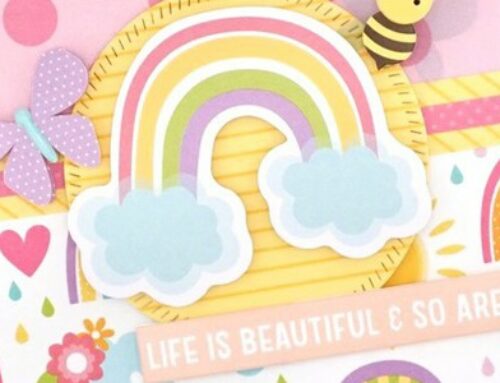
Up first today is design team member Marla Kress! In the spring issue Marla created these beautiful ribbon cupcakes for our Top 10 Most Wanted article on page 9. We loved these sweet cupcakes so much we asked Marla to share just how she made them!
"You are now in tween territory, which I have learned introduces a whole new world of experiences and fun. Lookout readers because I anticipate a great year ahead! In honor of your tenth birthday Scrapbook & Cards Today, I have made cupcakes (with paper of course) and today I’d like to share how I made one of them.
First you’ll start off with a few key pieces.
One cupcake wrapper template (any old template will do). This one happens to have a base which helps hold an insert. Then you’ll need one 3” circle, six 1” circles and a piece of ribbon. The wider the better and NOT too silky…you’ll see why ahead. Assemble the cupcake base.
Add you’re 3” circle to the top of the cupcake base. If you want you can punch a hole in the circle and tie it to the base so that it flips open but I usually just wedge it down inside.
Next fold each of the 1” circles in half. These will be used to make the cherry on top of the cupcake. I chose a paper with a red side so that I’d have a red cherry. Make sure that you fold the side that you WANT TO SEE towards the inside.
Apply glue to one of the folded half circle and begin layering another half circle on top. In my case I’m gluing all of the yellow sides together.
Until eventually I create and cute little paper cherry.
Next let’s look at the ribbon icing. I used my sewing machine to create a running stitch down one side of the ribbon. I DID NOT backstitch at the beginning or the end. If you don’t have a sewing machine, don’t worry. You can do this by hand and it may even work better!
Now pull ONE of the threads and start bunching the ribbon. Sometimes when you’re sewing on the machine this may happen and if it does, LET IT! Consider it a gift, a shortcut.
And now, remember how I said NOT to use a super silky ribbon in the beginning? Like the one pictured above? Well that’s because when you break out the hot glue in this next step IT WILL MELT. So if that happens you’ll have to grab another type of ribbon and try again. Boo! And now you know why my ribbon in this next photo looks completely different.
Take you’re hot glue gun and start gluing the gathered ribbon along the outer edge of the 3” circle. Keep gluing and working towards the center until the ribbon piles up nice and high. Pretend you’re piping icing on a real cupcake. Except you’re using a glue gun and ribbon and won’t feel at all guilty tomorrow.
Place you’re icing lid back on the base and you have a super cute little cupcake.
Add treats inside and they’ll be even better!
Thank you for stopping by and celebrating with us!" ~ Marla
Day ONE – Giveaway
"Happy 10th Birthday Scrapbook & Cards Today! We are so happy to be a part of your monumental birthday celebration! We are excited to offer one lucky reader an assortment from our new Spring Garden collection! Just in time for the upcoming warm weather!"
Our second prize package today is from our wonderful friends at Stampin' Up!…
"You can say, "Glad you were born," and leave it at that. Or you can acknowledge the greatness of the day by making a card, complete with cake, candles, and balloons with the Party Wishes Clear-Mount Stamp Set. Today's winner will also receive the Party Punch Pack! What's cuter than an itty bitty punched image? Three itty bitty punched images! Cut out tiny balloons, candles, and cupcakes. Congratulations on 10 years SCT!"
For an opportunity to win today's amazing "loot bag" prizes from Doodlebug and Stampin' Up! please be sure to leave a comment below by Wednesday, April 6th! Please also join us each day as we thank your partners for this prize and for all their support for SCT by clicking on the links below for their facebook pages:
If you don't already follow SCT on Facebook or Instagram (@sctmagazine), be sure to follow us long there too!
Day ONE – Challenge
Let's have some fun! Hidden throughout the spring issue are 10 little cupcake/dessert images. Each day we will share the image you are to find and at the end of the 10 days, when you've found all 10 cupcakes that coordinate with the image we share each day, you'll email us and be entered in to the draw to win a $250 mystery box put together by me, your "always happy to give away" Publisher! I have put together a fun box of products that you just have to have in your scrap room! If you don't have a physical copy of the magazine, you can view or download the spring issue HERE. This is today's image you're looking for:
So cute right? Thank you for joining us as we kick off this fun celebration! We are thrilled and honoured you've chosen to make SCT a part of your day. See you tomorrow!
~ Catherine
Publisher, Scrapbook & Cards Today Inc.


Love Love Love this calorie free cupcake! So cute and ever so clever with the hidden treats below. Sure could use this as my table treat! Thank you Doodlebug Design Inc. and Stampin’ Up! for these fabulous give aways. I love both these companies for the quality their products bring. Happy 10th Birthday SCT, have been following you for years, but can’t believe it has been 10. Here’s to 10 more then 10 more and then….. Thanks for all the inspiration and tips etc.
So happy for the opportunity to help celebrate your 10th birthday! It’s so exciting! Happy Birthday SCT! Love all the giveaways and chances to win – thank you for sharing your celebration with us!
Happy 10th Birthday! Fantastic idea using ribbon for the icing of the cupcake, and hiding treats inside. Thanks you for holding another great contest!
Woo hoo, I love a good party! Happy 10th to all of you at Scrapbook & Cards Today. Have my copy of the Spring issue and it is scrumptious! Great little challenge too!
How can you not love those spring colours. Love the stamps too. Always looking for birthday items for cards. Congratulations on 10 years, here’s to 10 more!
at first glance the cupcake looked like something yummy to eat! how cute! congrats on the big celebration! :)
Happy 10th. This project is a perfect way to kick off the celebrTion. Too cute.
Happy 10th! Birthday!!
That cupcake is a project I might actually try! So cute! And I love the colors in the Doodlebug Design collection. I am a happy SU demo, so I already have those birthday goodies!
Love this cupcake. Way too cute.
Happy Birthday Scrapbook and Cards
Happy Birthday!
Thanks for the chance to win such a generous giveaway.
Happy, Happy Birthday. Love the cupcake, especially the goodies hidden inside.
Happy birthday!
Happy 10th and many more.
Happy birthday! Great cupcake tutorial and fabulous prizes. We could use a little spring around here – 8+ inches of snow this morning and it is still snowing! Welcome spring – lol.
Happy birthday
Happy, happy birthday! The cupcake is so creative & cute! Wonderful prizes today–thanks for the chance to win!
What a great way to share a cupcake! No calories yet so pretty! Great prizes in today’s loot bag too! Looking forward to the next ten years of SCT! Love the cupcake challenge! Found today’s and can’t wait for tomorrow’s clue! HAPPY BIRTHDAY!
Happy Birthdayy! Love doodlebug and stampin up ! What a great way to start the celebrations!
The cupcake is SO cute! Thanks for the chance to win.
Happiest of birthdays to you! xox
Thanks for inviting me to your party! Happy 10th birthday SCT. I was just admiring the new collection from Doodlebug on the back of the magazine. Great prizes offered by Doodlebug and Stampin’ Up! Would love to win.
Awesome prizes from awesome companies! Love the quality of their products!! Thanks for the chance to win and HAPPY BIRTHDAY!!!!!!
Happy happy happy happy 10th Birthday!! Thank you for the awesome cupcake idea today! So excited about the giveaways!
Happy Happy 10th! Such a cute ribbon cupcake! Thanks for the opportunity to win. I love Doodlebug!
Love that 3D cupcake… And what awesome prizes! Happy birthday SCT!
Happy 10th Birthday SCT! That cupcake is the cutest! Thanks for the chance to win.
Happy 10th birthday. Love the cute little cupcake. Thank you Doodlebug and Stampin Up for celebrating SCT’s birthday.
Happy Birthday! Thank you for the chance to win one of these generous giveaways!
Going to be a fun scavenger hunt.
Great prize for today.
thanks.
HAPPY 10TH BIRTHDAY.
Happy 10th birthday! That cupcake is too too cute! Thanks for the chance to win!
cute cupcake and thanks for a chance to win! I’ll have to go a cupcake hunting… thanks!
oh my—those are so cute!! Great idea for different occasions! happy 10th birthday!!!! wow—incredible! 10 years…already! Thank you for the wonderful opportunity…love Doodlebug and Stampin up!
Love your 10th BIRTHDAY GIVE-AWAYS!!!
How adorable that wee little cupcake is, and absolutely no calories, if you don’t eat the goodies inside that is!! LOL Huge Congrats on your 10 year milestone, and hope we are right back here in another 10 years celebrating yet again! Thanks to Stampin Up and Doodle Bug for providing such awesome giveaways!! Good luck everyone!
Happy birthday-what a great cupcake!
What an adorable cupcake!
Happy 10th SCT!!!
Fabulous cupcake and prizes. Also love the fun challenge. I had better go and see if I can find the first clue.
The cupcake is adorable!!! Thanks for the step-by-step tutorial.
Happy 10th Birthday!
What fabulous prizes to celebrate your 10th (amazing) birthday. Happy Birthday SCT!
Happy Birthday! Thanks for the spring giveaways. So happy spring is on the way!
Happy Birthday! That cupcake is adorable, thanks for sharing :)
Love, love, love the cupcake! Happy 10th Birthday! Thanks for the chance to win such great products.
Happy Birthday SCT! Love the cupcake and that it has a hiding place for some treats!
Congratulations on reaching 10 years SCT…that’s an amazing milestone in this day & age. These are great prizes. Thank you to the sponsors and thank you to SCT for the chance to win them.
Happy 10th Birthday! What an adorable cupcake! Great prizes, too! Thank you for the opportunity!
that cupcake is very cute.. I will have to give it a try.
thanks for sharing.
and Happy birthday.
Love all the birthday ideas.
Love the paper cupcake. I think I will have to look at making some myself. Fabulous prizes for today too! Love both Doodlebug and Stampin up! Happy 10 years!
Happy Birthday. Love the cupcake!
Oh I would to win a prize – anything and everything because it’s all so awesome!!