

Hello SCT readers, and happy Monday! Today we’re starting your week off right with February’s free cut file, and a wonderful guest to inspire us to create with it! Brianna Lepper is a natural with cut files, being on the Paige Evans Silhouette team. Not only does Brianna use Paige’s cut files in such fun and beautiful ways, she also incorporates her own colourful, mixed-media style into every layout she creates, and today’s project is no exception. Let’s welcome her and see what she is sharing with us today!
…………………………….
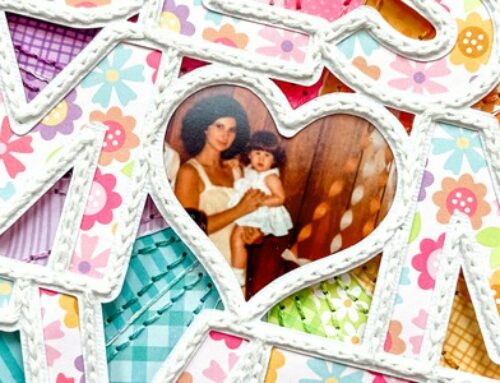
Hey crafty friends! It’s Brianna Lepper here and I’m super excited to be the SCT Magazine Blog guest designer for February. I can’t wait to show you what I created using the gorgeous Heart Background cut file designed by Paige Evans:
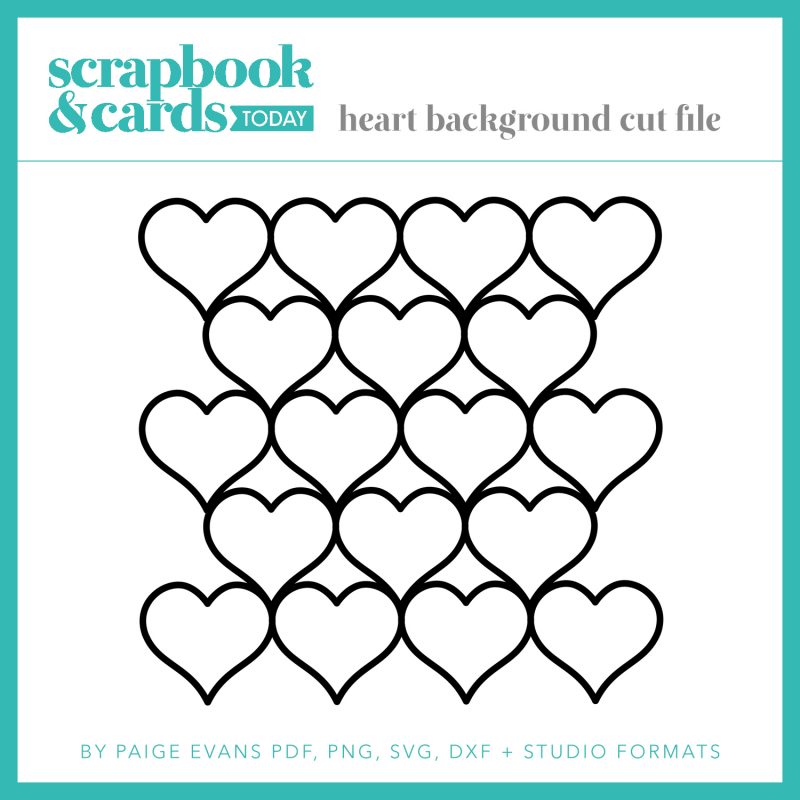
I decided to use the new Memory Explosion Box collection by Michael’s and Paige Evans. The colors in this collection are gorgeous and I thought it would be a perfect match with the cut file. Here’s my layout!

Supplies | Digital cut file: Heart Background by Paige Evans; Memory Explosion Box Collection by Michael’s and Paige Evans: 12×12 Sprinkle Paper Pad, 6×6 Double Sided Paper Pad, Travel Die Cuts, Shapes & Phrases Die Cuts, Birthday Die Cuts, Glitter Sets, Embellishment Mix, Adhesive Pocket Cards and Celebration Stickers; Cardstock: Vicki Boutin Mixed Media Foundations Paper and American Crafts Textured White; Shimmerz Paints: Spritz in You’re The Zest, Sweet Pea, Practice What You Peach, Hint of Mint and Pink Outside the Box; Vibez in Snow Way Man and Cold as Ice; Coloringz in Pretty in Pink; SpiegelMom Scraps Sequins: Assorted Mixes; Adhesive: Scotch Foam Tape, Nuvo Deluxe Adhesive; Other: Acetate, Tim Holtz Tiny Attacher and sewing thread.
To start, I die cut the cut file from a piece of textured white cardstock using my Silhouette Cameo. While that was cutting, I went back into the Silhouette Software and offset the inner heart pieces so that when it came time to back the cut file, the backing pieces would be sized perfectly. There are a few different ways to back a cut file and while this way may take some time in the beginning, it really saves time later on. I honestly don’t stick to one way of backing a cut file and will flip flop to whichever technique I’m in the mood for that day. You choose a way that works best for you! When everything was finished cutting, I moved onto the next step: mixed media.
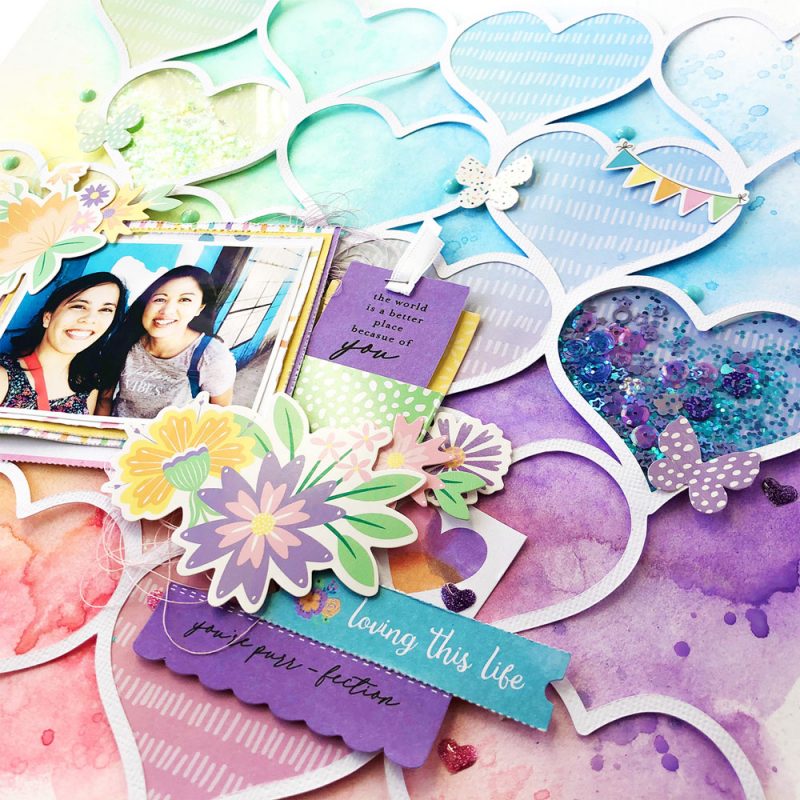
I am completely obsessed with creating rainbow backgrounds, so I thought I would create one for this layout. I used the Vicki Boutin Foundations Paper for the base of my layout and I decided to skip the gesso this time. And I do have to say, I didn’t have any problems getting the colors to run and blend. First, I sprayed on a bunch of Shimmerz Paints in rainbow order. To help get the colors moving, I sprayed on some clean water and blended everything with a paintbrush. Even without the gesso, the colors still had movement and didn’t soak immediately into the cardstock. I love how it turned out! I then set it aside to dry overnight and got to work on the next step: backing the cut file!
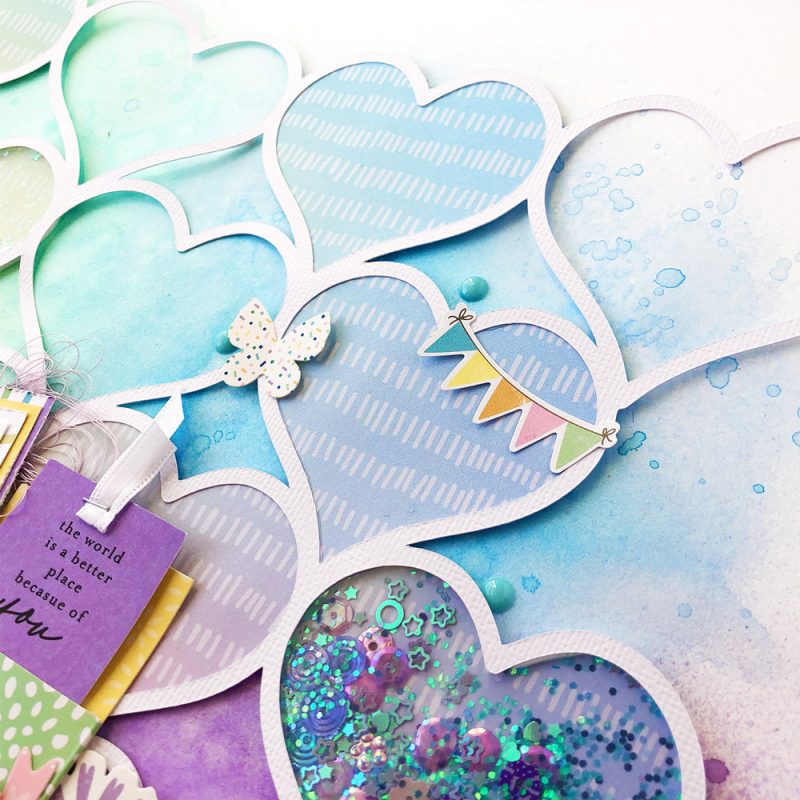
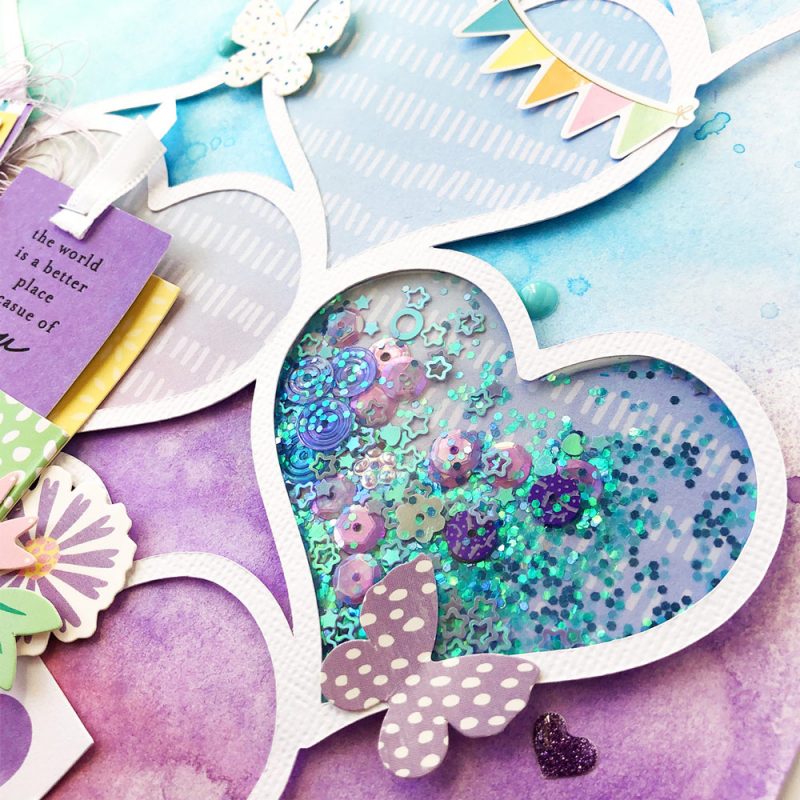
I love adding cut files to my projects and I also love finding new and creative ways to work with them. One of those techniques is to create some kind of shaker element in them. The Memory Explosion Box collection has three different glitter sets and I thought they’d make great shakers! So, I created three different shakers within the cut file, making sure to keep in mind the placement of each one and matching the colors in the shakers to the color on the background behind it.
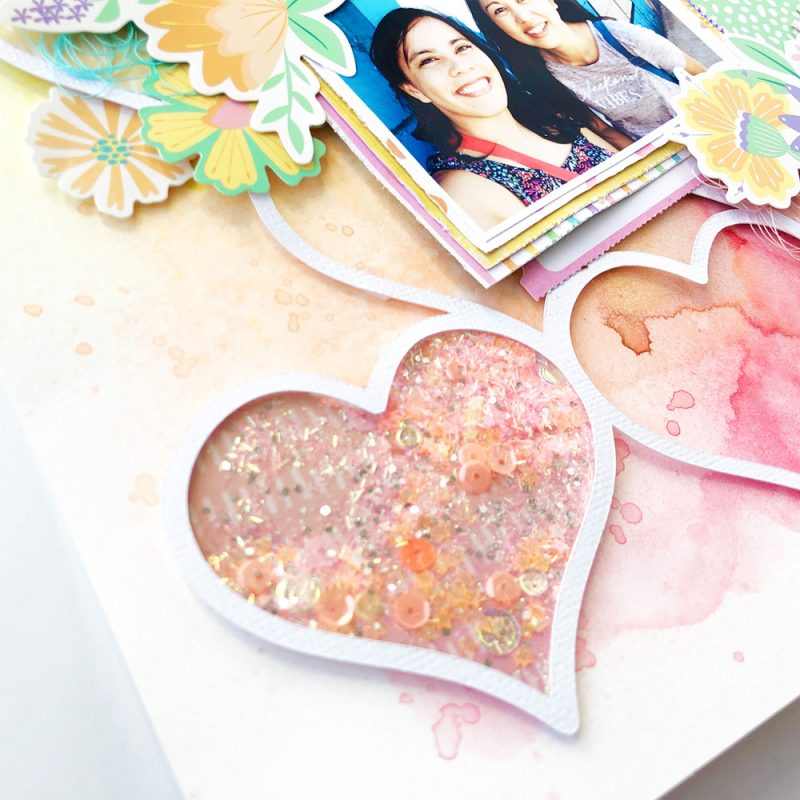
To create these fun shakers, I adhered a piece of acetate (you can use any plastic or packaging you have on hand) to three of the open hearts. After it was dry, I applied thin strips of foam tape around the perimeter of the heart to create a barrier for the glitter to sit in. I then poured in the glitter and also added SpiegelMom Scraps sequins in coordinating colors into each one. I then sealed each heart using the backing pieces I had previously cut. Super simple and fun!
Here’s the last shaker, I am loving all of the green sparkles!
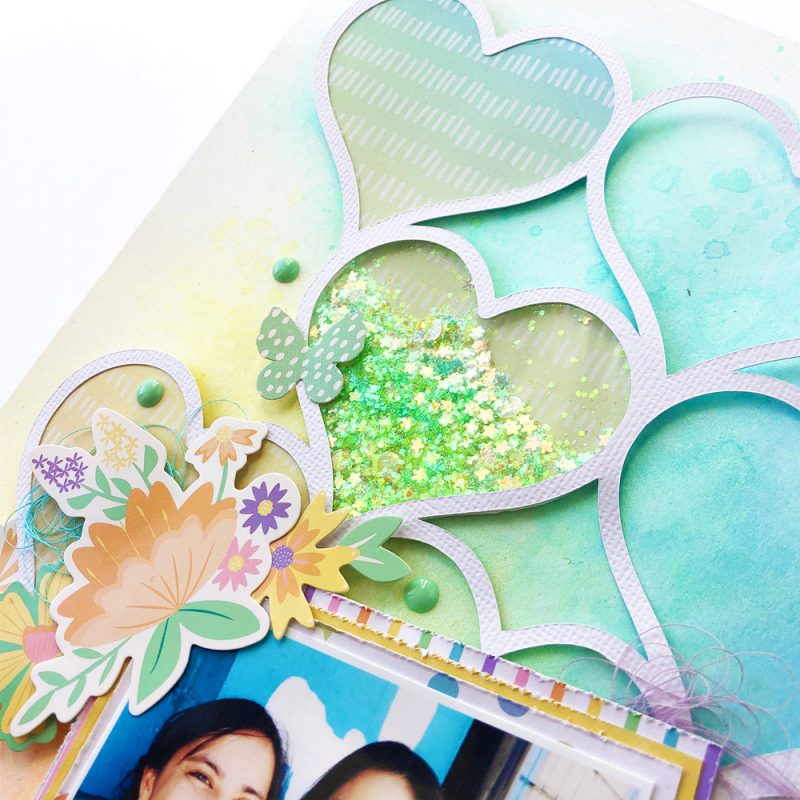
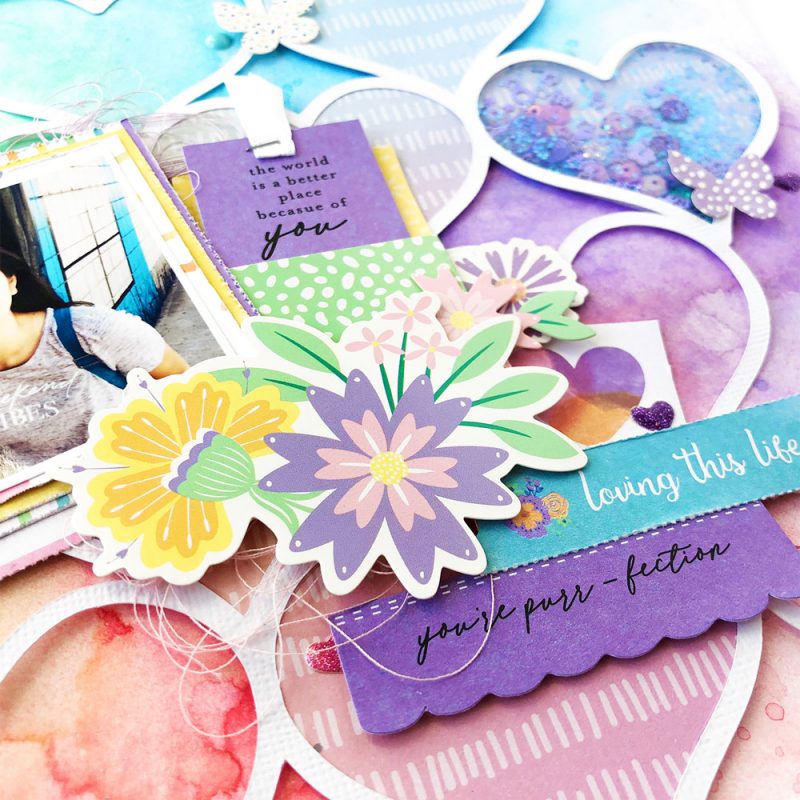
Next, I backed a few of the hearts in the cut file with the other patterned heart pieces I had left, making sure they also matched the background colors behind it. I then popped the entire cut file up on more foam adhesive to give the page even more interest. I embellished using the die cuts, stickers, embellishment mix and adhesive pockets from the Explosion Box Collection. I kept the embellishing quite minimal since the shakers and the mixed media were big elements on this layout. I didn’t want my page to get too busy.
That about wraps up this layout! I really enjoyed working with this cut file and I’m so honored to be this month’s guest designer. Whether it’s creating a mixed media background or a shaker element in a cut file, I hope that I was able to inspire you today! I can’t wait to see what y’all create with this amazing cut file! Cheers friends!
Hey y’all! My name is Brianna Lepper and I’ve been scrapbooking for a little over 15 years. We are military and are currently stationed in Northwest Louisiana. I have 2 boys, Noah and Elijah and they frequent my layouts quite often. If my projects aren’t about my boys, then they’re about our awesome pups, Luna, Pippa, and Theodore (our newest addition). I sell Real Estate by day and scrapbook at night.
About 5 or 6 years ago, I decided to film a scrapbook process video and upload it to my YouTube channel. I am so glad that I did because it opened up a whole new world that I had no idea existed. From there, I started sharing more of my work on Instagram and have really made the best crafty friends. I love working with mixed media and cut files and it’s so fun to see how my style has evolved over the years. Scrapbooking and creating anything, in general, has truly become my therapy and I’m so grateful to be able to do it every day!
Find more of Brianna’s work here: Blog | Instagram | Facebook | YouTube | Pinterest

Beautiful! Thanks for sharing :)
Oh, I love everything about your layout!! It inspires me to try using it this way on a layout!! TFS!!
I’m sooooo in love with this layout. Such amazing ways to back the cut file. Thanks for sharing.
It’s absolutely beautiful, Bri! ❤️❤️❤️
Absolutely gorgeous!!! ♥
Beautiful Layout!
Lovely! Thanks for the great cut file too!
I just love the many different windowed hearts of this background.Beautiful.
Beautiful layout! I love the shaker elements you incorporated into the cut file! So creative!
So pretty! Every heart is different; just like love!
Those shaker elements are so beautiful. Thanks for sharing the cut file!
Such a beautiful layout ???? thanks for the inspiration and the cut file!
Oh my! This is gorgeous and thank you for the cut file. A lot of love went into this layout.
Beautiful layout. I love the colors. Thank you for the cut file ????
What a beautiful layout! I love the fun shaker windows. :)