
Supplies: 6 x 8 Page Protectors: Becky Higgins Project Life; Journaling Cards, Stars & Tags: Elle’s Studio; Enamel Dots: Echo Park.
Raise your hand if you’re like me: you love using pocket pages to scrapbook, but secretly wish you could add more texture and layers!
It’s easy to slip your photos and journaling cards into divided page protectors and call it done, but if you’re looking to get a little crafty, flip pockets can help you “think outside the box”….or the page protector!
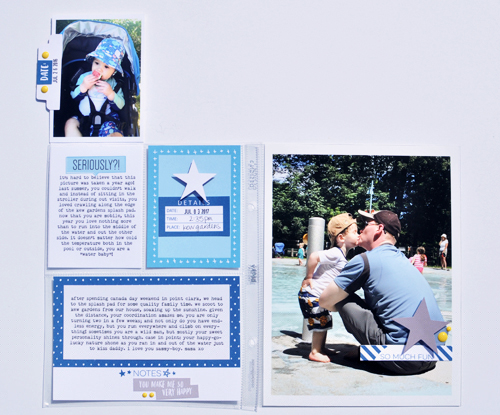
In this layout, I created a flip pocket to compare and contrast photos of my son from the splash pad over the past year. The top photo is from the summer 2017
and inside the flip pocket I included a photo of my son from the summer of 2016. I love showing the passage of time especially when my son is so young!
To create a flip pocket, I cut a 3”x 8” piece of white card stock. Using cardstock backing is one way to make your flip pocket secure. Of course, if you want something sturdier, you could buy some of these.
After folding the cardstock in half so that it measures, 3” x 4”
I then adhered my photos and journaling card to the paper making sure they are facing the correct direction.
Afterwards, I embellished the flip pocket with tabs to signal to the viewer to “look inside”.
Not only are flip pockets one way to add extra dimension and visual interest to your pocket page stories, my kids love looking for “hidden stories” as they flip through my pages. Thanks for looking & happy crafting!
Did you know…
That Jess curates a quarterly pocket kit for us called Life in Pockets? You can see our summer Life in Pockets kit (we have just a few left!) HERE and our brand new fall Life in Pockets HERE!

Cool idea! TFS!
LOVE flippy flappers! They are truly my saving Grace in my PL52!! I might actually love them too much… ;) Jess, your spreads are beautiful as always. XO
I just got on my computer and looked up SCT and was surprised to see Jess Forsters pocket pages and I love them. I like adding pockets to my pages and now with the help of Jess I can layer alot more of things together and I liked the surprised covers. Thanks for the help Jess and SCT.
This is such fun!
LOVE the look of the blog!
Great idea! I’m always looking for ways to enhance my pocket pages. Simple with great impact. Thank you