With the month of December fast approaching, our 3t’s designer Virginia Nebel thought she would share an AMAZING advent calendar project with you today! This just makes me want to raid my Christmas patterned paper stash and have fun with my kids making this project.
Here’s Virginia with her adorable project:
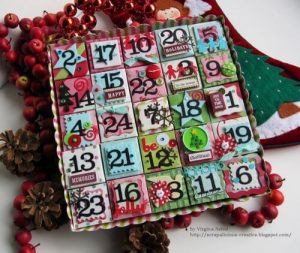
Celebrate the holiday season by making your own countdown calendar. Get ready to dig up all those pretty pattern papers and embellishments in your stash. This project is fabulous to make with all the ‘lil helpers at home too. We are going to make 50 little boxes using a traditional origami technique. The tools you will need are a ruler, pencil, and a bone folder.
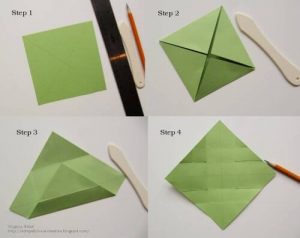
Start with 25 pattern paper squares measuring 5 x 5 inches each (best to use double sided papers).
Step 1. With your ruler mark the center of the square by intersecting lines from opposite diagonals.
Step 2. Fold in each corner to the center.
Step 3. Open up , fold in each corner to the top line created in the previous step.
Step 4 and 5. Open up again, refer to photo, choose two opposite ends and cut 2 lines from each end into the points which will become the outside corners of your box.
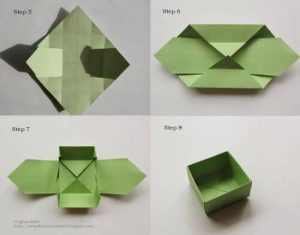
Step 6. Fold in bottom and top as shown, squeeze in the sides at the same time.
Step 7. Flip up side flaps and tuck into center.
Step 8. Voila, you’ve just created a little box. Use a bone folder and run along the creases to square up the box. Repeat above steps for remaining boxes.
I used squares 1/8 inch smaller (ie. 4 7/8 x 4 7/8 inches). Depending on the thickness of your paper you may need to adjust accordingly. Experiment first making sure the bottom fits snugly under the top before cutting out all the bottom squares.
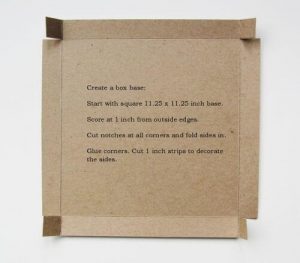
You’ve just made a ton of little boxes, yeah! Now just one more box base to make and you are ready to decorate. Cut a 11 ¼ x 11 ¼ inch square cardboard and score at 1 inch in from all sides. Notch out the corners and fold sides up and glue the corners. Cut 1 inch paper paper strips and decorate the sides. (If you want to have decorated edges like scallops on my example, then start with 1 ½ strips and trim down to fit).
Get creative and decorate, most of all have fun filling the boxes with goodies! My countdown calendar reflects all things my daughter loves to collect– candy, sweets, buttons, and little erasers.
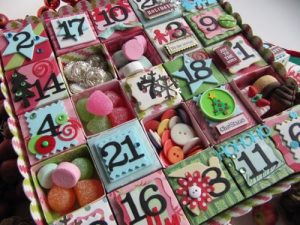
Didn’t I tell you Virginia’s project was AMAZING! You can check out more Virginia’s work on her crafting blog, http://scrapalicious-creative.blogspot.com/

