
Hi everyone, it's Audrey, waving a giant hello from North Carolina's Tar Heel State! It's my first time guesting on the Scrapbook & Cards Today blog, and I am so excited to be here! Now that June is here, I am in a vacation state of mind, and am ready for some grand summer adventures. So I have made a pair of summer-inspired cards to share today made with Photo Play Paper's fun new outdoorsy collections, Campfire and Lakeside.
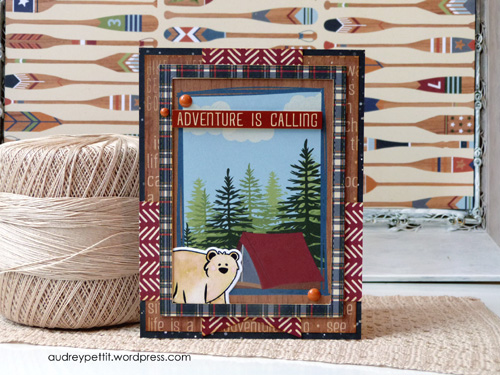
Supplies: Patterned Paper, 6×6 Paper Pad, Stamp, Die, Cardstock Sticker: Photo Play Paper Frame Dies: My Creative Time Enamel Dots: Simple Stories Watercolor Cardstock, Ink, Ink Blending Tool: Ranger Markers: Zig Clean Color Real Brush Markers
I absolutely adore these new nature-inspired collections, and love how beautifully they work together. The colors from both lines are a perfect match, and the ephemera die cuts, stamps, and dies coordinate with either line, too. I have used the stamps and dies on both cards today, as I simply cannot resist that cute little bear. And I've mixed a bit of each paper collection to finish my designs. Mixing and matching patterned papers is one of my favorite card-making techniques.

I love making a little scene to tell the story of my card design, which I've done here with stamps, stickers, and a printed ephemera die cut.
*Tip: Be sure to check out a collection's ready-made embellishments to use as quick and easy backgrounds and accents. It's a great time-saver.
Once I've pieced my scene, I like to use die cut in a variety of sizes and shapes to create a framework to anchor the elements together.

I stamped the bear onto watercolor paper and colored the image with Zig Clean Color markers before die cutting with the coordinating die shape. I snipped off the excess bear parts from the bottom and side before adding the die cut frame on top. And I love how the bear is just peeking in from the corner of the frame.

Supplies: Patterned Paper, 6×6 Paper Pad, Stamps, Dies, Cardstock Sticker: Photo Play Paper Watercolor Cardstock, Ink, Ink Blending Tool: Ranger Frame Dies: My Creative Time Markers: Zig Clean Color Real Brush Markers Twine: American Crafts
My second card also features that sweet bear with a fun mix of patterned papers and coordinating stamps. Once again I have made a framed scene for my bear, this time piecing a woodland setting using patterned papers and a cardstock sticker. I love how the green paper in the background sort of mimics the look of a whole forest full of trees.

I added a simple hand-cut curve to woodgrain paper to make a little hill for my bear to stand on, and placed the treeline sticker on the top of the hill to create a sense of distance. Such a simple way to piece some scenery from the supplies you already have on hand, without the need of any extra tools.
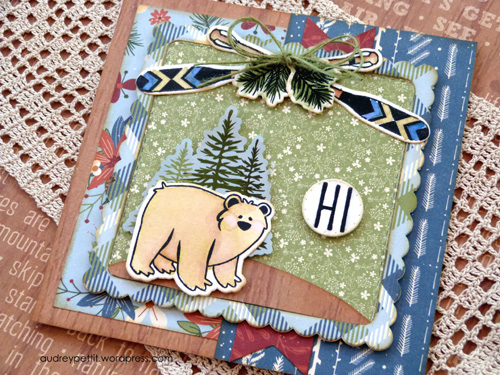
To complete the scene, I stamped and die cut some additional images to add to the top of the frame, as well as for the sentiment. All the images were stamped onto watercolor paper and colored with the Zig Clean Color markers. I created a swag element from a pair of oars that were tied with a bit of stamped greenery and a big twine bow. To help the sentiment stand out a bit more, I die cut the greeting with a small circle die and popped it onto the card base with foam adhesive.
Thank you all so much for stopping by today! And a huge thank you to the Scrapbook & Cards Today team for having me! I'd love to hear from you! Stop by and visit me at my blog, A Peek Into My Crafty World. Or you can find me here: Instagram Pinterest Facebook
~ Audrey


This is simply adorable! Love this card!
Oh my!
I LOVE these cards and those papers are just perfect for the outdoorsy stuff that fills a bunch of my scrapbook pages.
Totally awesome card! This is a collection that makes me smile! We are an outdoorsy family so they fit our lifestyle perfectly! TFS!
Adorable!! Love that little bear! :)
So cute and I love the dies you used as well as that marvelous paper. Thanks for sharing the fun.
These two paper collections are AWESOME! My family is big on camping and other outdoor fun so these are perfect for me. I’m off to find the best online price right now!!!
Congrats at being a guest designer here, Audrey! Love the woodsy look of your cards! :) ~ Andrea
super CUTE cards!
Yay for Audrey!