
Good morning SCT friends! It's Lisa Dickinson joining you this morning. If you know me then you know I'm always looking for new ways to put a creative spin on classic design frameworks. I use the basic grid as a starting point for many of my pages, so finding new applications to use on those grids assures that all my layouts don't end up looking the same. Adding an angle is a great way to change up the basic grid and it's the basis for my technique of Slanted Squares!
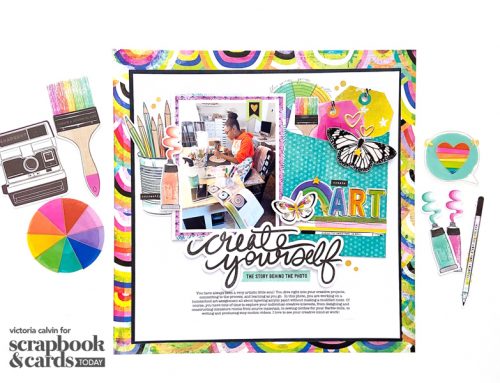
For this grid, I started with 2.75" squares, three of which were photos and the rest were assorted patterned papers. Because these squares on the larger side, I knew it would be difficult to center the design, so I planned for it to bleed off the edges on three sides, leaving some white space on the left for a title and journaling block. But rather than arrange the squares in a traditional grid, I slanted them almost 45˚and offset the seams between blocks.
On most of the patterned paper blocks, I layered coordinating embellishments including flowers, cork stickers and vellum pieces. I also added some circular stitching to a few blocks, which - unless you are a professional seamstress - is nearly impossible to do perfectly, so embrace the fact that the circles will look wonky! I love using this method for adhering vellum and mesh pieces where traditional adhesive would show.
For the embellishments that were more linear like the "kindred spirits" and "good times" banners and the vellum rulers, I adhered them atop the squares perpendicular to the page edges, which adds stability to the design. (The title and journaling block also serve this purpose). If every element were at an angle, the design would feel like it's sliding off the page, so it's important to balance the slanted lines with elements that feel stable and grounded.
Slanted squares create dynamic movement in a design, so they are great on any page theme that needs a sense of motion and energy. This design is easy to replicate with smaller squares as well (and a great way to use up smaller scraps!) and you don't necessarily have to incorporate the photos into the grid; they could be layered over a grid background. Adjusting the angle of the squares is another way to mix it up, so try changing the tilt of the grid with each new page!
Regardless of the angle or size of the squares, adding a slight slant puts a fresh spin on the grid (and results in some pretty fun pages!)


What a cool design and colorful layout!
Cute LO, thanks for sharing the slanting technique.
Beautiful layout, such great colors!
Delightful. Love the angles and layers.
Love the design and what a great way to use the best part of pictures. Great idea.
Gorgeous! I love Lisa’s use of color, and she always has great design ideas!
I like it that I have to twist my head to see all the angles on this LO!! Love it.
Really neat page! Love the dynamic design. Tfs! :) ~ Andrea