Basic HTML Version


www.scrapbookandcards.com
49
supplies
CARDSTOCK,
Bazzill Basics;
PATTERNED PAPER,
Pink Paislee;
GOOSEBUMPS,
Queen & Co;
SNOWFLAKE
PUNCH,
Martha Stewart;
GLITTER,
Ritz;
DIE,
Accucut;
ADHESIVE,
Xyron
supplies
CARDSTOCK,
Bazzill Basics;
PATTERNED PAPER,
Pink
Paislee;
DIE,
Sizzix;
CIRCLE PUNCH,
Creative Memories;
ADHESIVE,
Xyron
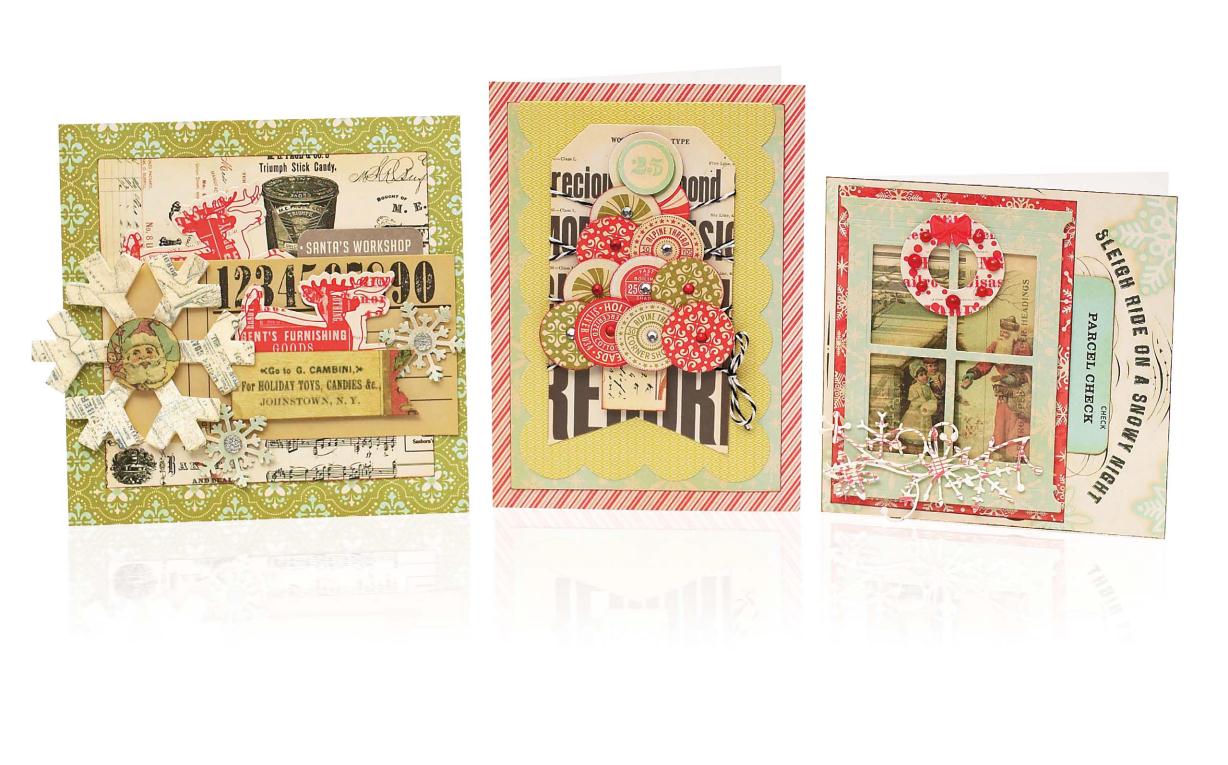
christmas tree
1 Trim an 9”x6” piece of cardstock. Fold it in half
with the opening on the right.
2 Trim a 3.75”x5.5” piece of light blue patterned
paper. Die cut a 3.5”x5.25” scalloped rectangle and
adhere it to the light blue piece. Adhere both to
the front of the card.
3 Cut a notch in the bottom of a tag. Wrap black
baker’s twine around the bottom of the tag and
tie it off in a bow on the right. Adhere the tag to
the front of the card.
4 Punch out 12 1” circles from a variety of patterned
papers. Layer the circles onto the tag using foam
adhesive to form a tree as shown.
5 Trim a 1” square from vintage paper and adhere it
to the bottom of the tree to form a trunk.
6 Adhere silver and red gems to the centers of the
circles.
santa’s workshop
1 Trim an 5.5”x11” piece of blue/green patterned
paper. Fold it in half with the opening on the
bottom.
2 Trim a 4.5” square piece of vintage paper and
adhere it to the center of the card.
3 Layer a variety of tags to the front of the
card as shown.
4 Die cut a snowflake from patterned paper and
cover it with glitter. Using a 1” circle punch,
punch out a santa face and adhere it to the
center of the snowflake.
5 Adhere the snowflake to the left side of the
card, allowing it to hang over the edge as
shown.
6 Trim out a word/sentiment banner from pat-
terned paper and adhere it to the right of the
snowflake.
7 Punch out several small snowflakes from pat-
terned paper and adhere them to the card as
shown. Add a goosebump gem to the center
of each one.
supplies
CARDSTOCK,
Bazzill Basics;
PATTERNED PAPER,
POSTAL TAG, GARLAND,
Pink Paislee;
PEARLS,
Queen & Co;
DIE CUT,
Memory Box;
ADHESIVE,
Xyron
window wreath
1 Trim a 9.5”x4.75” piece of cream, collage pat-
terned paper. Fold it in half with the opening on
the right.
2 Die cut a window shape from blue snowflake
paper and back the window with a vintage tag or
patterned paper.
3 Trim a 3.25”x4.5” piece of red snowflake paper
and adhere the window piece to the center.
Adhere the assembled piece to the left side of
the card.
4 Adhere a word/sentiment sticker to the right side
of the red snowflake mat as shown.
5 Adhere a wreath die cut to the top of the win-
dow with foam adhesive. Add red pearls to the
wreath.
6 Die cut snowflakes from patterned paper and
adhere them along the bottom of window.
the 3 i’s