
With our 10th birthday celebrations happening all year it only seemed fitting to have an hour designed to birthdays! Read on to see what Stacy Cohen, Nancy Damiano and special guest Yana Smakula from Hero Arts has in store for you!
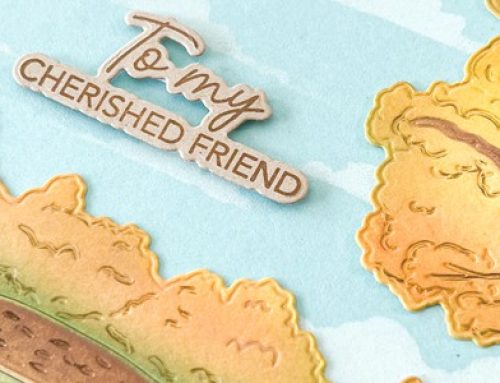
"For World Card Making Day I made a feminine birthday card with lace, bling, a doily, and a vibrant pink fabric flower
I love to use flowers on my crafty projects, but I can’t always find the exact size or color that I want. So what do I do? I make my own flowers! These burnt edge fabric ruffled flowers are pretty easy to make. Here’s how:
- Get some polyester fabric like satin, chiffon, charmeuse, etc. It should be 100% polyester since this will melt rather than burn. I usually buy “lining fabric” at my local fabric/craft store. It comes in many colors and it’s inexpensive. You only need ¼ of a yard to make a whole bunch of these flowers.
- Use a pencil to lightly sketch flowers in varying sizes on your fabric. These do NOT need to be perfectly shaped flowers since the edges are going to curl up and change shape in the end. For the pink flower on my finished card, the largest flower layer was about 3½ inches. Cut 4 to 6 flower layers, depending on how full you want your flower to be.
- Grab a candle and a pair of tweezers. Working one piece at a time, carefully hold the flower about 1 or 2 inches above the flame until the edge starts to curl.
- Slowly rotate the flower around over the flame as each section starts to melt and curl. Be careful not to singe the edges too much!
- Layer the flowers on top of each other with the largest on the bottom and the smallest on top. Adhere the layers together with a dot of fabric glue. You can either make a small fabric flower layer to fill the center, or add a decorative jewel, button, cluster of rhinestones, or other embellishment to the center.
Enjoy an amazing day!" ~ Stacy Cohen
……………
Ink Blending + Nuvo Drops!
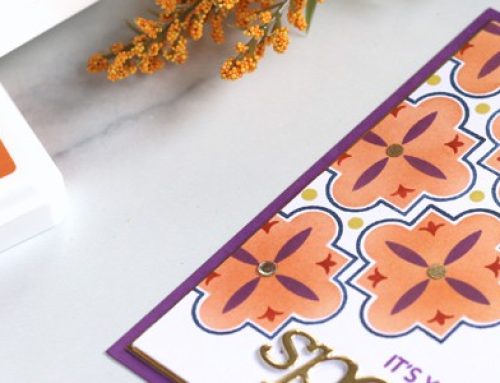
Hi cardmakers, Nancy here with a National Card Making Day celebration including some fun new products and a technique! Nuvo Drops are a fun way to create your very own enamel dots in a rainbow of colors.
The fine tip applicator makes it easy to get just a drop of embellishment in all of your projects. Here I filled all the tiny circles in this cut with little bursts of color. This frames out the center of the card and adds some texture.
To create a pretty, soft background try ink blending. You will need a foam ink blending tool and some pigment inks. Ink blending is made of many, light layers of color. Use a gentle touch and dab off excess ink on a scrap piece of paper. Continue to blend inks together until you have a nice, smooth gradient.
This birthday card comes together with a fairy stamped image that was watercolored. Use pop dots to attach the stamped image so it can really stand out.
Combining the new Nuvo drops and some ink blending is a beautiful way to create a pretty greeting. It's easy to create multiple cards for different occasions at the same time. Remember to use a soft touch with the blending and experiment with different color combinations!" ~ Nancy Damiano
4:00 pm special guest – Hero Arts!
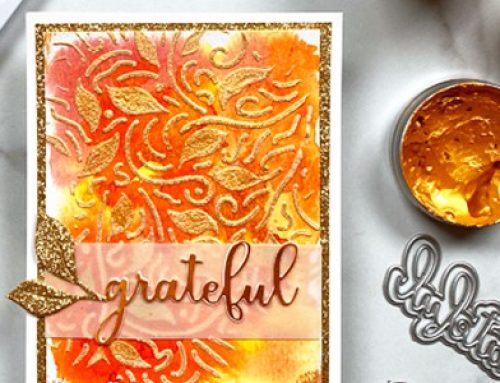
Color Layering stamps offer endless possibilities! I used Hero Arts Color Layering Hibiscus stamp set and stamped several large and small flowers using purples and a few leaves using greens. Images were cut out using coordinating dies and arranged onto an A2 panel framing a Birthday sentiment.
To create this sentiment I used "Birthday" from the Happy Birthday Script woodblock stamp, masked off the "Happy" and stamped it in black ink. I also added a layer of clear embossing powder for a shiny and raised look.
Several of the die cut images were foam mounted for a pop of dimension.
Lastly, I added a white heat embossed "Happy" from the You Are My Happy stamp set and embellished this card with a few metallic dots!" ~ Yana Smakula for Hero Arts
Thank you Yana for creating this gorgeous card! And guess what? Our friends at Hero Arts would love to offer the stamp and die set that Yana used to create this card. The winner of this hour's prize package will win the CL868 Color Layering Hibiscus stamp set and DI136 Color Layering Hibiscus Frame Cuts!
For an opportunity to win, please leave a comment below by October 8th! A winner will be randomly selected and announced on October 10th! Good luck!
Please join our friends at Hero Arts on their Facebook page and share a little "thank you" with them for another amazing prize!
Next at 6:00 pm – It's all about the holidays!

I absolutely adore all of Hero Arts’ layering stamp and die sets!!! This would be a wonderful prize to win!! Especially since Winter is on it’s way and if I won this flowers would be blooming all year long!! Fingers crossed and thanks for the fun day!
Love the hibiscus card! This flower always makes me think of Hawaii and other gorgeous locales.
Thanks for the opportunity to win!
Ooh, fabulous cards! Thanks for the inspiration.
I love Hero Arts, so thanks for the chance to win such a fantastic giveaway.
Very pretty. Sitting with the girls that taught me how to make cards 16 years ago?
Thank you Hero Arts!!!!
Love the stamp and die set. Lovely cards.
Love this card! Thank you for the inspiration!
Beautiful cards. Love the hibiscus layering set.
What a pretty collection of cards. I love seeing all the sweet inspiration.
Love all the cards, so much inspiration and techniques. Thanks
Lovely cards by all! Love Stacy’s pink flower and will have to try that. Nancy’s cards are adorable. And Yana’s card is beautiful. Love Hero Arts and would love to win this set!
Beautiful flower and I like the Nuvo drops. Very pretty Hero Arts card.
These cards are amazing
Truely awesome cards.
Lovely way to make flowers
on the first card and love
the fairies and inking on
the next cards. The stamping
on the last card is so pretty.
Carla from Utah
Wow! What neat ideas!!! Beautiful cards and I absolutely LOVE the Hero Arts stamp and die cut set! Awesome how the stamp sets layer!
Thanks for these tips on creating texture. Beautiful cards on this post. The Hero Arts layering stamps look wonderful!
Yana’s card is beautiful. I love how she achieved all the shades of purple by constant layering. She’s
a real pro!
I absolutely love the singe technique. It makes such
a beautiful edge! Definitely going to try this idea!
Beautiful cards. I loved the soft look the blending gave on the fairy cards.
Thanks for sharing the great inspiration and giveaway!
Love this gorgeous card!
Oh wow 3 beautiful cards and all different. Stacy Cohen, Nancy Damiano and Yana Smakula from Hero Arts have talent and we are happy that they don’t mind sharing their knowledge. Love these cards. Thanks you.
Love the techniques shared here. So inspiring! Thank you.
Beautiful cards ?
I LOVE Hero Arts’ layering stamps! The Hibiscus card is gorgeous (my favorite color!). Thank you HA for the chance to win this fabulous prize set.
Beautiful cards! Thanks for sharing!
Another bunch of beautiful cards!
These are all beautiful. That burnt flower is so pretty!!
These birthday cards are wonderful! Today is my mom’s 88th, but I am thinking of converting one to just an everyday card to send to her! Thank you!
Stunning cards! I am so going to try that nuvo trick from Nancy, love it!
Love the purples in the hibiscus card. Cool how you did the dots, Nancy.
So much inspiration! I adore Hero Arts and would be so happy to win. Thanks for the opportunity!
Once I saw the Hibiscus card, everything else just kinda went away! I would love to win the stamp and die set!!!
These are just lovely!
Great cards. I need to try those drops.
Beautiful cards!! I love the technique with the flowers – thanks for explaining it! Can’t wait to give it a try!
Lovely cards and a big thank you to Hero arts.
Love the hibiscus stamps and dies – lovely cards
Wow, what amazing techniques!
Thank you for the flower tutorial. The edges look real.
And I love the dots from Nuvo Crystal Drops.
Now I can go play.
Wow – love the flowers! Such gorgeous cards. I am inspired!!
Fabulous cards! I’d *almost* offer to have another birthday to get one!
These are some fabulous birthday cards! I love Stacy’s technique with the fabric and I can’t wait to try it (and hopefully not burn down my house! ). I’ve been wanting to get my hands on some Nuvo drops! That is such a pretty card..I love the colors!
I love Yana’s coloring and her layers for the hibiscus card! That’s such a lovely stamp set! Thanks for the chance to win.
Love Hero Arts stamps and dies and they’ve really outdone themselves with this hibiscus set. It’s absolutely gorgeous.
Beautiful! My favorite color is purple so you had me with the hibiscus card.
Wow-so many great tips in this post! Using the flame, and using those Nuvo Drops-so very cool!
Oh WOW!! I am in love with each and every design. Stunning cards!
Completely stunning layers
OMG! the hibiscus card is so pretty, such a simple technique. I can do this
Wonderful cards and a great prize – everything from Hero Arts is worth having!