
Thank you for joining us for our "hello" hour! Everyone loves a happy "hello" card and we thought designers Sheri Reguly, Melissa Phillips and Nicole Nowosad could easily create some beautiful cards that do just that! Nicole has even created a bonus free cut file you can use over and over today! Our special guest this hour is Richard Garay with a special giveaway too! Here we go…
"Hello, and Happy World Card Making Day! Whether it’s fashion, home decor, or paper crafting, it’s all about layering. The card that I have to share with you today, shows how some simple layering can add additional interest and texture into your creations.
(supplies: Cardstock: Bazzill Basics; Patterned Paper: Crate Paper, Simple Stories; Paper Heart, Stickers, Rub Ons: Crate Paper; Puffy Sticker: Pink Paislee; Enamel Dots: Simple Stories, Doodlebug Designs; Manual Die: My Favorite Things)
I started off with an idea, and gathered the supplies needed to embellish one of Crate Papers, already adorable, paper hearts.
First, I adhered the flag sticker towards the bottom right hand side of the heart, followed by the flagged sentiment puffy sticker.
I then adhered the flower sticker directly above, using adhesive foam to add additional dimension.
Lastly, I adhered a touch of gold glitter to the center of the main flower. Once dry, I adhered enamel dots to all three flowers. Two leaf shaped enamel accents provided the finishing touch and introduced an additional splash of color.
Finally, my layered accent was ready to adhere to my card.
And, while I had all of these wonderful goodies spread out across my desk, I couldn’t resist creating an additional two cards…both showing additional examples of simple layering. :)
(Supplies: Cardstock: Bazzill Basics; Patterned Paper: Crate Paper, Simple Stories, Pebbles Inc; Tassel, Clip, Chipboard, Stickers: Crate Paper; Cork Heart, Button: Pink Paislee; Enamel Dots: Simple Stories, My Mind’s Eye, Manual Die: My Favorite Things; Punches: Fiskars, EK Success)
Enjoy the rest of World Card Making Day with us!" ~ Sheri Reguly
…………………
"Layers are one thing I can’t seem to live without when it comes to creating my cards. Chipboard is one of my most favorite elements to utilize because of the weight and depth it provides. Cutting chipboard to fit your card may be a bit daunting at times because of the thickness of the chipboard. One tip I have learned over the years is to use my paper trimmer to score a cutting line and even cut into the chipboard a bit. Then your cutting line is there for you and all you need to do is follow it with your scissors and you’re finished, with a nice clean cut." ~ Melissa Phillips
…………………
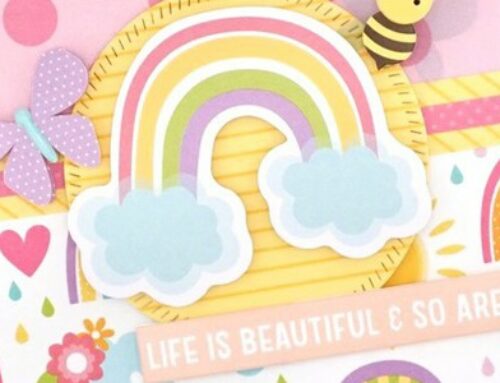
"I love sending a quick "hello" card to a friend to make her day a little brighter! I love to create these type of cards with colorful and bright patterned papers to help brighten that person’s day.
For my card, I chose to diecut the sentiment from some simple white cardstock and adhere various patterned papers from a 6×6 paper pad. I made sure to choose several papers that range in colour and pattern to back each letter of my diecut sentiment. To do this, I simply took the inside leftover letters from the diecut design and traced those letters to the patterned paper I chose for that letter. Once it was traced, I cut it out (giving a small allowance around the letter when cutting) and adhered it to the back of my diecut design. I like to use either a dot tape runner or a small amount of clear liquid adhesive for this purpose.
I layered it over a simple patterned paper that already had a floral design on it. This made the card come together even quicker… but it still needed a little something! Adding some small fussy cut flowers or pre-cut diecuts that co-ordinate to the card with some foam adhesive helps that floral design pop a little and add some quick and easy texture to the card.
It really doesn't have to be hard to made a fun card to cheer someone up, or just say hello!
I created this cut file for you to use on cards like this one, or others throughout World Card Making Day!
Enjoy a creative day friends!" ~ Nicole Nowosad
9:00 am special guest – Fun Stampers Journey
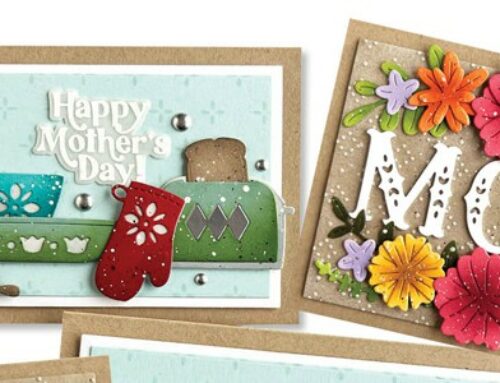
Hey guys! Happy World Card Making Day! I’m super happy you joined us on the SCT blog and I’d like to share a project created with products from my retail collection: Make Amazing Happen! Stamped flowers and a fun sentiment, all layered with details such as enamel matte dots, makes for the perfect card!
This Be Amazing card was created with:
- Be Amazing Stamp / Die set
- Amazing Accent Dots
- Make Amazing Prints
- FSJ Journey Sparkle Cuts
- FSJ Black Satin Ribbon
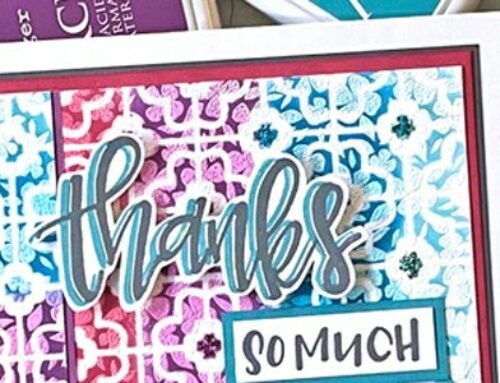
Another fun project created with the Make Amazing Happen collection is this spooky and oh so pretty Halloween treat tag! This tag could also be easily added to a card to send to someone who loves this special day! This was created by Make Amazing Design Team member: Patricia Roebuck.
Patricia shows you all the details with her video tutorial below!
To celebrate WCMD with you all, we are giving away the products used to create the Be Amazing card! Enjoy!" ~ Richard Garay
Thank you so much Richard and team! We are thrilled you joined us today. For an opportunity to win this amazing prize be sure to leave a comment below by October 8th! A winner will be randomly selected and announced on October 10th! Good luck!
SCT friends please take a moment today to stop by the Team Richard Garay Facebook page and give them a big "thank you!"
Next at 10:00 am – cards that sparkle and shine!


Beautiful cards – and thank you for the cut file download! :) Looking forward to a fun day filled with creative card inspiration! :)
Fun video, and I would love to win. I don’t have any RG products to play with yet.
Absolutely love the Halloween treat tag, but I love fall and Halloween. Thank you for sharing.
Such wonderful inspiration and a fun giveaway! Thanks for the chance!
Wow! what a nice way to start the day! Hello to all!
Beautiful cards. Thanks for the giveaway.
Such beautiful cards! I usually get sTuck for designs! Thanks for the inspiration!
Happy World Card Making Day to SCT and their lovely sponsors October is the month to be grateful for ???
Great ideas! Thank you.
Great inspiration.
So much inspiration all in one post. Love al projects and layers and elements used. Thank you. Happy world cardmaking day and thank you for the opportunity to win goodies. Yeah!!!!
These products look like so much fun to craft with! The inspiration cards are beautiful! Thanks for the wonderful giveaway!
Lovely cards. I am going to make some of those hearts to use in my creations.
Lovely cards and fab products! Would love to give them a try! Happy WCM Day to all!
Love the cards, so cute. Thanks for sharing
Thanks for the inspiration and chance to win a great prize! I look forward to all the fun posts today. :D
Love the video with Richard and his guest, great tag for Halloween. Also really like all the other cards, thanks for the inspiration. This prize is awesome and I love that dies are included. Thanks and Happy Card making day to all.
Love the Be Amazing set because it is so versatile. Great on the Halloween bags, but so pretty for a card anytime of year! Thanks for sharing all of you!!
Really love the tag – never thought to fold paper in half and die cut to get a reverse image die – a very clever idea.
Cute projects!
Lovely cards! I would love to try some of these wonderful products, I have yet to work with any RG products.
Great inspiration for easy layers. Thank you!!
I love these every hour, on the hour, inspiration days! Thank you for such cute ideas and detailed instructions. cheers, Louise
Die cuts and words are the best. Lovely to see new product lines
Lovely cards, I´m on one Hello layering card right now. :)
Wow–lots of fabulous cards to start off the day.
Cute cards and the prize pack is pretty awesome!! Thanks for the inspiration and fun!
Beautiful products and inspiration. Thanks for opportunity to win them.
Love the cards!
So many cards – so little time. Love all the designs!
Love the cards thanks for the inspiration. Always enjoy Richard Garay thanks!
LOVE! LOVE! LOVE! This adorable tag! Love all the ribbons,
staple idea, sprinkling glitter ink. Oh my!
thanks for the tip on getting a white border around
a die cut. It really makes the letters pop.
Layering does make a difference – doesn’t have to
be a lot – a little goes a long way.
thanks for sharing.
Happy WCMD
So much incredible information and inspiration. I’m in love with the free cut files. Thank so much for giving them away. You guys are always spoiling us! Thank you!
Oh my, such lovely cards!!!
These ca dis are great! I haven’t used this line before but, wow, I love it. Thanks for the chance to win
Woohoo! What an amazing tag!
Thanks so much for the video.malways good to see the steps along the way.
Happy Cardmaking Day!
Gorgeous card and products!
Thanks for the great video,wonderful ideas, and the chance to win the giveaway!
Love the color schemes on these beautiful cards. Happy Card Making Day!!
Beautiful projects! The fringed heart is awesome!
What a great way to start off WCMD! THANK YOU SO MUCH for the layering tips…I love doing clusters and such but never seem to make them come out right, especially for cards where you have a smaller space to work with! these cards are all so fabulous! Hello carsd are my favorite ones to do as they are just so versatile!
Thanks for the chance to win!
Oh my, lovely inspiration from all of these companies! Giving me lots of ideas now!
I love the sentiment layering, gives out such an impactful impression! Great tips!
What a fun project! Thanks for sharing.
Thanks Nicole for the cut files . Perfect for everyday use . Gorgeous cards Sheri . Thanks Richard Garay for sponsoring !!
I love how a few little things come together to make a beautiful card that can brighten someone’s day.
Fantastic cards! Thanks for the chance to win an equally fantastic giveaway.
happy world card making day everyone!!! I am getting together with my friends today to celebrate and make cards. Love your samples and your website.
Hello to you too. Always nice to get a “Hello, what’s up card” for no reason. Great ideas, will have to make bunch to have whenever I need to send a Hello.