Ready to start flocking? Here are the instructions to make all of the fantastic projects found in our winter 2008 issue on pages 27-30—and a bonus project as well!
10 things I love about winter by Kim Hughes
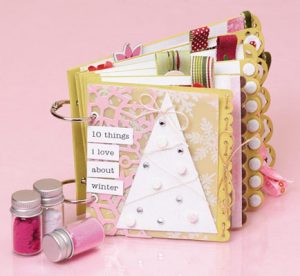
Here is the cover of my album:

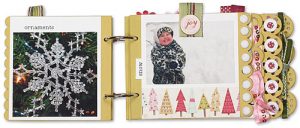
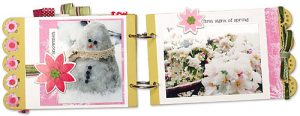
And here are some of the inside pages:


instructions:
- Paint entire album with 2 coats of green acrylic paint.
- Cut the pink lace snowflake paper and vellum snowflake paper down to size.
- Cut a tree from white flock paper; wrap twine around it and tie a bow at the top.
- Add rhinestones.
- Add white flock to the sticky side of mini Pop Dots and add to the tree.
- Adhere tree and papers to the cover.
- Print title of album onto white card stock and cut into strips and adhere on top of the pink lace card stock.
- Tie twine through the holes in the album.
- Cover each page in the mini album with white cardstock.
- Add die-cut accents and ribbon loops.
- Add glue to paper; press pink flock onto it; allow it to dry and then punch accents from that paper.
- Colour a white flock paper strip with a pink coloured pencil.
- Adhere flock scallop ribbon to the edge of the album.
- Add flocked brads to the holes in the album (metal wings may need to be cut down so that they won’t show); cover them on the other side with punched white flock paper.
- Add punched papers over holes in the mini album.
- Accent die-cut poinsettias with flower shaped flock brads.
- Thread flocked ribbon through the holes and tie in a bow.

Snow With Personality by Kim Hughes
instructions:
- Mat photos onto white card stock.
- Cut a strip of silver snowflake transparency (approx. 1.5 x 12) and add underneath the row of photos.
- Add photo to right side of the page with title running down the right side of the photo.
- Punch 7 circles from red paper and add flock to 3 circles with liquid glue; adhere to the left of the mail photo.
- Mix pink glitter into the gray flock to make a unique colour and add to the adhesive side of the foam arrow.
- Cut paper strips and hand write journaling.
- Use paper reinforcers as small accents and add flock to the sticky side of 3 circles.
- Add glitter/flock mix to a pop dot and add to the inside of the small circle.
- Add a dot found within the flock letter pack to a small circle accent.
- Press a Zot onto the top of a button and add glitter/flock mix on top

Merry Christmas by Kim Hughes
instructions:
- Cut a standard 4.25 x 5.5 card base from pink paper.
- Cut down the scalloped cardstock to approx. 4 x 4.75 and add to card base.
- Add brads to scalloped paper holes.
- Trace mitten pattern onto the back of the striped paper and cut out.
- Add a pink cuff to the mitten after cutting a scalloped edge in the bottom.
- Add white flock to a snowflake accent and attach it to the mitten with a green flocked brad.
- Use a glue pen to colour in some of the stripes in the patterned paper and then apply red flock.
- Press sentiment stamp onto a Glue pad and stamp onto the bottom of the card.
- Immediately press red flock onto the sentiment.
- Allow to dry before tapping off excess flock

Seasons Greetings by Kimber McGray
instructions:
- Cut snowflake pattern paper 8.5×5.5 and fold in half to create basic card background.
- Cut white cardstock 5.5×3; cut a curve in the 5.5 long side to create the “snowy hill” effect.
- Using the flocking kit from We R Memory Keepers, transfer the sentiment onto the bottom corner of the white cardstock.
- Cover the sentiment with pink flock; adhere white cardstock with sentiment to bottom of card front.
- Create the flocked snowflakes on extra white cardstock using the flocking image kit and pink flock; cut out and adhere to card front.
- Stamp 3 tree images on extra white cardstock with black ink.
- Using blender pens and olive ink; colour in the trees.
- Cut out the stamped tree images and trim to different heights; adhere to card front

Innocent by Kim Hughes
instructions:
- 1.Cut the cream cardstock slightly smaller than 12×12 and mat onto blue paper.
- 2.Line up photos at an angle for more visual appeal.
- 3.Cut paper strips and hand journal on them.
- 4.Add white flock on top of the alphabet stickers with liquid glue.
- 5.Punch 1 green snowflake from green decorative flock paper; add a green flocked brad to the center of the snowflake and add as an “o” within the title “snow.”
- 6.Hand write “with personality” onto white cardstock; cut it into a strip and add to the page with a pink brad.
- 7.Press lace snowflake paper onto an adhesive sheet and press white flock onto the entire surface.
- 8.Cut down lace paper to approx. 8×3 and use excess paper to cut an accent snowflake to use next to the title.
- 9.Adhere lace snowflake paper to page with liquid adhesive.
- 10.Apply liquid glue to the tops of pink brads and dip into pink flock (allow to dry).
- 11.Punch snowflakes from patterned pink flock paper and add to the lace snowflake paper with pink brads.
- 12.Cut a thin strip of multi-coloured patterned paper and add under photos.
- 13.Wrap pom pom ribbon around the layout and adhere to the back with tape.

Yummy Stuff by Kim Hughes
instructions:
- Tie red flocked ribbon around the neck of the jar.
- Tie twine around the ribbon knot.
- Tie jingle bells onto the ends of the twine.
- Stamp “yummy stuff” onto white flock paper and cut a tag around the words.
- Cut a scalloped edge in the bottom of the tag and punch a hole in the tag.
- Attach tag to ribbon with a safety pin.
- Trace the lid onto the back of patterned white flock paper and cut a circle to cover the top of the lid.
- Cut 2 holly leaves from patterned white flock paper and lightly colour over each leaf with a green coloured pencil.
- Create pink brads by colouring white flock brads with a Copic marker.
- Apply ink to all paper edges and adhere all pieces to the jar lid.

