
Hello there! It's Mendi Yoshikawa here today from Sunny Studio Stamps! I am the owner and designer behind the scenes of this new playful company and I am so excited to be joining you today with three fun ways to incorporate masking into your cardmaking. I don't know about you, but I love creating cards that are easy to send through the mail and masking is a great way to help reduce bulk.
For my first card I started by stamping my tree branch and three birdhouses onto my card panel using VersaFine ink on Bristol paper. I wanted to use the coordinating "string" from the stamp set to hang the birdhouses from the branch, but I stamped them closer to the branch than the stamp allowed so I created a small mask by stamping and cutting out my image from a post-it note. I then laid it over my image so that I could stamp the longer string without ruining my original image.
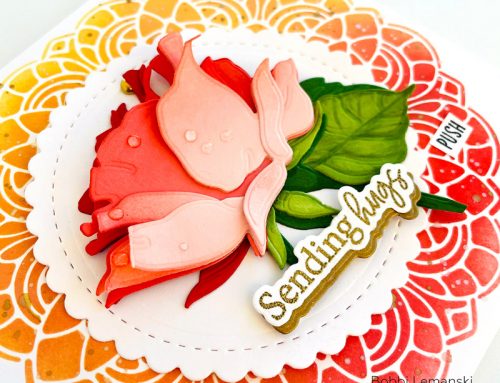
I thought it would be fun to experiment with watercoloring my background for this card so I grabbed my Molotow Liquid masking pen to apply a generous layer of masking fluid over all my images to protect them. This is a great way to create a card if you don't have the matching dies for the images. Just be sure to let the fluid completely dry, giving it about thirty minutes before proceeding to the next step.
Next I mixed a bit of blue gansai watercolors on my clear acrylic block, watering it down before applying it with a large paint brush to my card panel. To keep my panel from curling I applied some washi tape around the edges and adhered it to a cutting board I borrowed from my kitchen.
After the first layer had dried I applied a second layer of the color to the bottom part of the panel to achieve a deeper background color and a bit on an ombre effect. I then set it aside to dry once more for about an hour, making sure the panel was completely dry before moving onto the next step.
Once everything was completely dry, I used a combination of my finger and an adhesive eraser to gently rub off the masking fluid, being careful to not rub off the paper in the process.
For my last step I colored my images using the Kuratake Clean Color Real Brush markers and a water brush. I started by laying down a line of color where I thought my shadows would be and then using the waterbrush to pull the color to the other lighter parts of the image where I imagined my light source was coming from. If I ever colored outside of the lines I simply added a little extra water and blotted up the extra color with the corner of a paper towel.
When I was done I realized I should have added some little birds to my scene so I ended up stamping them on my background and stamping an extra set to color, fussy cut and add over the top. This is a great trick for adding dainty images like bird feet without actually having to cut them out.
Supply List: Sunny Studio A Bird's Life & Sunny Borders Stamps Strathmoore Bristol Paper Gansai Tambi Watercolors Zig Clean Color Real Brush Markers Molotow Liquid Masking Pen Versafine Ink
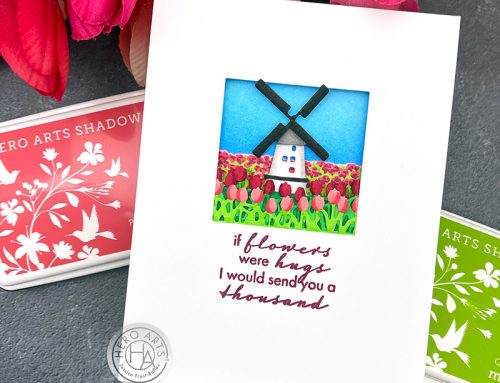
For my second card I masked my center focal point by die-cutting a circle from some typing paper and using some temporary adhesive to hold it in place on my flat white card panel. I then sponged on some ink using a jumbo foam dauber and my favorite distress inks. I think it's always so magical to lift off the mask to reveal what's left behind.
When I was done inking up my masked circle, I die-cut the bottom edge using Sunny Studio's Fishtail Banner dies and ran the panel through my die-cutting machine once more using Carta Bella's Snow Fun Embossing Folder. I was so pleased to discover the snowflakes also work as bubbles!
Supply List: Sunny Studio Oceans of Joy & Island Getaway Stamps Sunny Studio Fishtail Banner & Fishtail Banner II dies Neenah Cardstock Ranger Distress Ink, Versamark Ink Ranger Fine White Embossing Powder Carta Bella Snow Fun Embossing Folder
As one last finishing touch, I added a little water to the raised "bubbles" in my masked circle with my paint brush and blotted them with a paper towel to remove a bit of the distress ink and accentuate them even more.
For my last card I used a masking technique to create my ocean waves using the Sunny Studio Wavy Border dies. I cut the borders from post-it tape to form my masks and then applied the mask to my card panel, sponging the edge with Tumbled Glass distress ink. I then used one of the other borders from the set to repeat the process. The effect is a beautiful multi-layered image.
Supply List: Neenah Cardstock Ranger Distress Ink, MFT Hybrid Ink & Versafine Ink Tsukineko Jumbo Dauber Copic Markers Sunny Studio Stitched Scallop Border & Wavy Border dies Sunny Studio Magical Mermaids & Oceans of Joy Stamps Post-it Tape
I hope I've inspired you to try some masking in your own card making. It's such a fun technique and is a great way to add extra impact to your projects. Thank you so much to Scrapbook & Cards Today for having me!
Many of the stamps I've used here today are part of Sunny Studio's Summer release debuting tomorrow. I hope you will join us at Sunny Studio blog through Saturday night for a chance to win one of five $25 gift cards we are giving away as part of our new release festivities. :)
Facebook: https://www.facebook.com/SunnyStudioStamps/
Instagram: https://www.instagram.com/sunnystudiostamps/
Pinterest: https://www.pinterest.com/SunnyStudios/
Flickr: https://www.flickr.com/groups/2870029@N21/pool/


Mendi, your cards are always spot on and so inspiring! LOVE these so much!
Beautiful cards Mendi!
Mendi, they are super cute!!!
Great cards! The mermaid card is absolutely adorable! TFS!
super cute!
Wonderful cards.
Love the cards. They are so whimsical. :)
Gorgeous cards, Mendi!
Mendi rocks, she’s has been a awesome scrapbooker and cardmaker for years and now she’s a fabulous stamp designer!
Such cute cards Mendi! TFS Girl :D
Wow these are really gorgeous cards. Thankyou for sharing your talent but I don’t suppose you do a video tutorial do you please? It’s just I have read the instructions on how you did them, and for the second card I really cannot work out how you did the fish tail with out getting any embossed parts on it. Might seem easy to some but I’ve only been papercrafting a short while and so far only made 4 cards. ??. Thanks in advance to who ever is kind enough to reply lol.
Hi Andrea! Thank you for your sweet feedback Welcome to cardmaking! Yay! To use the fishtail banner first I used our original Fishtail Banner set to cut my panel and ran it through my die-cutting machine with the embossing folder next. After that I cut a second scalloped banner using our Fishtail Banner II dies with no embossing (just cutting enough to hide under the original embossed and adhered it to the underside with a little tape runner). :)
So sweet…. all your cards and I was just going through your blog post on the 13th…. (a little behind) Stunning cards!
Cute cards! Love the colors & designs. I have a hate/hate relationship with masking fluid, since it always seems to tear my paper when I remove it, no matter how long I let everything dry. :( You did a really great job with yours, though. I may have to try the Molotow pen. Tfs! :) ~ Andrea
Love the colours what a great ideal
thanks SCT
Very cute and so happy that you shared your masking techniques.