
Hello Scrapbook and Cards Today friends! My name is Suzy Plantamura and I have three cards to share with you today using one of my favorite stamping techniques I call "random stamping". I try to get as much use as possible out of my stamps, so I often turn to this technique as it uses all the stamps in one set and can give you many different looks with one set. My favorite type of stamps to use for this technique are flower stamps as they create beautiful card backgrounds.
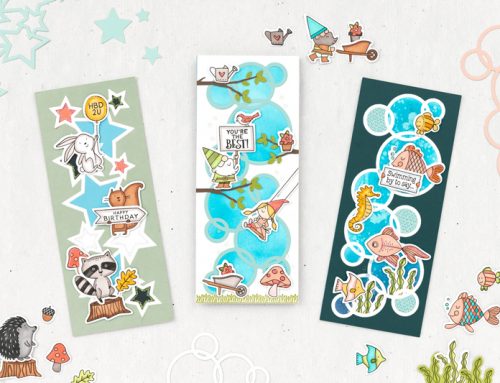
Today I am using a floral stamp set by Concord & 9th called Wildflowers. I used a different stamping method for the flower outlines on each of my three cards: white embossing, black outlines, and tan outlines for no-line stamping. So let's get started! Here is an image of my three cards together:
My first card is made with Ranger Watercolor Paper that is die-cut into a stitched rectangle full card size (4.5"x5.25") using Lawn Fawn Large Stitched Rectangle Dies. I used a Misti Stamping Tool to make this technique easier, but it can be done with just stamping blocks as well. I arranged the flowers and leaves on the card like a puzzle, stamping them with Versamark Ink and embossed them with Ranger white embossing powder. Here is how it looked once it was stamped (hard to see as the embossing powder is white on white):
My second card is made with Arches Hot Pressed Watercolor Paper that is die-cut into a stitched rectangle full card size as well. I stamped each of the images aligning them next to each other like a puzzle as well. This time I used less of the images, focusing on just one of the flower types in the set. I stamped them all with a light tan ink called MFT Natural Ink. I use this ink so I can color the images with no outlines.
My third card is made with Neenah White Cardstock (which works well with Copic markers) that is also die-cut into a stitched rectangle full card size. This time I stamped the images with black ink so they are outlined using Simon Says Stamp Intense Black Ink (as it works with both watercolors and Copic markers).
Once all three card fronts were stamped, I got to start the fun part – coloring them. My favorite coloring method is watercolor, so I used that on the first two card fronts.
I painted all of the embossed images in with my Daniel Smith watercolors using yellows, oranges, and reds. I then added shading and details with my Kaiser Craft Glitter Pens. I painted the background with a wet on wet technique using very light shades of the same colors in the flowers and leaves.
I painted the flowers on this card with my Daniel Smith watercolors as well being careful to paint just over the ink outlines so they blend into the color and don't show. I used blues and pinks, blending them in the center of the flowers to form purple. I painted the leaves green and used that same shade with more water for the background.
On my last card, I colored the flowers with Copic Markers. This time I used a whole bunch of colors instead of one color palette including yellows, pinks, blues, greens, and teals. I colored the background with lighter shades of each of these colors blending them to form a soft pastel look.
Now that all of my card fronts were colored, I attached them to card bases and added salutations and sequins.
I stamped a sentiment for this card on watercolor paper using a Simon Says Stamp called Uplifting Thoughts die-cut with a stitched rectangle tag from MFT Tag Builder Blueprints 4. I stamped it with Versamark Ink and embossed it with Ranger white embossing powder. I painted the tag with orange watercolors. I cut the end off the tag and attached it as a banner on the top right side of the card. I finished the card with some Pretty Pink Posh Raspberry Sequins and Marigold Sequins. Here is a close up image of the card:
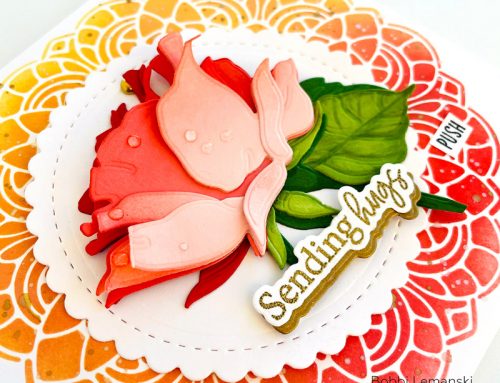
To finish this card, I die-cut a small stitched rectangle using Lawn Fawn Small Rectangle Dies for the salutation. I used the same Simon Says Stamp Uplifting Thoughts stamp set. This time I stamped it with Versamark Ink and embossed it with Wow Royal Crush Embossing Powder. I attached this to the bottom right side of the card. I added some Pretty Pink Posh sequins from the Winter Sparkle Pack in the center of each flower. Here is a close up image of this card:
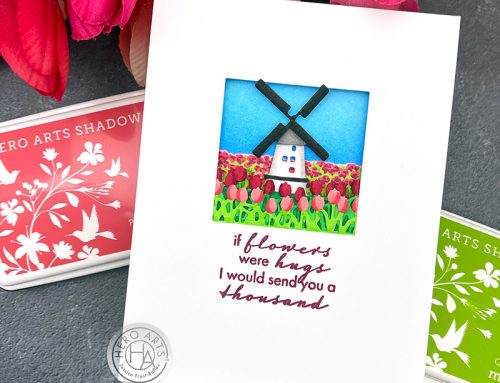
To finish my last card with black line stamping, I die-cut two banners using MFT Tag Builder Blueprints 4 (for the smaller green border tag) and MFT Blueprints 20 for the larger banner. I stamped the sentiment using a Simon Says Stamp set called All My Love. I used Lawn Fawn Sunflower Ink to stamp it and then added shadows using an orange glitter pen from my Kaiser Craft Glitter Gel Pens. Instead of finishing this card with sequins as I usually do, I used some Tonic Nuvo Morning Dew Crystal Drops. Here is a close up of this card:
I hope you enjoyed my "random stamping" technique I used on these three cards today. It really let's you stretch your stamps, especially when you try it with different types and coloring methods. Thank you so much Scrapbook & Cards Today for letting me be your guest blogger!
~ Suzy Plantamura


Loving them! TFS.
I love the arrangement and the different coloring methods.
Beautiful. Just beautiful!
These cards are beautiful :)
Thank you for the wonderful detailed description of the 3 beautiful cards. I enJOYed reading and studying them.
All I can say is “Wow”! These cards took my breath away!
Amazing colors and designs…great products used so well. I am totally impressed with these cards!
Super “how-to” and gorgeous results. Beautiful!
Awesome technique, and I love the colors you used in each card! Definitely pinning this for future reference & inspiration. :) ~ Andrea
These are lovely and the colors are so cheerful.
You have really great ideas for making cards. Doesn’t it feel good to be creative?