
It's our 3T's hour! This hour we are excited to share some fun tips, tricks and techniques with you from three designers! It's all about the three's so sit back and enjoy!
Tutorial by Kimberly Crawford:
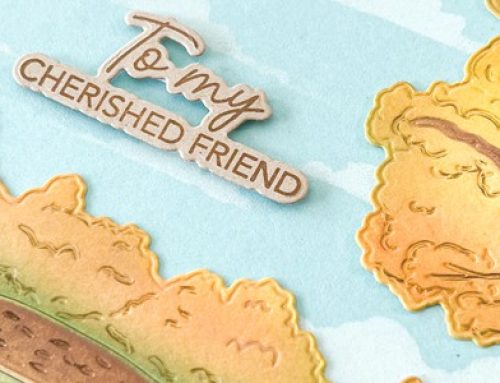
Hello everyone and Happy World Card Making Day! Kimberly Crawford here today to share a great way to create a faux watercolor background. By using dye-based inks, water, and an acrylic block, you can create a beautiful background for your cards, or even a layout if you use a larger block. Let's get started!
1. Gather your dye-based inks, I like to use three colors, a misting bottle with water, an acrylic block, and watercolor paper. Oh, and keep a couple of paper towels handy as well.
2. Starting with your darkest ink, press the pad directly onto your acrylic block. Apply as much or as little ink as you desire.
3. Mist water over the ink. The more water you use, the more the color will spread. The color will also have less intensity with more water.
4. Press the acrylic block onto your watercolor paper. Slide it around, pick it up and move it, however you would like. After a little experimenting, you will quickly find out how the ink and water will move on the paper and be able to create the look you want.
5. I slid the block around on my watercolor paper to create a large splotch of color. Because of all the water on my block, I used my paper towel to dab off any excess ink. For more intense spots of color, you can leave those behind to dry. Feel free to speed the process up with your heat tool.
6. To add depth to my background, this time I did not mist as much water onto my inked acrylic block. You can see how much stronger the color appears. Continue to add layers of ink and color to your background, until you are loving the results!
I hope you find the time to add this fun technique to your day of card making! Have fun creating some beautiful backgrounds!" ~ Kimberly Crawford
Creating Holiday Tags by Stephanie Klauck:
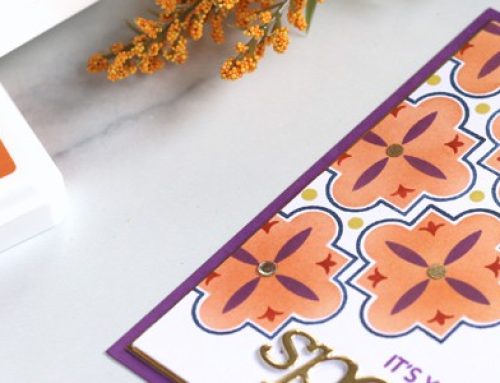
Hello everyone! It's Stephanie here and I am thrilled to be on the SCT blog celebrating World Card Making Day with all of you! For my post today, I'm sharing some festive holiday tags to give you some ideas to get a head start on the busy holiday creative season. And I'm excited to be sharing some new (not even released!) products from My Favorite Things that will make creating your holiday tags fun and easy! The stamps and dies I'm using will officially be available on Tuesday October 6th at 10pm! ;)
Creating holiday tags can be as easy or as detailed as you'd like. I created a bunch of tags using only 3 colours of cardstock and 3 sheets of patterned paper. The fun thing about these tag dies is that you can layer the pieces to create dimensional tags or leave them flat for more simple tag designs.
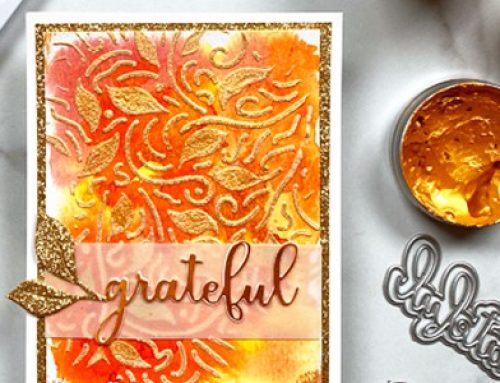
I kept the basic design of the tags the same but I changed up the colours I used together and well as how I layered the papers and diecut snowflakes. I even went a little more detailed with one of them and created a round shaker tag. It is such a fun and unexpected way to make a tag really stand out on your holiday gifts.
I like to tie my tags onto gifts, so I added ribbon the tops of all of them. If you'd prefer to adhere your tags directly to your presents you can skip the ribbon and just put double sided adhesive on the back. Or you can add the ribbon for a decorative element and still adhere them with adhesive.
Handmade holiday tags are a great way to dress up your packages and make a great impression with the recipient. Handmade is so special and really shows your friends and family how much you care. And we have all of these supplies anyway… we might as well put them to good use! Plus, they are a lot of fun to make!
I hope you are all having an amazing WCMD! Thanks for stopping by!
Double Tri-Fold shutter card by Jen Walker (our very own Director of Customer Happiness!):
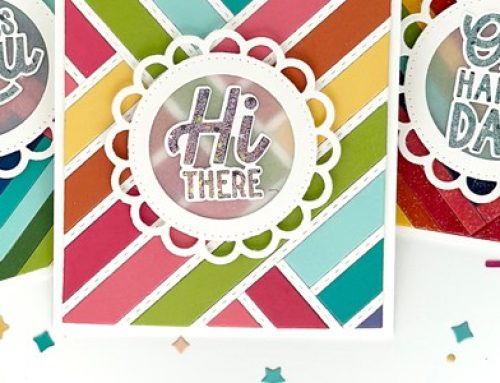
Happy World Card Making Day everyone! I hope you're having a fabulous day. Haven’t the projects all been amazing so far?! For my card technique, I am going to show you how to create a double tri-fold shutter card. For this card, I created two tri-fold shutter cards and folded them in reverse to each other so that I could attach them in the center. Here is how to create the tri-fold shutter cards:
Step 1 – Cut a 12×12 piece of cardstock into two 6×12 pieces
Step 2 – Across the length of each piece, score the cardstock at 2”, 4”, 8” and 10”
Step 3 – On each piece of cardstock, cut from the 2” score line to the 10” score line at both 1.5” and 4.5”
Step 4 – Fold the cardstock at the 2” mark. On the top and bottom sections, the second score mark gets folded away from you, the third score marks get folded towards you and the fourth score mark gets folded away from you. For the middle section, fold the score marks in the opposite direction as the top and bottom pieces you just folded.
Step 5 – Fold the second piece of cardstock in the same way. Flip that piece of cardstock over and line up beside the other cardstock which will now appear to be folded in the opposite directions.
Step 6 – Adhere a 4×6 piece of scrap cardstock to the backside of the cardstock where the two pieces will be joined. Place your nice 4×6 decorative card on the front side of the card. Your two pieces of cardstock should now be connected to each other.
Step 7 – Place the card out flat so you can plan how you would like to decorate your card. Embellish each of the various panels with patterned paper, chipboard, stickers, etc.
Step 8 – After you are done embellishing all the different sections, fold the panels one more time to re-establish the folds.
And your completed card…enjoy!
Thank you ladies for these amazing tutorials!
3:00 PM Giveaways!
Prize 1 from BoBunny:
"Happy World Card Making Day SCT friends! The Provence collection by BoBunny captures an elegant, simple feel. This prize pack contains all of the papers, combo sticker, Chipboard, Layered Chipboard, Noteworthy, Buttons and Brads!"
Prize 2 from May Arts:
A $30 gift certificate from May Arts and The Ribbon Lady! Imagine choosing from all those ribbons! Oh, the choices!
Prize 3 from Therm O Web:
This great prize includes Therm O Web’s Brand New iCraft® Deco Foil™ Products! They’ve just released Black and Iridescent Foils which are perfect for Halloween projects as well as their new PeelnStick™ Toner Sheets that allows you to create your own foiled designs!
Prize 4 from Your Next Stamp:
This prize package includes the ever popular GumDrops, along with the new Holiday Snow Globe stamps and matching Holiday Snow Globe dies from our friends at Your Next Stamp!
Another INCREDIBLE prize package from our wonderful sponsors! They sure know how to celebrate don't they? For an opportunity to win our 3:00 PM prize package just leave a comment below by October 9! Super easy! All winners from today's event will be chosen and posted next Saturday, October 10th! Good luck!
We would then ask you to take just a moment to join all of this hour's sponsors on their Facebook pages to give them a huge THANK YOU! They always tell us how much it means to see all those great comments from you! Here are links to their pages…
Join us at 5:00 PM for a great campaign we want to share with you. This makes our hearts happy and we all know what a happy heart does for us! See you at 5!
~ Catherine


Holy Crackers!!! Amazing tips and tricks!!! LOVE what the designers have created and I am dying to attempt to make the shutter card!!!! Great prizes too! TFS!
Awesome tips and tricks. Thank you.
Love the great tutorials! Will definitely be trying these techniques! Awesome giveaway!
Love these triple T’s, would love to win some great giveaways!
Those tags are so, so adorable!
Great tips & tricks thanks for another great giveaway
This is an amazing tutorial! I can hardly wait to get started. I have fallen in love with shaker anything, so the gift tag is a must. I really like the faux water effect with the stamping and will use this on a lot of things. The tri-fold card is great and am wondering if I can take it a little further and make a chipboard book with it! So many ideas, my brain is boiling over. Thanks for everything.
Loving the 3T’s!! Thank you for the challenge of the Tri-fold card!! Thank you to BoBunny, May Arts, Therm O Web, and Your Next Stamp for your generous giveaways!
Nice techniques, love the double trifolded card! And WOW those are great giveaways!
Oh my goodness, such awesome projects! I think I am going to try the watercolour technique today, as I have been so in love with all the cards that have been made using watercolour backgrounds. That technique, along with the gold and metallic foiling, seems to be a huge trend right now, and I absolutely love the end result! Thanks to all the designers for taking the time to share their projects and tutorials! Thanks to the sponsors for their awesome giveaways today also!
Wowzers to the trifold card! Amazing!
And those cute little Christmas gift tags! So sweet.
Oh my GOODNESS …. Thank you for the awesome tutorials. I am going to have to try the panel card …. that looks incredible. Will post a picture when done!!
Oh my. I loved the technique with the dye inks. The christmas tags are so bright and fun. The double tri-fold card is just amazing. So big and beautiful. Thanks for sharing. More amazing prizes as well. Thanks to all the lovely sponsors. Hugz
Amazing talent in the card making world. Thanks for the inspiration! Thanks for the chance to win awesome prizes, SCT and sponsors!!
Talk about inspiration! Love these tips and techniques! These are heading straight to my ‘must try’ list! As for your sponsors: THANK YOU! Such a generous community!
~carol
Awesome tutorials. I’ve never seen a flutter card made before. Thanks for a chance to win great prizes.
Beautiful Card thanks for the tutorial! Thanks for a chance to win!
Love that shutter card
Such amazing and gorgeous inspiration!
Thanks for the card tutorial! Must give it a try.
Those prizes are amazing – keep crossing my fingers.
Fantastic tutorials. Great prizes. What a great day!
Thank you for posting those tips and tricks and techniques. Definitely my favorite thing to read on a blog!
Thanks for the chance to win
I love World Cardmaking Day and it has been great spending it with Scrapbook & Cards Today and all their amazing sponsors and designers!!! The 3 T’s are outstanding! I love the Double Tri-Fold Shutter Card! What awesome inspiration from Kimberley, Stephanie and Jen!!! Thank you Scrapbook & Cards Today for making this World Cardmaking Day a fantastic day!!! Excuse me now while I go into my craft room and do what you inspired me to do!!! CREAT!!!
Fun tutorials and fabulous prizes! Good googily moogily! Awesome!
Love Kimberly’s watercolor technique – what a beautiful effect.
Great tips and techniques, can’t wait to try them. Fabulous cards, so inspiring. Love the prizes too.
Great tips and techniques! Thanks for the chance to win!
Nice techniques, gift tags are so useful, especially up scaled with shaker insert.
Would gladly experiment and create with any of this hours prizes
Great cards and utterly adorable tags!
That is a really cute stamp set. And I love dies that match the stamps.
Thanks for the tutorial, I love getting messy
Loving the 3 T’s! Thank you!! Happy WCMD everyone. I am in card heaven!!
Great tutorials – the 3T’s is one of my favourite parts of your magazine! Thank you.
Great prizes
Great tutorials. I love the faux watercolor card.
The tri fold is my favorite card to do. Love the outcome
Great prizes and awesome tips! Love the holiday gift tag blog post.
Fun techniques and great prizes. Happy World Card Making Day!
I cant believe all the ideas and beautiful cards you are showing us. The prizes are phi-nominal and ever so generous. BoBunny,May Arts, Therm O Web and Your Next Stamp are giving such awesome craft supplies. Would absolutely love this one. This is so exciting, thanks so much you guys are amazing.
Wow! I have got to try some of these things. Love the watercolor tip. Kimberly sure makes it looks easy. Another great prize pack. So many ideas. Now to just fine the time!
Happy cardmaking day to all of you! Beautiful crafts girls! Thanks for the giveaways :)
Thanks for the 3Ts! So many wonderful prizes. A big thank you to all of today’s sponsors.
Amazing tutorials. I must try that!!!
Thanks so much for the tips.
Love that multi-folded card!!
great tips and prizes; love the leaf card with that fun background! the tags are cute and the cutting/folding card is amazing!
Fun tutorial. I want to run down to my inky supply and try this NOW!!!
Love those tips…Can’t get enough of them. Again what WONDERFUL prizes.
Thanks for the inspiration! Wonderful projects & incredible prize package! Thanks for the chance to win!
That is a big card!!! Love the beautiful tags, too :)