
Good morning! We are thrilled that you are joining us for week two of our Partner Celebration. Today we're happy to be celebrating our wonderful friends at Pinkfresh Studio! Let's get started with a few inspiring projects by their design team member May Sukyong Park.
Pinkfresh Studio is pleased to offer the sets used to create these cards, an $82 value, to one lucky winner!
To see more Pinkfresh Studio, be sure to check them out at the links below:
Would you love an opportunity to win these amazing stamps and dies? Pinkfresh Studio would love to share this prize package with one lucky reader! Be sure to leave a comment below by September 5th! All Partner Celebration winners will be randomly selected and revealed on September 8th! Good luck!
We know you are also our best cheerleaders and would love for you to take a moment to let Pinkfresh Studio know how much you appreciate this amazing celebration prize! We hope you'll take a moment to visit them on their Facebook page with a big "SCT thank you!" It' goes a long way friends and we appreciate the time you take to let our partner's know they are appreciated.
……………………………….
And that's not all for today! It is Magazine Monday with Susan and this week we are Crazy for Cardstock!
"Happy Magazine Monday, friends!
Cardstock is one of the most basic things any paper crafter has in her stash, and I feel like sometimes it’s overlooked as merely a card base or a building block for a layout. If you’re anything like me, you have SO MUCH cardstock.
I recently spent some time in my craft room working on taming a big pile of cardstock. I tend to work on a project, and the scraps and unused pieces end up in a pile. I figured it was high time to take care of it!
The first thing I did was pull out pieces that would be big enough to make an A2 (4.25” x 5.5”) card base. I cut, scored, and folded those so that I have a stash of card bases to easily grab when it’s time to create! Takes a little time, but saves time for later, right?
Next, I found pieces that could be made into 4.25” x 5.5” panels. These are a great resource for building a card front. And again – a little work to begin with, but I’m already reaping the benefits of this little pile of loveliness!
In the end, I was left with little bits that still have the potential for use, so I sorted them by colour, and stashed them away. I pitched some pieces that were REALLY small, but when it comes down to it, it’s hard to part with most of the scraps. Sometimes you’ll find JUST the right colour, and those scraps can create magic.
So what to do with all of that glorious cardstock? I recently made four cards that just might inspire you.
yay
BY SUSAN R. OPEL
supplies CARDSTOCK: Bazzill Basics, My Favorite Things; STAMPS: CZ Design + Simon Says Stamp.; INK: Tsukineko; EMBOSSING POWDER: American Crafts; DIES: My Favorite Things; ADHESIVE: Scrapbook Adhesives by 3L
This card was inspired by one I saw by the checkout in my local grocery store. I always love looking at cards in the store for inspiration! I actually came home and created this card within the hour! The inspiration card had a rounded rectangle with three bold colours with small white lines in between. Due to the celebratory nature of the card, I thought that lots of silver accents were appropriate! And bold, colourful cardstock steals the show!
muchas gracias
BY SUSAN R. OPEL
supplies CARDSTOCK: My Favorite Things; STAMPS: Avery Elle.; INK: Tsukineko; EMBOSSING POWDER: American Crafts; DIES: My Favorite Things; ADHESIVE: Scrapbook Adhesives by 3L
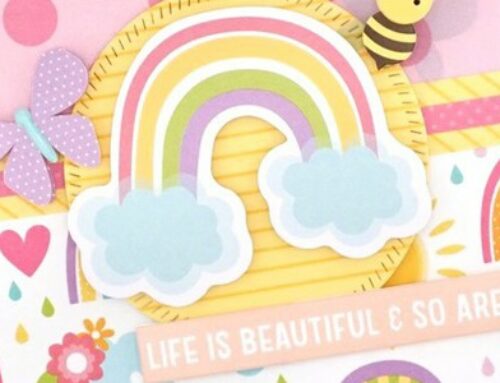
Ooooh, this one was fun! I had created the circle (it’s actually two rainbow dies with the sentiment hiding the seam) some time ago, and didn’t use them on a project. The heat embossed sentiment was also set aside for later use. I had the brilliant idea of this design using little unused bits in a bowl I keep on my table, and this came together in about five minutes! Those cardstock panels I mentioned above were great! I placed the rainbows on several colours until I landed on the aqua. Perfect!
miss thang
BY SUSAN R. OPEL
supplies CARDSTOCK: Bazzill Basics, My Favorite Things; STAMPS: CZ Design + Simon Says Stamp.; INK: Tsukineko; EMBOSSING POWDER: Stampin’ Up!; DIES: Simon Says Stamp; ADHESIVE: Scrapbook Adhesives by 3L
This card was another simple one. I gathered a bunch of cardstock scraps and just started playing with colour combinations. I cut each strip to 1/2 an inch, and then adhered them snugly side by side on thin cardstock. Next, I grabbed the heart die, and voila – a custom striped heart! A gray cardstock panel looked perfect with these colours, and I die cut a heart from the middle of it so that the striped heart could be inlaid for a flat design. Heat embossing the fun sentiment in white really allowed the colours to POP!
like, wow
BY SUSAN R. OPEL
supplies CARDSTOCK: Bazzill Basics, My Favorite Things; STAMPS: CZ Design + Simon Says Stamp.; INK, DIES: My Favorite Things; SEQUINS: Simon Says Stamp; ADHESIVE: Scrapbook Adhesives by 3L
Now this card. This one is SO SO me! Bold and colourful to the max. I seriously wish I could have a blouse with this design. I did the same cardstock strip thing as with the heart card above, but this time I die cut a hexagon and cut it in half. I played around with placement until I found this magical look! Let me tell you, I was nothing short of GIDDY when I got this one done! And these brand new sentiment stamps from CZ Design and Simon Says Stamp just absolutely KILL ME!
What will you do with your cardstock scraps? I hope this has inspired you to dig and unleash the power of this forgotten paper crafting basic!
Here’s to colour and cardstock!"
Susan R. Opel, Editor-in-Chief


Pinkfresh Studio is definitely a favorite, would love to win this awesome package! Thank you!
Love that circle wreath design and those colorful cards.
Wonderful cards and stamps and thanks for all the ideas using cardstock scraps.
Gorgeous card….and beautiful stamps, thanks for the chance to win!
The Pinkfresh Studio cards are so lovely. Would love to win this package to try & recreate these cards. I also love the tips for using scraps. I’m definitely stealing those ideas!
Love these cards and especially the last one that I never would have thought to arrange like that!
Awesome cards!!! I love the PinkFresh Stamps and dies. Thanks for a chance to win.
Another day of great inspiration and giveaways! Thanks for sharing!
Wonderful inspiring ideas. Thanks SCT!
Pinkfresh has such fun and delightful stamps and dies! Thank you for another great opportunity! And those cards!! Love the bright bold colors!
What cute cards!
Love Pinkfresh and those stamps/dies are wonderful! Thanks for the chance to win! Bravo to Susan for those bold and colorful cards too, your favorite is my favorite.
So many great ideas–love the stamp sets from Pinkfresh and the cards made from scraps of card stock.
These cards are so fun and whimsical! Thanks for the chance to win!
I save my card stock scraps. Never know when they can be used. I love the different card ideas. Very creative. I think my daughter would go bonkers over the unicorn stamp.
❤️ ❤️ ❤️ Inkfresh’s Unicorn ? set! Add some color, lots of sparkle and shimmer and you have a magical card to share! Winning this giveaway would make me the happiest girl in the whole USA,
Love these cool “scraps” cards! I also went through my cardstock and did the same thing you did! LOL GMTA! TFS!
Such lovely cards. Love the stamps and dies. I don’t have any products from this company but would love to. Great tips for using scraps. Thank you for a chance to win!
I love the Pinkfresh Studio stamps. the card samples are so cute! I would love to make them. Thanks for the chance to win!!!
LOVE your amazing use of scraps in these colorfully wonderful cards!!! And those giveaways aren’t bad either!
Good paper saving ideas! Nice stamps useful for cards and scrapping!
the card inspiration is amazing!
The stamp sets are amazing! Thanks for the inspiration and the chance to win!
Oh wow-LOVE the use of colored cardstock, Susan–especially that incredible last card! Yes, you inspired me!
Awesome giveaway today, thank you! The cards May created are gorgeous; she’s very talented! And love Susan’s cards, too; love all the happy colors!
Wow! Amazing cards!!!
Thank you so much for all the ideas using cardstock scraps!!! <3
Very cute card ideas!!
The cards are so pretty! I hate to admit I have never used any Pink Fresh products but would love to try them! Everything is so wonderful!
I love the bright rainbow colours used for these cards, Susan. I also enjoyed the cards made with Pinkfresh products!
I love Pinkfresh Studios.They make the coolest creations for stamping.
Love the cards!
I’ve always wanted something from PinkFresh. I’ve loved them from afar. Maybe this will be my opportunity?
Thank you for the great card ideas! Awesome inspiration!
I love these sets. They are fantastically creative! From what I can tell, you have a horse and a unicorn. Love them! The cards Susan made are just beautiful with those bright colors.
I love Pink Fresh paper …I had no idea that made stamps….thanks for showing.
Love Susan’s cards and that she used her scraps
WOW! They are amazing and gorgeous cards.
I’d love to win the prize set from Pinkfresh Studio.
Thank you so much!!!
Love these cards. Such great ideas! Thanks.
Oh, so many gorgeous ideas! Thank you for the inspiration, and thank you for the amazing giveaway. I absolutely love the “Unicorn Dreams” set– I’ve been smitten ever since I first saw it!
Such pretty cards.
Both sets of projects are wonderful. I always love May’s designs, and really like the pink window card. And I love the graphic look and bright colours of Susan’s cards!
These cards are so beautiful! I love all these stamps and dies from Pinkfresh Studio and would be thrilled to add them to my craft room. What a generous giveaway. Thank you
Beautiful cards!! Thanks for the inspiration and the amazing giveaways.
LOve all the cards! Great inspiration! Thanks Pinkfresh Studio for the opportunity to win!
Such a great giveaway. Thanks for sharing!
I really appreciate the cardstock tip and the lovely cards.
Wonderful ideas for the cardstock scraps – both the cutting to size and the cards! And, Pinkfresh is one of my very favorite companies, so good luck to me!
Fun cards, Susan! Great ways to use those tidbits of cardstock!!
WOW! How great are those cards. Would love win!!
I am smitten with Pinkfresh designs!!!
Thanks for inspiring me with these great cards! It would be amazing to win this Pinkfresh Studio prize package. Thanks SCT!,
All the cards are awesome! PinkFresh Studio’s stamps sets are whimsical, nostalgic and super cute!
What an awesome prize package! Pink Fresh is one of my favorites!
Thanks SCT and Pinkfresh for the chance to win such a great prize!