
Hello, hello everyone! Happy summer! (or winter, if you happen to be in the Southern Hemisphere…;) Maggie here with yet another look into how my 2017 Memory Planner is coming along!
If you’ll remember, this year I’m using a personal-sized Heidi Swapp Memory Planner to record my family’s stories, so there is not an awful lot of extra space to document longer memories – or to add extra photos directly to my daily pages.
For that reason, I’ve had to be a little more creative in how I choose to use those pages. Read my last post, HERE, to see how I’m adding extra photos & memorabilia to my planner.
This month, I’m sharing a couple of tips on how to add interactive, added elements to your planner. Adding these extra elements is an easy, fun way to add visual interest to your documenting, while still allowing you to get your jounaling done.
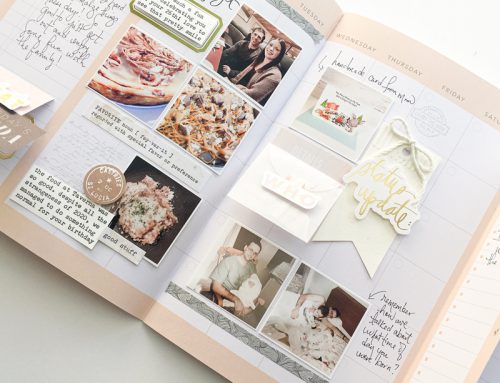
My daughter and her friends recently bought a little fish that they plan on all “raising” together (teenagers…sigh…smile). Before the girl who had the honor of keeping him at her house brought him home, they decided they wanted to take “family photos” that included all of them with their new ward. I, of course, had to add this story to my planner, so I printed out a small, square photo of all of the girls with their fish and adhered it to the daily space in my book.
Then I simply wrote the story on the back of a small, instax-sized card and attached the card directly over my photo with a piece of washi tape.
When the card is down, it just appears to be an embellishment, but as soon as you lift it, you can not only see the photo, but you can also read the text that goes along with it.
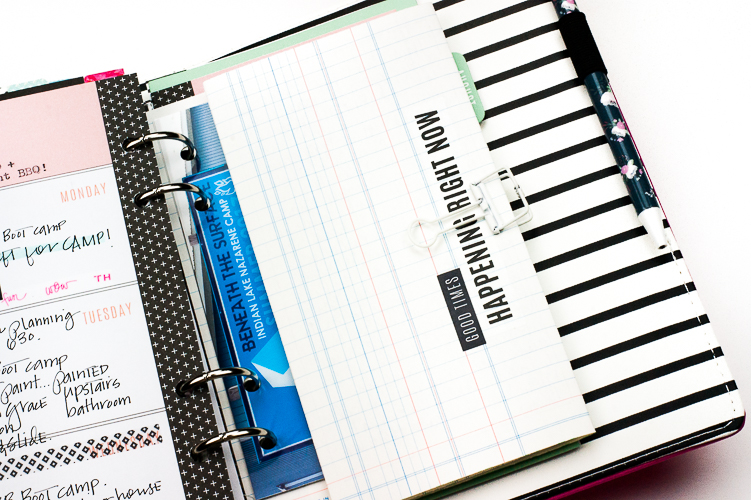
This next example was the perfect solution for me when I needed to document my son’s recent week at camp in Michigan.
I cut a sheet of ledger paper down to the height I needed and then folded it a couple of times so that it would fit in my planner width-wise. I made sure to leave room so that I could punch holes into the left side.
Now, because the kids weren’t allowed to bring their phones, the only photos we have from the week were the ones that Gray’s Youth Pastor was able to snap right before they left for home. I printed both of those out and tucked them into the folded paper, and then I punched holes into both the photos and the folded ledger paper.
On each folded section I wrote a little something about the week. I left the space behind the photos blank so that Grayson could do a little journaling of his own.
In order to document a day-trip to a local state park, I started with a couple of pieces of note paper from the new Heidi Swapp Stationery Collection. I attached the pieces to each other at the top with a length of washi tape, and then I added some binder attachers to the bottom page so that I didn’t need to punch holes directly into the notes.
TIP: Don’t have binder attachers or an attacher die to create your own? No worries! For these attachers, I simply took an oversized label, cut it in half, folded both of those pieces in half and adhered them to the bottom card. Then I punched my planner holes into labels…easy peasy!
I added some photos and journaling to each note card and popped the entire thing into my album.
Finally, in order to hold some memorabilia and notes from a baseball game my son & husband attended, I altered a greeting card to make a pocket.
I sewed up the bottom and side of the card, and used a 1” hold punch to create a little slot in the top of my new pocket.
I punched my planner holes directly into the pockets & tucked the tickets & journaling in. So quick & so easy!
I love finding new & interesting ways to add to my documenting…and I hope I’ve inspired you to do the same! Why not try something new in your planner today?
To see more of my work, and to keep up with my scrapbooking & planning, check out my blog: Midwestern Girl DIY, follow me on Instagram @maggiemassey, or visit my Facebook Page.
Be sure to also check out my past SCT planner posts:
Thank you so much for stopping by!
~ Maggie Massey

Great tips and tricks! TFS!
It makes me feel like jumping into planner now, so fun!