
Hello everyone! I am so thrilled to have you all back joining me on this Memory Planner journey…and what a journey it is! I cannot believe we have officially reached the half way point of the year this month. Month 6.
I was thinking a lot about this half way point a few weeks back when the month started. I could not believe it. So I began looking through my Memory Planner from the beginning of the year. As I turned each page, and reflected on all of the incredible moments that have filled my days this year, a part of me felt a bit disappointed. Sure the pages were filled with beautiful photos and gorgeous products….but I was missing details. Notes. Words. Story. It became so clear to me that if I was going to do one thing in my planner for the rest of this year…it would be to write more down. I needed to tell our story more. Plain and simple.
I don’t know about you, but for me time just seems to be passing by quicker than ever. My son is growing up, life is busy and I just need to bring myself back down to centre and write our life story down….before it’s too late and I really forget. I always think to myself, "oh I will remember". And guess what? I forget. No matter how hard I try….I just cannot remember all those details….or little things that stand out. The funny moments. The milestones. The memories.
Now…just note that I am not talking about writing in depth essays or anything massively time consuming (unless of course if you want to). I am just talking about adding in more little daily blurbs and passages, recaps and highlights. If at times I feel like I want to write more….then the option is there. For now though, my goal is to focus and commit myself to continuing on with what I started this month. It really is amazing how each little bit adds up in an incredible way!
So today, I want to share with you all some very simple ways to add in more journaling and story into your Memory Planner pages. These are things that I have relied on this month to keep me focused and on track. If they worked for me, I can guarantee they will work for you!
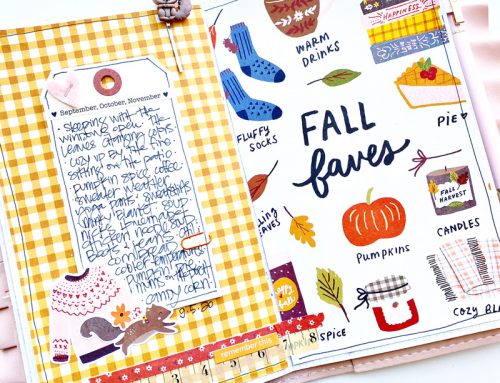
I began my month with a gorgeous print created by Maggie Massey. She had this available a few weeks back on Heidi Swapp’s blog. I definitely wanted to incorporate it into my planner this month so I printed it out on a piece of acetate paper using a laser printer, and then ran it through my MINC with champagne foil. I love how it creates such a gorgeous focal point.
I love filling up my monthly dashboard pages with certain things that are just inspiring/standing out to me at the moment. I often choose to include pieces that I am also trying to focus on within the month. They serve as helpful, inspiring reminders. We all need them don’t we?
So let's begin. Here are my tips to begin including MORE journaling in your planner pages this month…and the next!
TIP #1:INCORPORATE PROJECT LIFE CARDS
Adding in project life journaling cards to a planner is an amazing way to obtain more space for documenting and telling your story.
I know we all have stashes of PL cards! What a great way to use them up, make them functional and get rid of duplicates!
Once I completed my journaling on my card I simply punched holes into the card and popped it inside my planner. Super easy! I love how it adds a little bit "more" to my planner.
TIP #2: JUST START WRITING
When it comes to journaling, sometimes all you have to do is just start. I know that blank page can be so intimidating! When I committed to this process I told myself that I had to start with the journaling first….embellish later. The words were to make up the base of my page. Once you do that, it becomes easier to tell your story and there is less worry about the "other stuff". Make your handwriting the art.
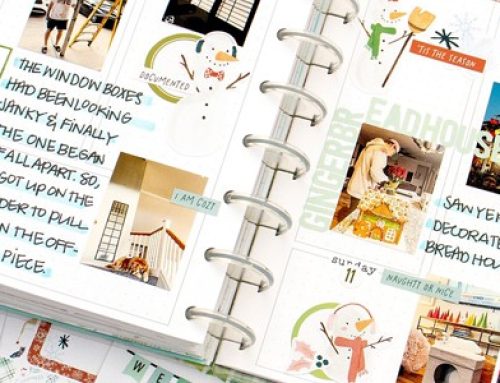
TIP #3: ADD IN NOTEBOOK PAGES
Notebooks are brilliant tools. They are even more amazing when added into Memory Planners. These notebooks are gorgeous accessories…and are a part of the Heidi Swapp Memory Planner collection. I love that they already coordinate beautifully with the planner, plus they allow for SO much story telling potential.
One day I decided to switch things up and type up my journaling instead. So I simply ran through one of the notebook pages in my printer and then embellished after. I punched holes and placed it easily through the binder rings.
I was then able to add in additional journaling/photos to the other side as well.
I used the smaller notepad from the same collection to add in a fun journaled "current" list. I love this variation to traditional journaling. Plus, who doesn't love making lists?
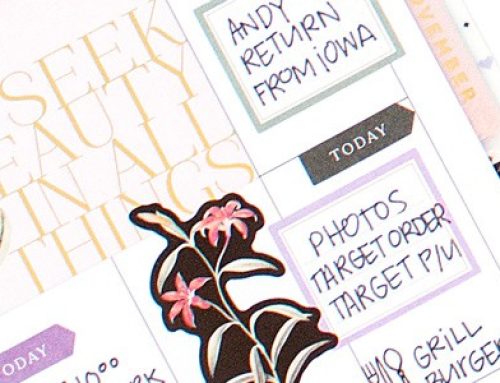
TIP #4: UTILIZE PROMPTS
These stickers are from the Memory Planner collection, and are probably one of my most favourite tools when it comes to journaling.
Often times people do not know what to say, what to write. Just simply, how to START. Honestly, I am one of these people….more often than not! That is why these stickers are AMAZING. They are filled with a variety of prompts, and "story starters" guaranteed to trigger a story or note about the day. I love using them. Even if I do not use the actual sticker on a page, I find I still will look at these stickers to prompt an idea, insight or memory for me to jot down of the day. I highly recommend these. They are great tools for successful journaling.
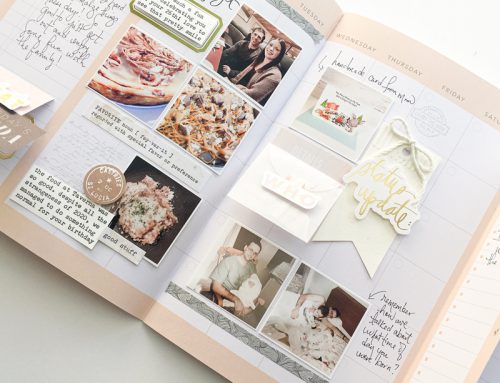
TIP #5: ADD PHOTOS IN DIFFERENTLY
Instead of adding in photos directly onto Memory Planner pages, finding alternate ways is a great way to keep more journaling space open…and add in variety all at the same time!
For this weekly spread, I added in my Instax photos using alternate ways. One way was I chose to punch holes directly on my photo and place into the binder rings.
The second way was to create a pocket/envelope and place the photos inside of that.
Another way I was able to keep more room open for journaling without sacrificing on my photos was to create a "photo flap".
I simply added washi to one side of my instax. That way I could write underneath my photo but still keep my photo on the page!
I hope these journaling tips have inspired you to start writing more in your own Memory Planner. I encourage you to go back through your completed months and see if you feel anything is missing. Often when you do that, you can go forward with a new appreciation and mindset in what you truly want to remember. That way you can begin each new day ahead making each entry better than the days before.
I know I am already so much happier with this past month and everything I was able to include. I just don't want to forget, it's as simple as that.
Thank you so much for stopping by this month. See you in July!
Be sure to visit Lindsay on Instagram: @lindsaybateman or take her new class at Big Picture Scrapbooking. Details here!

I don’t know how I got to miss the memory planner trend… Sure is a keeper!
Great tips! I try to write in what my 4 year old granddaughter has said or done that day so that I can write more detailed info later. I am so glad that I jumped on the memory planner bandwagon! It is such a great way to document her precious life!!
I love all these tips! Especially the Project Life one. I would never have thought of that! What a great way to use up all my duplicates. Thanks Lindsay! :)
More really great tips for my planner, Lindsay!! Thanks so much for sharing!!
What a great blog post this one is — thank you for all the specific details. I haven’t been bitten by the ‘planner’ craze yet but maybe soon after reading this.
Great ideas! Love looking at your planner each month. Extremely inspiring.
Such great ideas. Thank you. Love my Memory Planner!