
We are so excited to welcome our first guest for 2021, the amazing Maria Celeste Gonzalo! Celes’ creations are always filled with bold colors, intricate designs and beautiful details that make us wish we could see them up close. Today’s creation is no exception. Let’s take a look at what Celes is sharing with us today!
…………………….
Hi everybody! I feel so happy to be here! I´m Celes from GuiadeManualidades.com. I’m a crafter and paperlover living in Mendoza, Argentina. I’m so excited to show you this project! Would like to create something sweet to keep all your most beautiful photos with the one you love? Valentine´s Day is coming and we can prepare this special idea to give as a gift.
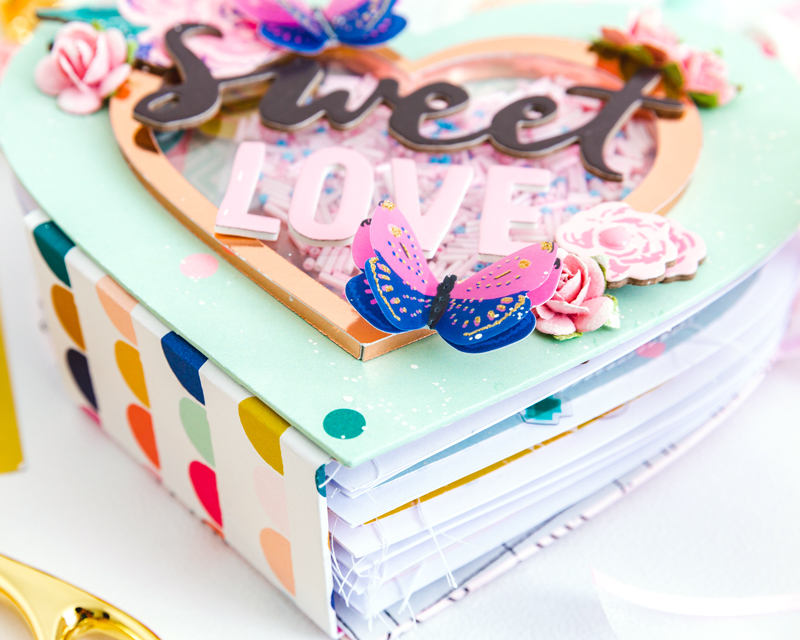
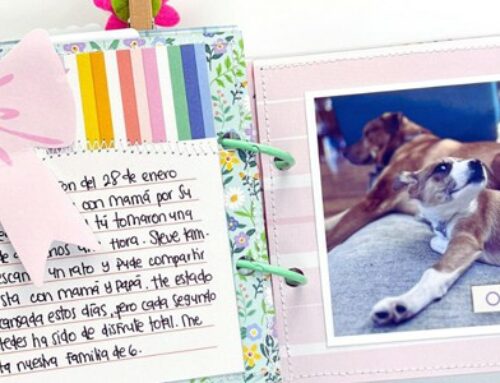
The last months have been really complicated. Our world has changed… our life has changed. So, we learned to enjoy things in a very different way and our memories became more and more important and special. That is why I decided to make a heart-shaped mini album. I prepared all the cutting files for you to re-create this album for yourself, too!
The collection I chose for this project is Sweet Story by Maggie Holmes. I’m a huge fan of Maggie and I love every collection she creates. It’s full of lovely details and has a wonderful palette.

Supplies | Sweet Story collection: paper pad, ephemera Pieces, layered stickers, cardstock stickers, chipboard stickers, washi tape; Other: White cardstock, acetate, foam adhesive, foil paper
The first thing you need to do is to choose your cutting files. You will find the archives in .FCM (Brother ScanNCut), .SVG (for other cutting machines), .PDF (for printing and cutting by hand), and .DXF (for other cutting machines).
DOWNLOAD THE MINI ALBUM CUT FILES HERE
IMPORTANT: if you are using a cutting machine, before cutting your material, please try them all. Just cut them in paper and check that every piece fits in the correct way. This will help you in case you need to resize some of them.
My final project is approximately 7 1/4” w x 6 1/4” h.
I will explain some details of the cutting files first. Here’s a description of what you’ll find:
- The first file is “MINI-ALBUM-STRUCTURE”: use it to cut two pieces of stable cardboard.
- The second file is “MINI-ALBUM-SHAKER”: use the first heart to cut one piece of foil paper. Use the second heart to cut two pieces of white foam. Use the third heart to cut one piece of acetate.
- The third file is “MINI-ALBUM-INTERIOR-PAGES”: use the first heart to cut one piece of design paper for the interior of the front cover. Use the second heart to cut 1 piece of design paper for the interior of the back cover and to cut 12 base pages for your mini album (white cardstock). Use the third heart to cut 12 different pieces of design papers to add to your base pages.
STRUCTURE:
Let’s get started! Use the first file to cut the two pieces of stable cardboard and add an extra one for the spine (2” w x 3 1/2” h). I chose three papers from the collection. Two of them for both covers and the other one for the spine. I love to choose patterned papers!
Once you have finished your structure, it’s time to make the lovely shaker, which I’m in love with! As we are going to work in it, we are going to prepare a lovely cover YAY!

COVER:
Use the second cutting file. Here you will need foil paper, white foam and acetate. Cut the pieces in the way I explained before. For the foam pieces: glue them together. Then, you have to glue the new piece to the cover. Let it dry off as much time as it needs.
Cut another piece of acetate (by hand) to glue it on the back of the central heart and let it dry. Now we have a place where to put all our beads. You can add a mix of colors and shapes—you will fall in love with it!
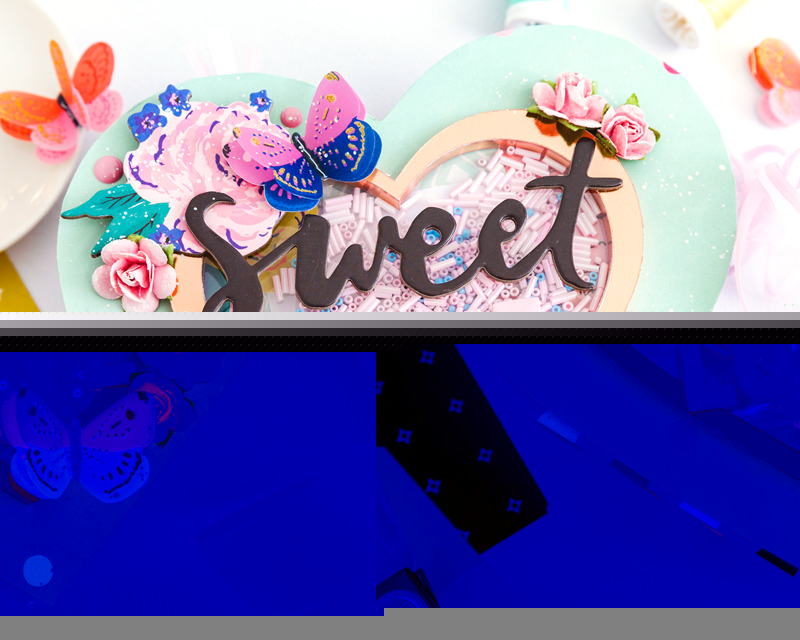
Here you can use your extra file for cutting the foil strips. You can cover the inside of the shaker (foam and cardboard) and the outside (foam). This is just a detail. If you choose not to do it, it will be fine.
If you are not adding strips of foil paper, you can glue acetate and foil paper hearts. Your shaker will be complete! Colorful and beautiful!
Add a touch of color! You can use chipboard stickers, paper flowers, watercolors, enamel dots, and everything you like. Decorating is the most wonderful step!
INTERIOR:
Let’s prepare the interior of the mini-album.
I made a basic spine. To make that, cut a piece of white cardstock of 10 1/4” w x 3” h. Then you have to score it in 1 ½”, 2”, 2 ½”, 2 3/4”, 3 1/4”, 3 3/4”, 4”, 4 1/2”, 5”, 5 1/4”, 5 ¾” 6 1/4”, 6 1/2”, 7”, 7 ½”, 7 ¾”, 8 ¼”, 8 ¾”. As a result, you will have a spine with 6 hinges. Another detail you can add is small strips of foil paper between them. Once it’s ready, you can glue the spine to the structure. The spine is smaller than your structure. Just leave 1/4” up and down.
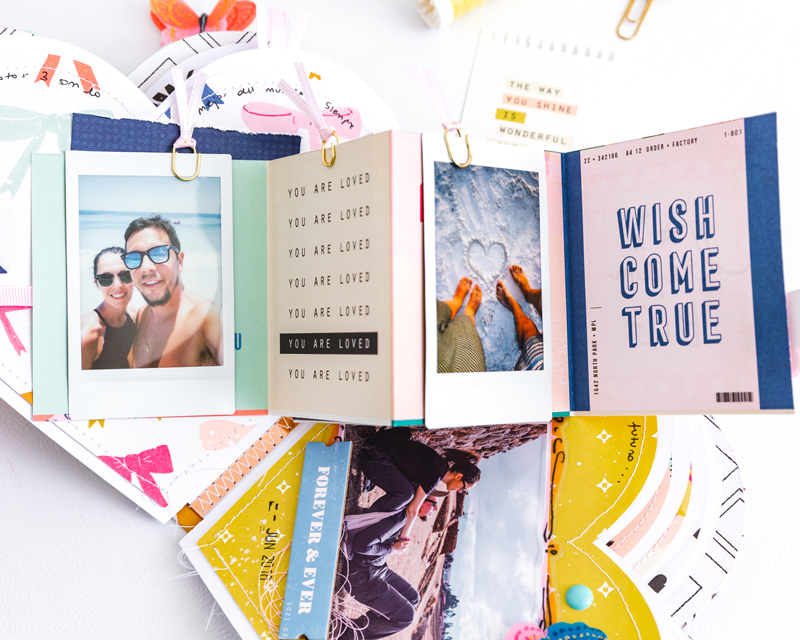
It’s time to use the third cutting file. You will need white cardstock and your collection paper pad. Use the first and second heart to cut a design paper. These are the back papers of both covers. Before you glue them, remember to add a ribbon so you can close your mini album. Once you are ready, it’s time to start with the pages. I always feel happy to start creating with all my pictures!

You need to cut 12 base pages in white cardstock. You will need two pieces to create one page. Just glue both pages but leave the left side of the heart of the rainbow without glue (it’s like a “small pocket”). You will use that pocket to add the page to the spine.
You need to cut 12 different pieces of design papers to add to your base pages. Another detail you can add is sewing—a warm and lovely detail. Of course, it’s optional.
Time to work on all pages! Bring all you got to your table: die cuts, stickers, chipboards, enamels dots, and washi tapes. As I always say, “magic begins!” You can make as many interior structures as you like or just add pictures, write memories and decorate with your favorite embellishments. Let’s create together!

When you finish decorating, you can glue your pages to the spine. Remember to use the “small pocket”. It’s easy! Put glue in the first hinge and carefully add your page. Check that your page is aligned to your cover. Once the first page is ready, you can keep going with the rest of them.
Note: If you are planning to make some inside structures as cascade or anything else, you have to add them before you glue the pages together. The same thing happens if you are planning to decorate with brads or something similar.
I hope you like this idea! Play with papers and take your time to create a beautiful mini album with the pictures you love. If you have any trouble or just want to say “hi” you can find me on all my social media sites. I’ll be happy to help you to make this lovely mini album! Thank you for taking the time to see my project! See you next time!

My name is María Celeste but everybody calls me Celes. I’m a 39 years old craft lover and a DIY-er soul living in Mendoza, Argentina. Since I can remember I am in love with paper. Life put me in a different plan and I started economy when I was 19. But after 5 years, four jobs and a special situation I decided to change everything. My journey through creativity and as a maker began. I love color, rainbows, butterflies, unicorns, and everything that involves this kind of thing.
After all these years, I can’t spend a day without creating or drawing a new idea! You will always see me with my ScanNCut, some papers, and talking about a new idea or plan to share. I love being a part of the American Crafts, We R Memory Keepers, and Simple Stories design teams.
The most important thing to me is to be able to create and encourage others to do the same. Scrapbooking and creating with love has healed my soul and heart and that is what I want everybody to learn. It is something that makes you completely happy!
Find more of Celes’ work here : Instagram | Facebook | YouTube | Blog
…………………………
What an absolutely mini-album that Celes shared with us today! Be sure to follow her at the links above to see more of her beautiful artwork, and let her inspire you to create something gorgeous this week, friends!


I’m so glad to see Celes here! Her albums are just gorgeous ????
Thank you so much Maria del Carmen! ❤️????
How beautiful! Thank you for the cut files! Would love to recreate this adorable album. :)
Happy to know you like it ????
Beautiful!
Thanks ????????????
Thank you for introducing me to this designer. It is rare to find one so generous with her creation files!
Thank you! ????????????
A fresh face & great project!!!
Thank you so much Kelly! ????????????
Thank you SCT for introducing this magnificent talented Crafter Celes. I just finished doing this album and had so much fun. Now I want to make more of her creations.
El mini es precioso Celes… Me alegra que puedas compartir tus minis con todos los lectores de la revista!
por siempre tu fan!
What a beautiful album! Looking forward to seeing what she will create next.