
Hey, everyone! It’s Dilay here and I’m excited to share this handmade ‘congratulations’ card, perfect for celebrating a friend or family member’s wedding day! It’s filled with intricate details, yet is surprisingly simple to create using patterned paper and dies from Honey Bee Stamps. Let’s dive in!

Supplies | Honey Bee Stamps: Lovely Layers: Tie The Knot – Honey Cuts, Lovely Layouts: Party Frames – Honey Cuts, Simply Spring Paper Pad 6×8.5 – 24 Double Sided Sheets, Adventure Awaits Paper Pad 6×8.5 – 24 Double Sided Sheets, Inside: Wedding Sentiments, Lovely Layers: Greenery – Honey Cuts, Lovely Layers: Spring Greenery – Honey Cuts: Scrapbook Adhesives by 3L: 3D Thin Foam Squares, Scrapbook.com: Perfectly Clear Clue; Scrapbook & Cards Today: White Cardstock; Concord & 9th: Colored Cardstock
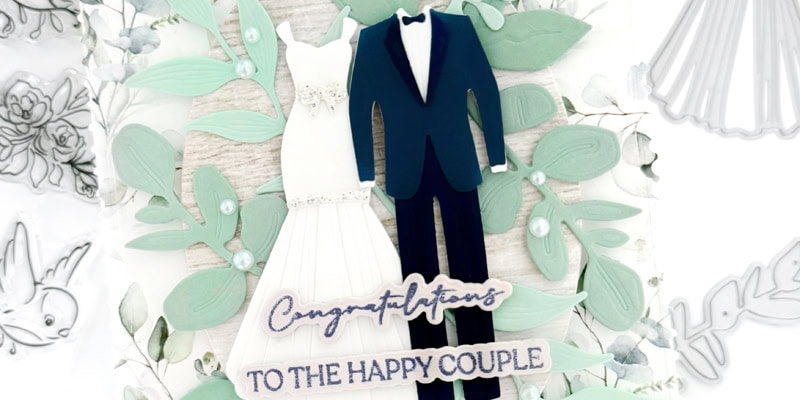
I began by selecting some beautiful patterned paper for the background and oval center, opting for a leafy pattern for the backdrop and a cozy wood grain for the center. Then, I coordinated a few cardstock colors, primarily blue for the groom and white for the bride.

I die-cut the leafy patterned paper using the Lovely Layouts Party Frames die and adhered it onto an A2-sized, top-folding white card base. For the center, I die-cut an oval from wood grain patterned paper using one of the Sweet Stacks Oval dies and added it over the card base using thin foam adhesive squares. Next, I die-cut several leaves, aiming to match their designs as closely as possible to the patterned paper. I used a variety of leaf and greenery dies in light and muted green cardstock shades to keep it cohesive. I adhered the leaves randomly over the oval, leaving parts of each leaf to overhang onto the background.

Now for the stars of the show: the bride and groom! I die-cut the pieces, using shades of blue for the groom and white for the bride, and carefully adhered them together for each figure. For the bride, I added some bling to the waist and seams. Once complete, I placed each figure in the center, with the groom slightly in front of the bride (to achieve this, I used thin foam adhesive only for the groom.)

To finish, I selected two sentiments and stamped them in blue onto a piece of light gray cardstock. I die-cut them with their coordinating dies and adhered them over the bride and groom. Finally, I added a few pearl metallic embellishments as a finishing touch.
I hope you enjoyed learning more about today’s card and found some inspiration for your next project—it’s wedding season!

Find more of Dilay’s work here: Instagram | YouTube | Blog | Facebook


Beautiful
Beautiful card! Love your color choices.
Elegant and could also be adapted for an Anniversary celebration invitation.
this is just beautiful!
Such pretty colors in this card. Unique and unexpected but very pretty.
So pretty!
Wow!!!