
Happy Friday, friends! We’re excited about this weekend, as it is our Crop & Create Delivered Papercrafting event weekend, so we will be busy with 1700 attendees, creating in our wonderful community together! We’re also excited to share one of the latest and greatest collections from American Crafts with you today! Not only will you see the beautiful new products, but you’ll also get full instructions to make a project of your own! And don’t miss out on the opportunity to win a wonderful collection prize package at the end of today’s post, too! Now, let’s turn it over to our friends at American Crafts!
…………………….
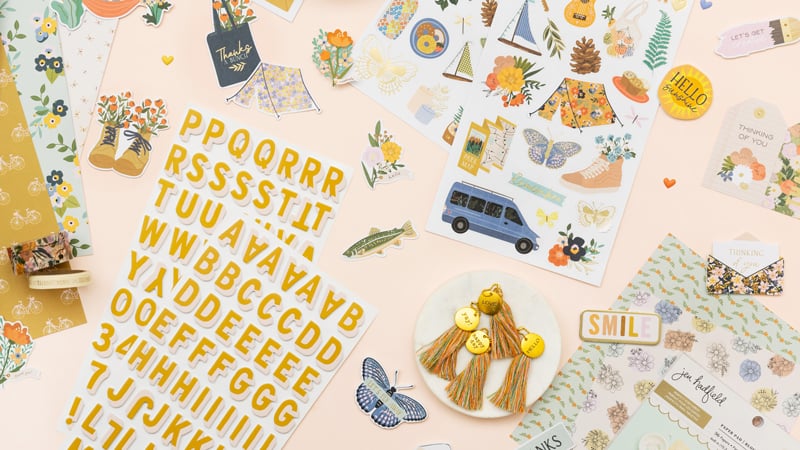
We are so excited to introduce you to one of our newest collections, Live and Let Grow by Jen Hadfield!

Start each new day with an eye for adventure! Whether you’re on the road to a campsite in the woods, or gathering flowers and foliage in the garden, document the day with a deep, full color palette and rustic outdoor theme. Sticker icons like campers, tents, maps, and boats symbolize travel and exploration, while bicycles, mugs, and homemade treats remind us that adventure isn’t always that far away. Sometimes we find it right here at home. Take a look at some of the beautiful elements you’ll find throughout this collection:
Live & Let Grow is perfect for creating layouts, cards, pocket pages and more, like mini albums! Today, we’d love to inspire you, and give you full directions on how to create a one-of-a-kind mini album to document your best outdoor moments. Take a look:

Supplies | Jen Hadfield Live & Let Grow 12 x 12 paper pad, Jen Hadfield Live & Let Grow Alpha Thickers, Jen Hadfield Live & Let Grow phrase ephemera, Jen Hadfield Live & Let Grow tassels, Jen Hadfield Live & Let Grow icon ephemera, Jen Hadfield Live & Let Grow sticker book, Jen Hadfield Live & Let Grow puffy heart stickers, white cardstock, kraft cardstock, We R Memory Keepers Cinch machine, We R Memory Keepers Cinch binding coils – 1” (smaller or bigger depending on the bulk of your album), adhesive, paper trimmer, scissors, sewing machine (optional)
Basic Album Components
- Trim 15-20 patterned papers + white cardstock to 4” x 6” pieces.
- Trim kraft cardstock into 20 pieces measuring ½” x 4”.
- Gather photos. For this album stick to 4” x 6” or 3” x 4” horizontal pictures.
- Decide the order of the album. Place map pattern on front and back covers. Place other patterns and photos in order as desired. Do not adhere anything back-to-back yet, especially if stitching is desired.
Specific page-by-page instructions
Cover
- Adhere kraft cardstock strip to left side of map pattern.
- Add title using alphabet Thickers and printed text on white cardstock.
- Embellish with puffy hearts or as desired.
- Stitch down the edge of kraft cardstock and across puffy hearts if desired.

Page One
- Trim 3” x 4” Card from cut apart patterned paper.
- Add journaling on a 2 ½” x 4” piece of white cardstock.
- Adhere 3” x 4” card, journaling, and kraft cardstock strip from left to right on 4” x 6” white cardstock.
- Stitch down the edge of kraft cardstock and embellish as desired.
Page Two
- Adhere kraft cardstock strip to the left side of blue striped pattern.
- Add 3” x 4” photo to patterned paper
- Add journaling strip on white cardstock.
- Stitch down the edge of kraft cardstock and embellish as desired.

Page Three
- Adhere kraft cardstock strip to the right side of a 4” x 6” photo.
- Stitch down the edge of kraft cardstock and embellish as desired.

Page Four
- Adhere kraft cardstock strip to the left side of sunburst patterned paper.
- Print journaling strip on white cardstock and cut the right end into a banner. Adhere to bottom of patterned paper.
- Stitch down the edge of kraft cardstock and add ephemera/embellishments to fill the page as desired.

Page Five
- Adhere kraft cardstock strip to the right side of fish patterned paper.
- Adhere 3” x 4” photo.
- Add label shape from journaling ephemera pack to bottom right of photo.
- Add stitching to kraft cardstock + label and embellish as desired.

Page Six
- Trim 3” x 4” card from cut apart patterned paper and 2” square from cut apart patterned paper. Adhere 2” square to 3” x 4” card.
- Add journaling on a 2 ½” x 4” piece of white cardstock.
- Adhere kraft cardstock strip, journaling, and 3” x 4” card from left to right on 4” x 6” white cardstock.
- Stitch down the edge of kraft cardstock and 2” x 2” square and embellish as desired.
Page Seven
- Adhere kraft cardstock strip to right side of 4” x 6” photo.
- Fussy cut “Wild” sentiment from patterned paper and adhere to center of photo.
- Stitch down the edge of kraft cardstock and sentiment if desired.

Page Eight
- Trim 3” x 4” card from cut apart patterned paper.
- Print journaling on 2 ½” x 4” piece of white cardstock.
- Adhere kraft cardstock strip, journaling, and 3” x 4” card from left to right on 4” x 6” white cardstock.
- Stitch down the edge of kraft cardstock and embellish as desired.
Page Nine
- Adhere kraft cardstock strip to the right side of plaid patterned paper.
- Add photo to patterned paper.
- Embellish as desired.
- Stitch down the edge of kraft cardstock and embellishment if desired.
Page Ten
- Adhere kraft cardstock strip to left side of 4” x 6” photo.
- Add journaling to white cardstock and adhere at the bottom of photo.
Page Eleven
- Adhere kraft cardstock strip to the right side of tree patterned paper.
- Add photo to patterned paper.
- Stitch down the edge of kraft cardstock and embellish as desired.
Page Twelve
- Trim 3” x 4” card and 2” x 2” card from cut apart patterned papers.
- Adhere 2” card to 3” x 4” card.
- Print journaling on 2 ½” x 4” piece of white cardstock.
- Adhere kraft cardstock strip, journaling, and 3” x 4” card from left to right on 4” x 6” white cardstock.
- Embellish as desired.
- Stitch down the edge of kraft cardstock and embellishment if desired.
Page Thirteen
- Adhere kraft cardstock strip to the right side of a 4” x 6” photo.
- Stitch down the edge of kraft cardstock and embellish as desired.
Page Fourteen
- Adhere kraft cardstock strip to the left side of wave patterned paper.
- Print journaling strip on white cardstock and cut the right end into a banner. Adhere to bottom of patterned paper.
- Stitch down the edge of kraft cardstock and add ephemera/embellishments to fill the page as desired.

Page Fifteen
- Trim 3” x 4” card from cut apart patterned paper and 2” square from cut apart patterned paper. Adhere 2” square to 3” x 4” card.
- Add journaling on a 2 ½” x 4” piece of white cardstock.
- Adhere 3” x 4” card, journaling, and kraft cardstock strip from left to right on 4” x 6” white cardstock.
- Stitch down the edge of kraft cardstock and 2” x 2” square and embellish as desired.
Page Sixteen
- Adhere kraft cardstock strip to the left side of blue striped paper.
- Adhere 3” x 4” photo.
- Add label shape from journaling ephemera pack to bottom right of photo.
- Add stitching to kraft cardstock + label and embellish as desired.
Page Seventeen
- Adhere kraft cardstock strip to right side of 4” x 6” photo.
- Print journaling strip on white cardstock and cut left end into a banner. Adhere to bottom of photo.
- Embellish as desired.
- Stitch down edge of kraft cardstock + embellishment if desired.
Page Eighteen
- Adhere kraft cardstock strip to left side of sunburst patterned paper.
- Add photo to patterned paper.
- Add embellishment as desired.
- Stitch down edge of kraft cardstock + embellishment if desired.
Back Cover
- Add kraft cardstock strip to right side of map patterned paper.
- Stitch down edge of kraft cardstock if desired.
Assembly
- After all stitching has been completed, trim threads.
- Adhere pages back-to-back. All kraft cardstock strips should be on the center of the book where it will be bound.
- Use a Cinch Binding tool to bind album.
- Add tassel to top ring for embellishment if desired.
Remember, when you have the instructions, it’s easy to switch things up and make them your own! Make this album fit you. Try all 4×6 photos, different papers or embellishments, or even flip this album to fit vertical photos!
How about a Live & Let Grow prize package for one lucky commenter to help you create this sweet album?

To enter to win, leave a comment telling us what your favorite outdoor activity is at this time of year! Comments will close on Wednesday, May 4th at midnight ET and a winner will be selected at random and announced on Friday, May 6th! Good luck, and be sure to follow us at the links below for more Live and Let Grow inspiration, as well as projects from our other new collections!
American Crafts: Website | Blog | Instagram | YouTube | Pinterest
…………………….
Last week, our friends at Totally Tiffany introduced us to the must-have new Cindy tote, and offered up one as a giveaway! What we had not realized, was that TT actually wanted to send out FIVE totes to five different lucky winners! Find out if you’re one of them:
“What a fabulous bag and prize! Since my name is Cindi, I especially love it LOL. My biggest organizational challenge is how to store my go to tools that I use every time I scrap. They are usually a mess on my desk but I don’t want to store them far away where I have to get them out every time but I am tired of the messy desk.” ~ Cindi
“My biggest organizational challenge by far is ephemera and stickers. Having them in a way that will get them used up! The Cindy Bag looks great for portable crafty times! Thanks for showing us!” ~ Cathy L.
For me it’s organization for 12×12 paper… does one store by company, theme, colour, keep ephemera with or somewhere else, combine with card stock or keep separate? Many questions and struggles with storage. ~ Dione A.
I have several unorganized stencils. My 6×6 are now organized and easy to use, but larger ones are not. ~ Lisa K.
Well! My greatest organization challenge is how to organize my crafting tools efficiently. I don’t have mush free space on my desk, and I haven’t found a solution yet for my tools to be stored neatly, but still be visible and easy to grab… ugh! ~ Michal D.
Winners, please email meghann@scrapbookandcards.com with your full name, shipping address and telephone number to claim your prize. Have a wonderful, creative weekend, all!


Without a doubt I am a true and avid gardening gnome! I spend all my days scooting around my beautiful woodland forest I did it all with my green gnome thumbs! Love this collection and that album is adorable. Thank you for the chance to win it!
Darling album. I like
walking about our
small community
and also fishing.
Carla from Arizona
Just love this new collection. I love camp fires this time of the year. the warm glow of the fire while bundled up – is just so relaxing with family and friends. The camp album is just so darn cute! Great idea!
What a lovely collection! Thank you for the instructions! My favourite activity once it warms up is swimming. Presently walking and preparing for golf.
Very cute set! As soon as it’s warm enough, I love being outside as much as possible. I even move all of my crafts outside with me to work in the sun!
We love to camp in the spring until it gets too hot here in Texas.
I think taking walks is my favorite activity now. It is beautiful weather and beautiful scenery!
My favorite activity this time of year is camping. I’ve turned my trailer in to a rolling craft room and love scrapbooking or making cards while camping.
This time of the year I like to sit on my screenporch in the afternoon sun. I may also be looking/buying craft supplies while doing this ;)
What a great collection! My favourite springtime activity is gardening. Before the bugs come out and the weather is too hot!
I love being able to sit outside, read a book or play with my dogs. If the mosquitos don’t carry me away, I will stay out for an hour or 2 at a time.
This is an amazing album! Thank you for sharing such detailed instructions. I love hiking in beautiful spring weather.
Sounds like a great weekend! Love the beautiful album!
My favorite outdoor activity at this time of the year is some front deck gardening. I love sprucing up my deck with some new potted plants, and freshening up the plants that are already out there.
Love the album! I love hiking in all seasons! There is beauty all around, and I make sure I take the time to experience it. The Live and Let Grow collection is fantastic!
I can’t wait for spring to start planting. I also love to take long walk in the forest and be with nature.
My favorite outdoor activity this time of year is just to take long walks around the neighborhood so I can enjoy all the beautiful flowers, trees and other things in my neighbors yards come back to life. Just a few days ago I noticed that one of my neighbors had gotten a nest of bees and they were so happy with all the awesome pollen in her yard!
This collection is darling! Our favorite activity this time of year is bike riding. We have a lovely trail near our home that we frequent.
My favourite thing to do this time of year is getting into my garden.
A beautiful select of paper and products. ????
I absolutely love this collection and what you have done with it! My favourite outdoor activity is hiking. Love taking that beaten down path or trailblazing a new one!
I can’t wait to get out on the golf course.
My favorite outdoor activity is just being
able to go outside, sit in the swing, and relax.
After being cooped up in the house all winter,
I’m ready for some warm, fresh air. Love
your journaling. thanks for sharing
txmlhl(at)yahoo(dot)com
What a gorgeous album. This time of year it can be warm or cold in Michigan. But, I love walking outside and enjoying the breeze, the sight of new leaves and the blue sky! American Crafts always has fresh and fun collections. I could see using this for so many projects! Thank you SCT and American Crafts for the wonderful opportunity!
PS – I have no longer receiving emails from the blog. I tired to sign up again but I do not get the confirmation email. Anyone else having issue? Just wondered.
This is beautiful ???? my favorite outdoor activity is anything with water! From seaworld to the beach to a good old fashion water balloon fight!
My favorite outdoor activity this year is to swim in our pool. It isn’t a big pool but it is so refreshing when it gets so hot and humid here. I swim almost every day.
Exploring one of our many beautiful state parks in MN!
Thanks for this awesome giveaway.
Love this idea and I already have a cinch tool.
What a beautiful collection, and all these instructions for the album … wow! Since walking has turned into my ‘year-round’ activity, I think my favourite thing about spring, is getting to enjoy coffee outside with my friends. When Covid forced us outdoors early for in person visits, even no that it isn’t an issue, it brings back all the good feels of being with the ones we love. That … and rolling down the windows in the car. Mmmmm.
Camping! We have a camper and are headed out west for 2 months. This would be great to document our trip!
I love how this blog post is the instructions for a whole mini album ! Thanks for some great inspiration !
We love to go recumbent trike riding….with the exception of the allergy causing Palo Verde blooms it is a perfect outdoor activity!! Thank you for the great instructions….seems like a perfect mini album for my granddaughter!
Ha ha just realised asked for our favourite outdoor activity for this time of year – far and away mine is cleaning up the garden and swimming ! I start early as soon as snow off the ground for both ! Lol great blog post .
It’s Autumn here in Australia so the days are sunny and cool so I love go for day long bushwalks I’m lucky to live in the bush surrounded by a national park so I have many to choose from. These walks make up many of my scrapbooking pages.
My favorite outdoor activity is walking ????♂️ Our dog and look at all the beautiful blooms. Thanks for a chance to win! The album is darling!
Now that the weather is warming up I love to go camping. A nice fire, a drink and a book!
Having fun fishing at the pond! The meadows are still nice and green, but not for long with the heat!
Love working in the yard – hate mowing lawn, but love my garden and living off it all summer and throughout the winter. Fun album and so perfect for any outdoor adventure.
Love this time of year! Opening up the RV at the beach, getting it all ready for the season, then grabbing a book and hanging on the deck.
I LOVE THE CAMPING IMAGES!!! I would so love to have these papers! Thank you for the chance
Wow! I cant believe you gave instructions for a whole mini album! This collection is great for my upcoming hiking trips.
Oh what a fantastic collection and beautiful photo book. It’s still pretty cold here but on a warmer day I like to fuss in the garden and get it ready to plant.
My favorite outdoor activity in the spring is hiking in the Cascade Mountains.
My family loves to go camping. Sitting by the campfire at night and making some super messy s’mores is what we really love to do.
Cute album. Love the camping theme. I like to go camping and boating.
Lovely album, like the style. My favorite outdoor activity is my garden, this is the time for new plants and fertilize, love to watch them bloom!
It’s autumn here and my favourite thing to do when the weather’s cooler is to go on walks with my family, something we started doing a lot more of during various pandemic lockdowns.
This time of year is great weather for walks outside! I enjoy neighborhood walks with my dog…and without her too, because I can walk faster!
Lovely pages in this mini – thanks for these detailed steps.
I love this time of year when i can get outside and plant new flowers, clean up my flower beds, put the deck furniture and bar-b-que out and enjoy the longer days enjoying my little patch of Heaven on earth
My favorite outdoor activity is gardening. I also enjoy walking my dog. I love the mini album. Really special and incredible.
Congratulations to the winners. The mini book is gorgeous. My favorite spring outdoor activity is going to the nursery to select new plants for our yard.