
We are so excited to welcome a special guest to the blog today, Youngmi An! Youngmi has a special talent for creating clean and colourful scrapbooking layouts that make the most of the stash she has on hand, and we think that you will love the “dreamy” page that Youngmi is about to share with us, as well as her encouragement to use what you have on hand to create!
…………………….
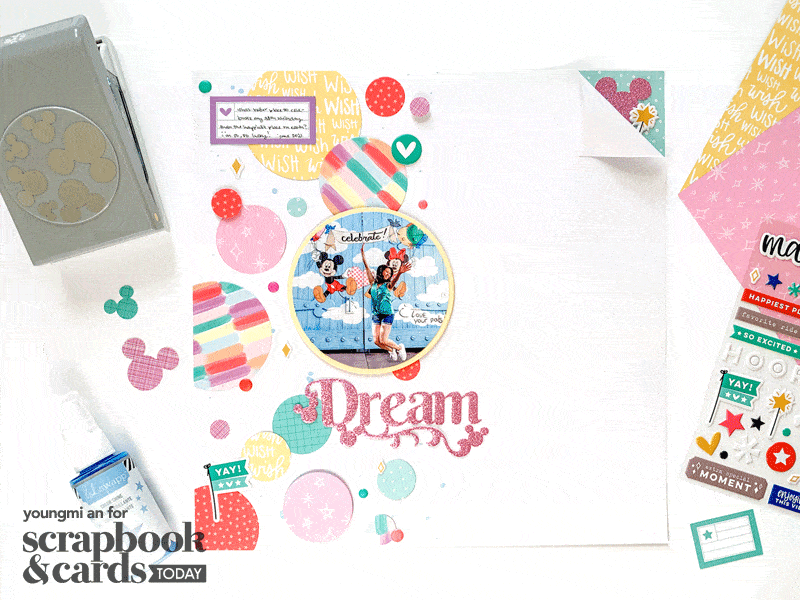
Hi everyone! My name’s Youngmi and I’m so excited to be today’s guest here on the SCT blog! As you can probably tell from my Instagram feed, one of my favorite things to scrap are Disney memories. I’m lucky enough to live in California, so we try to go to Disneyland once a year. I love to Disneybound, eat all the Mickey-shaped foods, say hello to my favorite characters and just absorb all that Disney magic! My Disney layouts are all about color, energy and pure joy. The layout I’m sharing with you today is what I like to think of as a “sprinkle” layout. It’s super playful, perfect for older stash and those odd pieces of paper that you still have from collections long gone.
Supplies | Hero Arts: Nesting Circle Infinity Dies; Elle’s Studio: (similar products) Good Times 6 x 8.5 inch Paper Stack, Tiny Shapes and Dots Puffy Stickers – Cool Tones; EK Success: Mickey Ears Confetti Punch; Scraps and Ink Crafts: Dream metal die; American Crafts: white textured cardstock, patterned papers by Amy Tangerine, Shimelle, and Damask Love; Lawn Fawn: (similar product) Spiffy Speckles Collection Pack; Heidi Swapp: Color Shine in Ocean; Bazzill: African Daisy cardstock
When working with older supplies, I try to think outside of the collection. I’m someone who normally loves to work within a collection because it makes scrapping so fast and simple. But after making several layouts with one collection, sometimes I need a refresh. That’s when I mix and match my supplies to create new and unique combinations.
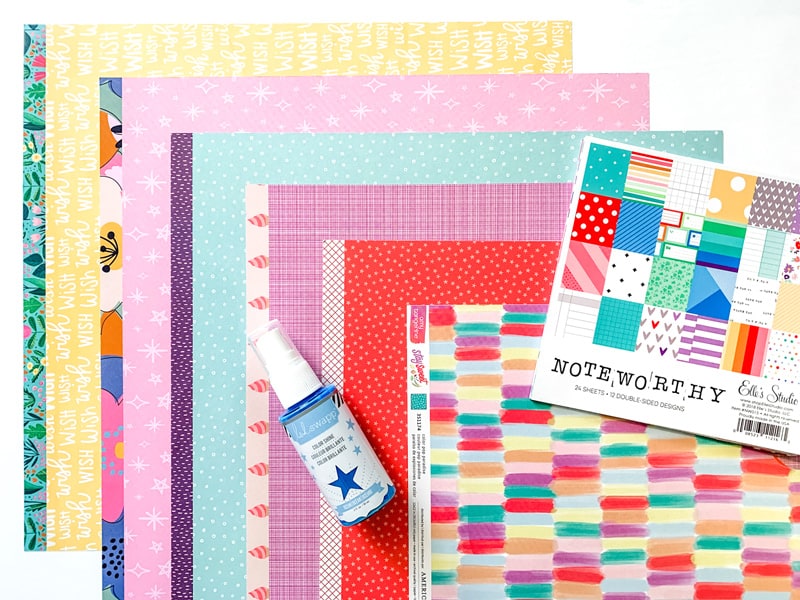
I started my layout with a multicolored Amy Tangerine paper from the Stay Sweet collection. The bright colors were just what I was looking for, and the pale blue and turquoise colors matched my photo perfectly. Next, I dug through my stash for coordinating patterned papers with small prints that read visually as a single color. I used a mix of papers from Shimelle Never Grow Up, Damask Love Grl Pwr, Amy Tangerine Picnic in the Park and Shine On, Lawn Fawn Pint-Sized Patterns Beachside, and Elle’s Studio Noteworthy. I couldn’t find any patterned papers in that pale blue color, but I wanted to bring it into the layout since there’s so much of it in my photo. The Heidi Swapp Color Shine mist in Ocean was a perfect match.
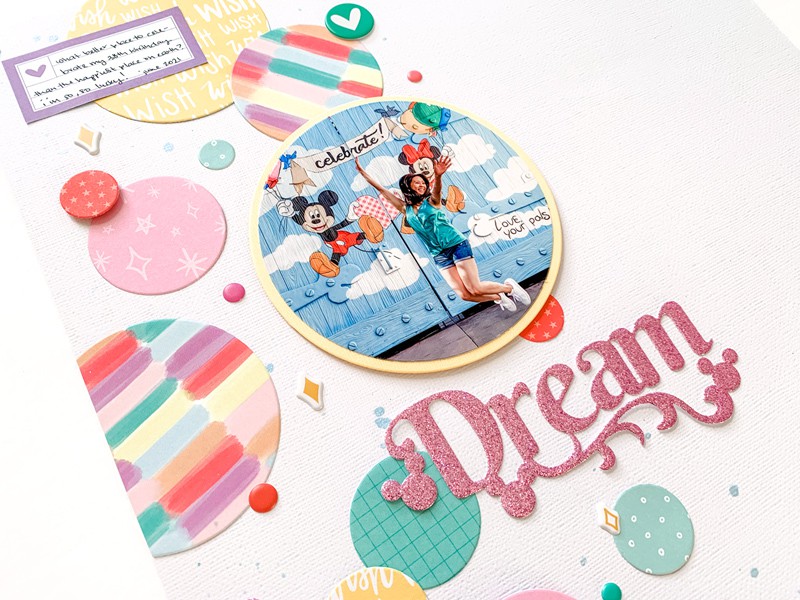
I started by sprinkling the Color Shine mist along the left side of my paper. While that dried, I gave my Big Shot a workout by cutting out circles in all different sizes from each of my patterned papers. My Nesting Circle Infinity Dies from Hero Arts made this a breeze. I also cut my photo into a circle and matted it on yellow Bazzill cardstock to make it pop.
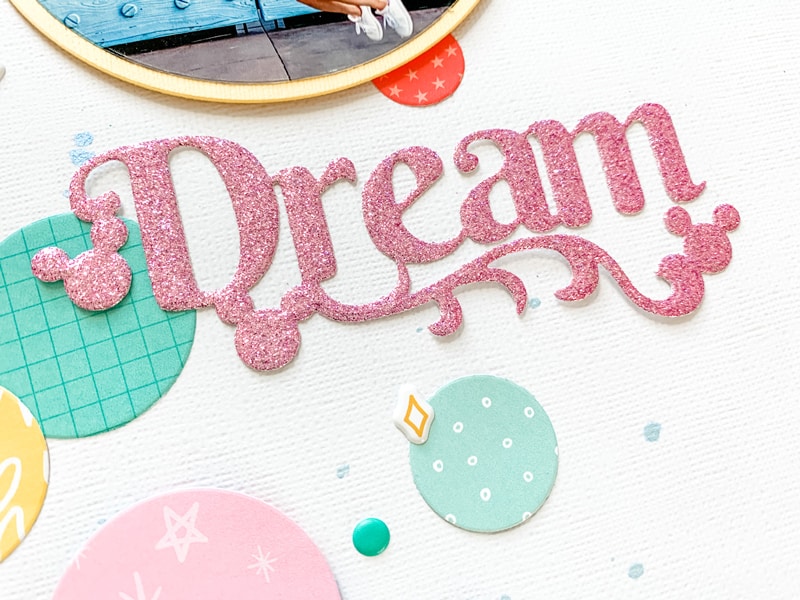
I laid out my circles along the left side of my page, overlapping a few here and there. For added dimension, I popped up a few circles with foam adhesive. I wanted more texture in my layout so I used the Scraps and Ink Crafts Dream metal die to cut my title from Martha Stewart Amethyst glitter cardstock.
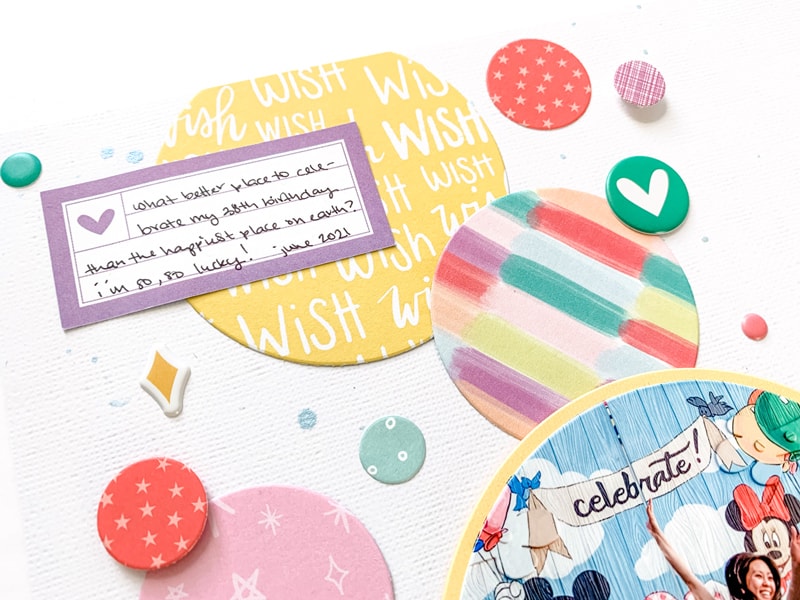
Now, on to the sprinkles! Enamel dots, gems, brads, sequins, buttons, puffy stickers, small stamps and tiny die cuts all work great as sprinkles. For this layout, I used Elle’s Studio puffy stickers. I added my journaling on an Elle’s Studio tag cut from the Noteworthy paper pad and layered it over one of the circles.
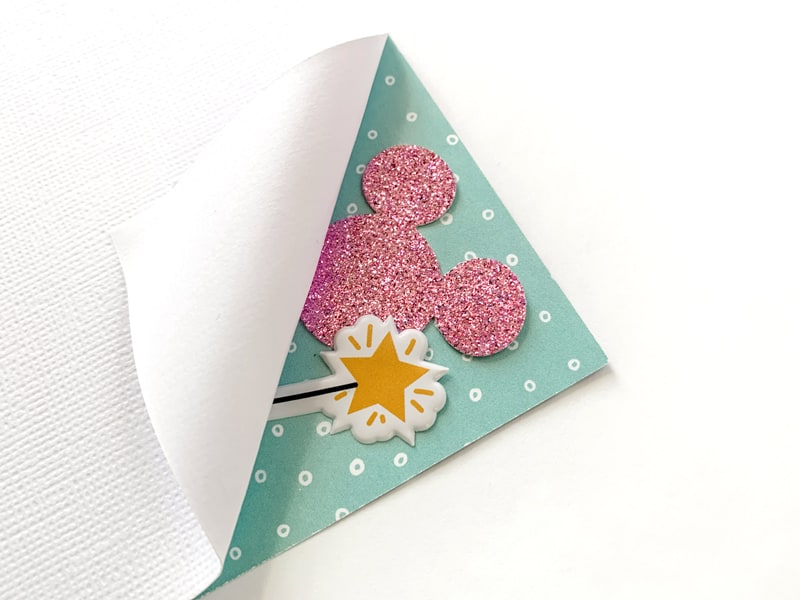
There’s a lot of white space on this layout, so to break it up a bit, I created a little spot of embellishment at the top right of my page. I folded down the corner and held it in place with a strong glue dot. I cut a triangle from one of my patterned papers and adhered it to the back of my page. You’ll want to be sure to cut it a bit larger than the space you’re trying to fill so there’s room for your adhesive. To pull in design elements from the rest of the page, I used my EK Success Mickey Ears Confetti Punch to make a Mickey from the same glitter cardstock as my title and added an Elle’s Studio puffy sticker. The idea is for the embellishments to be peeking out as though you’ve uncovered a hidden Mickey behind the layout!
I hope this layout inspires you to revisit your stash and mix up your supplies in fresh, new ways. Give this sprinkle design a try with the supplies you have on hand! If you don’t have circle dies, you can trace items in your home like jars, or rolls of washi tape to make a variety of different-sized circles. Or repeat a different shape—hearts, stars, or Mickeys would be super cute too! What tiny embellishments do you have in your stash that can be used as sprinkles? I can’t wait to see what you create!

My name is Youngmi and I’m a midwest girl currently living in sunny California with my husband. I’ve been scrapbooking for over 20 years! In the moments when I’m not scrapbooking, I enjoy baking, traveling, reading, quilting, and living out all my nerdy dreams. That includes DisneyBounding, gaming, being a proud Ravenpuff, and dreaming of cosplays. Nerdy scrappers unite! You can see more of my work on Instagram!

What a beautiful layout. Love the colours!
Gorgeous layout! Thank you for sharing.
Youngmi, not only do I love the layout, but I LOVE how you put the collection together. This concept is something I could see using many times over. Thank you for the inspiration! And the dreamy layout. <3
Very cute layout!!! Love the circles!
This is such a cute layout.
Thank you so much for all your love for this project!
Love all of the colours. Hope to get to Disney again soon!