
We may be ending the week with World Cardmaking Day, but we wanted the celebration to last a little bit longer, so this entire week is dedicated to our love of cardmaking! Each day we’ll be featuring ideas and inspiration to up your card game. Get inspired to create along with us as we warm-up for the big game: World Cardmaking Day on Saturday, October 2nd!
Today we’re kicking things off with design team member Sidnie des Jardins, and we’re starting the week on a nice and easy note with sweet and simple cards!
……………………….
Hi SCT friends! It’s Sidnie and I’m back to show you how to make cards that do not have to be complicated to be beautiful.
Have you ever looked at someone’s cards on their social media, blog, or in a magazine and said, “Wow! That card looks so beautiful, but it looks really complicated,” which then intimates you? Today I’m sharing two ways to make beautiful cards with ease.

Supplies | Pinkfresh Studio: English Garden washi tape and coordinating die, Fancy Diagonal die cut, Painted Peony stamp, Black Hybrid ink; Honey Bee Stamps: A2 Double-stitched frame Honey Cuts; Neenah: Solar White 80lb cardstock; Simon Says Stamp: Green Apple cardstock; Thermoweb: Ultra Bond permanent adhesive
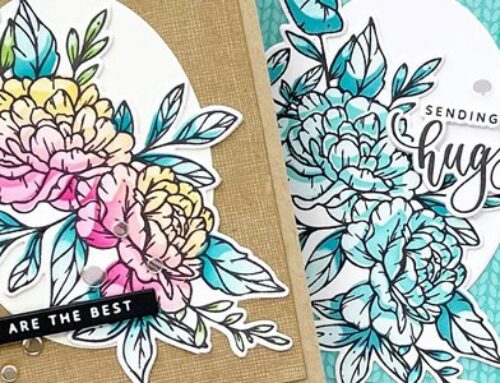
For my first example, I grabbed my Pinkfresh Studio English Garden washi tape and applied it to 80lb Neenah Solar White cardstock. Make sure you roll out the full image. Next, I lined up the coordinating English Garden die on the washi tape image and ran it through my Big Shot die cutting machine. I also ran the Stitched Rectangle die through my machine using green apple cardstock and used my Pinkfresh Studio Fancy Diagonal stripes die on another piece of Neenah Solar White cardstock.
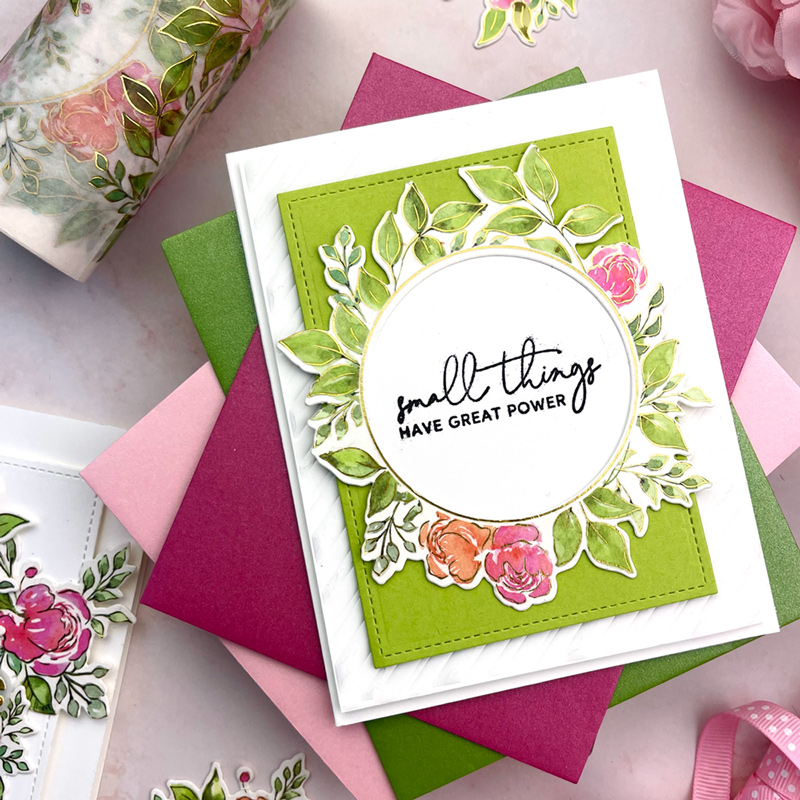
I attached the diagonal stripes panel to an A2-sized card base using Thermoweb’s Ultra Bond glue, then I adhered my green stitched rectangle panel on top. I added my die cut wreath and used a sentiment from Pinkfresh Studio’s Painted Peony stamp. That’s card number one complete, and it only took minutes!
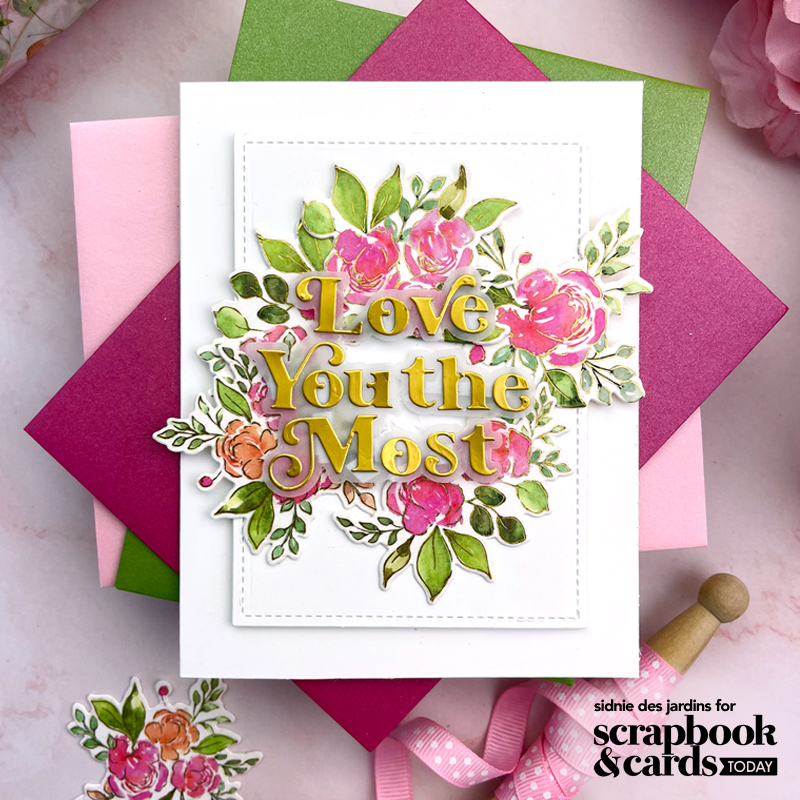
Supplies | Pinkfresh Studio: English Garden washi tape and coordinating die, Love You The Most die; Honey Bee Stamps: A2 Double-stitched frame Honey Cuts; Pink & Main: gold foil cardstock; Neenah: Solar White 80lb cardstock; Thermoweb: Ultra Bond permanent adhesive
My second example is even easier than the first one! I used the remaining die cuts from the previous project and adhered them to another stitched rectangle panel using Neenah Solar White 80lb cardstock.

The sentiment was cut from Pinkfresh Studio’s Love You The Most die using gold foil cardstock from Pink and Main. I then attached the die cuts on top of my flowers. I adhered my panel to an A2- sized card base using some more of that awesome Ultra Bond glue from Thermoweb.
I hope you were able to be inspired with my projects I shared with you today. Remember that less is sometimes more, and that you can still create a beautiful card with just a few steps! See you next time!

Find more of Sidnie’s work here : Instagram | Facebook | Blog


Both are lovely cards . The second one really shows that gorgeous flower design – I really like this washi tape – such a pretty pattern. I think I need some haha
Beautiful cards.
These are gorgeous.
The cards are beautiful.
Lovin these cards!
love these! I’ve seen that washi, but didn’t realize it’s potential! thanks so much for sharing these :)