

Happy Monday, friends! Today we are excited to kick off the week with a special guest, Pocono Pam! Pam is one of the collaborators of the Unity collection from Hero Arts, along with her friend Dana Joy, who we got to be inspired by earlier in the month. In case you missed that post, be sure to check it out HERE. Let’s take a look at the beautiful cards that Pam has to share with us today, created with this inclusive line of products that celebrates the diversity in our craft!
![]()
Hola, everyone! It’s Pocono Pam here! I am super excited to be here today on the Scrapbook & Cards Today blog sharing cards I created using products from the Hero Arts Unity collection!
Many Hero Arts products complement each other. I love using their word dies along with background stamps or stacked for a clean and simple card.

Supplies | Hero Arts: Hero Hues Dove White top-folded card, Hero Hues Dove White side-folded card, Hero Hues Premium Cardstock Dove White, Hero Hues Premium Cardstock Pitch Black, Colors of Earth Paper, Hero Arts Glitter Paper Fall – Copper, Love You Stamp and Cut XL, Nesting Hearts Infinity Dies, clear embossing & watermark ink, Detail Black embossing powder, Precision Glue, Hero Tools Compact Cutter
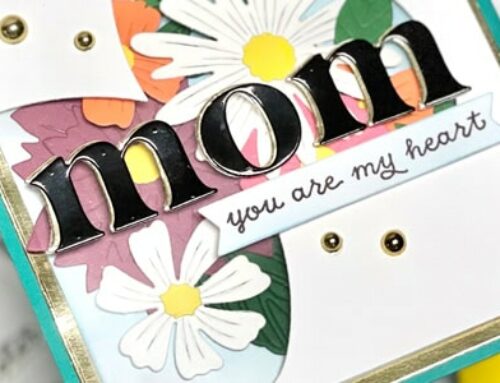
For my first card, I wanted to highlight the beautiful earth tones of the Hero Arts Colors of Earth Paper. To begin, I embossed the third largest Nesting Hearts Infinity Die onto a 4 x 5.25” Dove White card panel with my Sizzix Big Shot Machine. This created an impression on the panel similar to the result of an embossing folder. I then adhered the panel to a Dove White top-folded card base.
Tip: Not all die-cutting machines are the same. Carefully follow the instructions for your machine to emboss with your dies.
Next, I die-cut “love” from the Hero Arts Love You Stamp and Cut XL set in four of the Hero Arts Colors of Earth Paper and one in copper glitter paper from the Hero Arts Glitter Paper Fall pack. The cardstock and glitter paper is part of the Hero Arts Unity collection.

To continue, I stacked and glued the die-cuts, slightly off-setting each layer, and adhered it onto the embossed heart.
Tip: When stacking my die-cuts, I let the glue dry in between each layer to ensure they stayed in place.
Next, I heat set the sentiment from the Hero Arts Love You Stamp and Cut XL set with Detail Black embossing powder onto Hero Arts Dove White cardstock. I trimmed and backed it with Pitch Black cardstock and popped it onto the card with foam dots for dimension.
To complete my card, using Hero Hues Pitch Black cardstock, I die-cut and glued a few of the smallest hearts from the Nesting Hearts Infinity Dies onto the card.
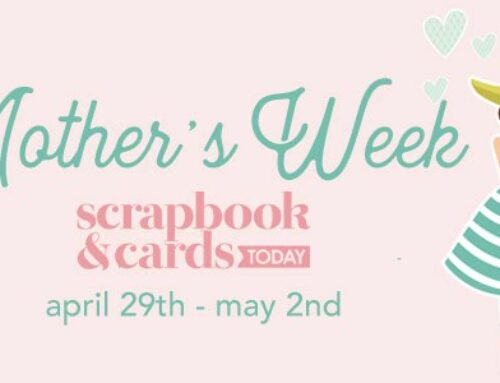
Word dies can also make a nice addition to background stamps as you can see on my second card!

Supplies | Hero Arts: Hero Hues Premium Cardstock Dove White, Hero Hues Dove White side-folded card, Hero Hues Premium Cardstock Azalea, Hero Hues Premium Cardstock Pitch Black, Hero Arts Glitter Paper Basics – Black, United People Bold Prints, Hero Arts Love You Stamp and Cut XL set, Taffy Reactive Ink, Grape Slush Reactive Ink, Creamsicle Reactive Ink, Champagne sequin mix, Precision Glue, Water Mist bottle, Hero Tools Compact Cutter
To begin, I placed the Hero Arts United People Bold Prints on my MISTI door. I then inked the stamp top to bottom with Hero Arts Taffy, Grape Slush, and Creamsicle Reactive Inks.
Next, from a few inches away, I lightly misted the stamp and closed the MISTI door onto a 3.75 x 5” Dove White card panel and pressed down for a few seconds.
Tip: For this technique, using a fine water mist produces a nice result; especially with the fine lines of the stamp.
Upon opening the door, I was left with a beautiful blended image! I let it dry; backed it with Hero Arts Hero Azalea cardstock and glued it to a Hero Arts Hero Hues Dove White side-folded card.
Next, I die-cut “you” from the Hero Arts Love You Stamp and Cut XL set several times in Pitch Black cardstock and once in Hero Arts Glitter Paper Basics – Black. I stacked and glued the die-cuts, placing the glitter die-cut on top. Once stacked, “you” appeared to be a thick word embellishment instead of a flat die-cut. I adhered it to the card front.

Tip: After stacking the die-cuts, go over any white areas left from the glitter paper with a black marker. Be sure to do this before adhering it to your card.
To complete my card, I stamped “brighten my day” onto Hero Arts Dove White cardstock, trimmed it to 2.75 X .25” and adhered it to the card front, and added a few Hero Arts Champagne sequins.
Word dies can stand alone on a card or can be used as an addition to make your cards pop! I hope I have inspired you to take out word dies you may have in your stash and stack them!
Thanks for stopping by to take a peek at my cards featuring the Hero Arts Unity collection! products! Have a happy, crafty day!
Peace!

Find more of Pam’s work here: Instagram | Blog
![]()
![]()
Don’t miss more inspiration featuring the Unity collection on the CommUNITY series on the Hero Arts blog, and thank you to Dana and Pam for sharing these wonderful products, and their gorgeous creations with us this month!


Nice!
Pocono Pam coming through with the Melanin card inspiration. HELLOOOOOOO Diversity. LOVE LOVE LOVE!!!!!!!!!!!!!!!!
Just fabulous!!!
Awesome projects, Pam!