
Hi SCT friends! It’s Sidnie and I’m back to show you fun and festive ways to be creative when making your Christmas cards to create greetings that are both fun and festive! Christmas is my favorite time of year and for me, I hold nothing back when I create holiday cards. Some are colorful and bright, others may be CAS, or cute and simple. That’s the style of cards I’ll be sharing with you today!
Supplies | Stamp: Hero Arts Christmas Rose Bold Prints stamp; Die: Hero Arts Happy Holidays Script Stamp & Cut; Ink: Pinkfresh Studio Black Hybrid Ink; Cardstock: Neenah Solar White 80lb cardstock, Neenah Solar White 110lb cardstock, Simon Says Stamp Surf Blue cardstock, Pink and Main gold foil cardstock; Adhesive: Thermoweb Ultra Bond glue; Markers: Copic R59, R46, R29, R35, YG67, YG17 and YG03; Other: White gel pen, vellum
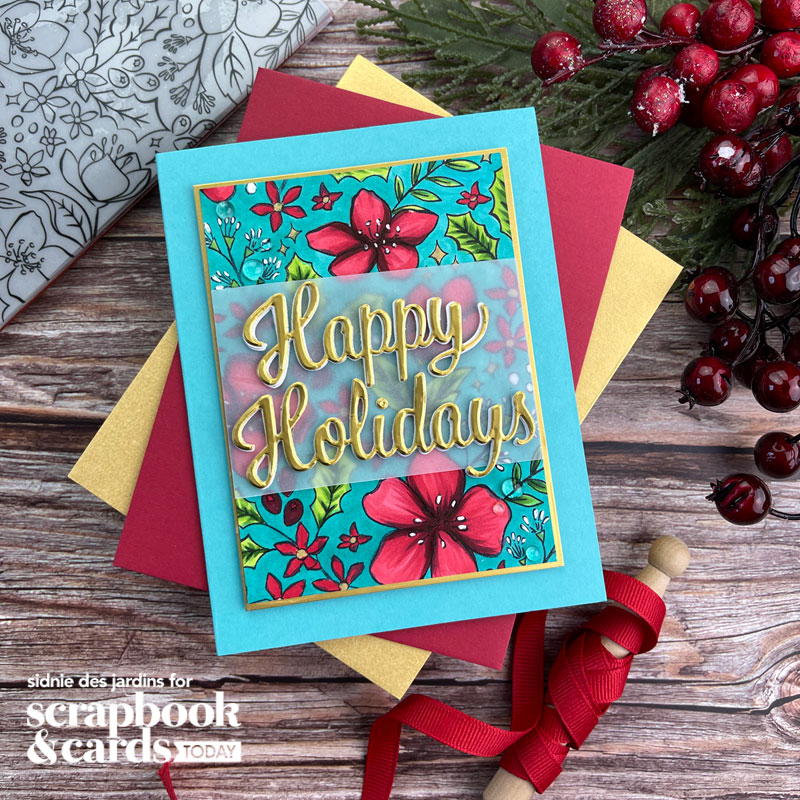
My first example began with the Hero Arts Christmas Rose Bold Prints stamp and my Misti. I used 80lb Neenah Solar White cardstock and inked up my Copic-friendly black ink, Black Hybrid Ink from Pinkfresh Studio, to stamp the image on the cardstock. I did this twice to ensure I got a crisp image.

I used the following Copics to color my image, going from lightest to darkest: R59, R46, R29, and R35 for the roses; YG67, YG17, and YG03 for the leaves.

When I was finished coloring the leaves and roses, I trimmed my panel down and proceeded to finish coloring the white areas of my panel in BG15.
I die cut the Hero Arts Happy Holidays Script Stamp & Cut sentiment four times using Neenah Solar White 110lb cardstock and once using Pink and Main’s gold foil cardstock. I adhered gold cardstock to the back of my panel and attached it to an A2-sized card base using Simon Says Stamp’s Surf Blue cardstock. I added vellum and adhered my sentiment to the middle of my panel using Thermoweb’s Ultra Bond glue. That’s card number one complete!

Supplies | Dies: Hero Arts Christmas Lights Border Fancy Die, Hero Arts Merry Christmas Banner die; Cardstock: Hero Arts Pitch Black cardstock, Neenah Solar White 110lb cardstock, Neenah Solar White 80lb cardstock; Ink: Festive Berries Distress Ink; Tools: Honey Bee Stamps blender brushes; Copic Markers: R29, Y18, YR04, YG67, B99 and V15; Adhesive: Thermoweb Ultra Bond glue, Glossy Accents
My second example is going to be even easier than the first! I ran the Hero Arts Christmas Lights Border Fancy Die through my die cutting machine using Neenah Solar White 110lb cardstock. I colored each light bulb with Christmas colors and colored the string and the border in green. I used glossy accents on each bulb and set it aside to dry.

I ran my Hero Arts Merry Christmas Banner die through my die cutting machine as well using Hero Arts Pitch Black cardstock and again in Neenah 110lb. I taped the back of the word in place of the white banner. After I poked out the black letters from the black banner, I adhered it to the white cardstock.

I used Festive Berries Distress Ink in the middle of the A2 size card base created with Neenah Solar White 80lb cardstock. I adhered the fully dried lights border to the card base using Thermoweb’s Ultra Bond glue, then adhered the banner and to the center of the card base using foam adhesive.
There you have it! Two examples of how you can make colorful and bright Christmas cards. I hope you were inspired by the projects I shared with you today! See you next time!
 Find more of Sidnie’s work here : Instagram | Facebook | Blog


Fabulous cards! Live the color choices!
Gorgeous card colors are splendid
I love these so much! The first one is so beautiful (gold and vellum are my jam) and the second one is so wonderful with those delightful Christmas lights!!! Thank you so much for sharing and inspiring!!!
Wow, Love that turquoise
Fabulous cards!
Beautiful cards. Those little light bulbs are adorable.
Beautiful work! Thanks for sharing!
So oretty. Love the light one!
So pretty. Love the light one!