
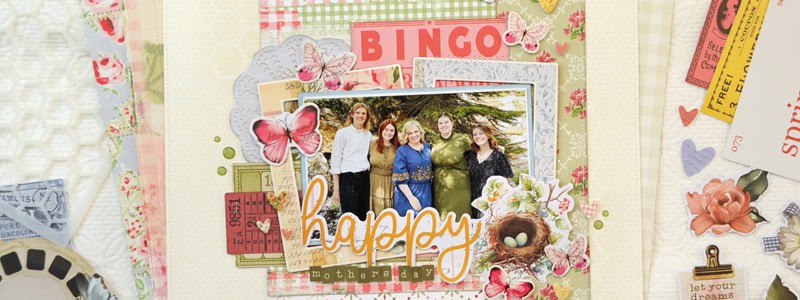
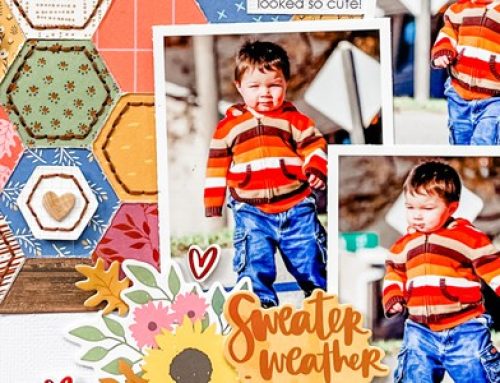
Hello, friends! It’s Jana Eubank. The sketches in the Spring/Summer 2024 issue are beautiful and I couldn’t wait to try my hand at one of them. I adapted the following 8.5 x 11″ sketch for a 12 x 12″ layout documenting a snapshot of me with my children from Mother’s Day last year. Take a look!

Click HERE to see all of the Spring/Summer 2024 issue sketches!
I used the beautiful Spring Garden collection by Simple Stories.

Supplies | Simple Stories Spring Garden collection: Patterned Paper, 6×8 Pad, Chipboard Frames, Foam Stickers, Bits & Pieces, Ephemera, Honeycomb Stencil, Washi Tape, Enamel Dots; Simple Stories Color Vibe: Warm White Cardstock, Sky Cardstock, Fall Alphabet Sticker Book; Ranger: Antique Linen Distress Ink; Spellbinders: Romantic Slimline Borders Dies, Platinum 6 Machine; Scrapbook.com: Magic Mat, Adhesive; Other: stitching, staples
I began by stitching around the edge of my background cardstock (Color Vibe Warm White cardstock by Simple Stories), then adding subtle detail to the background using the Honeycomb Stencil and Antique Linen Distress Ink.

Next, I followed the sketch to add background layers to my design. I machine-stitched around the green paper for additional detail as indicated on the sketch, then added strips of washi tape under the top and bottom edges for additional color

In place of the border strips across the top and bottom of the layer on the left, I opted to add zig-zag stitching and die cut lace borders.

Instead of the two photos in the sketch, I used a chipboard piece with two frames as a layer below my single photo as a fun twist.

I switched the placement of the banners on the sketch to the opposing corners, and then, instead of banner shapes, I created embellishment clusters with butterfly accents. I added a third grouping of butterflies near the top-right corner of the page to create a visual triangle of embellishments.

Finally, I created the title for the page with a die-cut word and tile letter stickers, covering the preprinted design peeking out from the bottom of the chipboard frame behind the photo.

I hope my layout today inspired you to use a sketch as a starting point, customizing the design as you work to fit with your current photo. For example, use a single photo in place of two photos, or add additional embellishments to repeat colors or shapes.
Thanks for coming by! See you again soon!

Find more of Jana’s creations here: Facebook | Instagram | YouTube

YOur layout is beautiful!
Pretty LO!
Beautiful Layout!
Beautiful layout. I am slowly getting a little better at the layers. I have lots of Simple Stories and I think I will try to make this layout.
I just love this!