
Welcome back to another day of Giving Thanks Week here on the SCT blog! One wonderful way to document all of the things you are grateful for in one place is by creating a mini album, and today Conny Craig is sharing a very special album that she created to inspire us! Let’s take a look and find out how she put it together—it is easier than you think to make with just chipboard and paper!
![]()
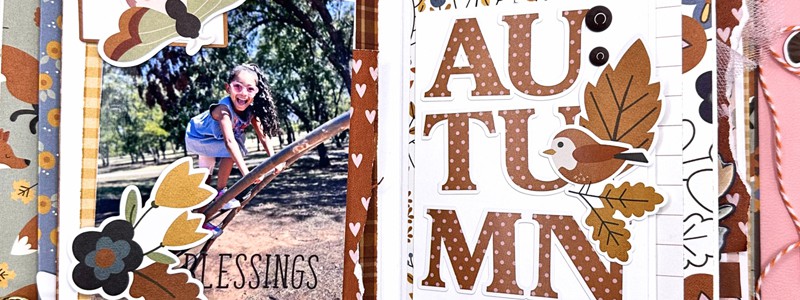
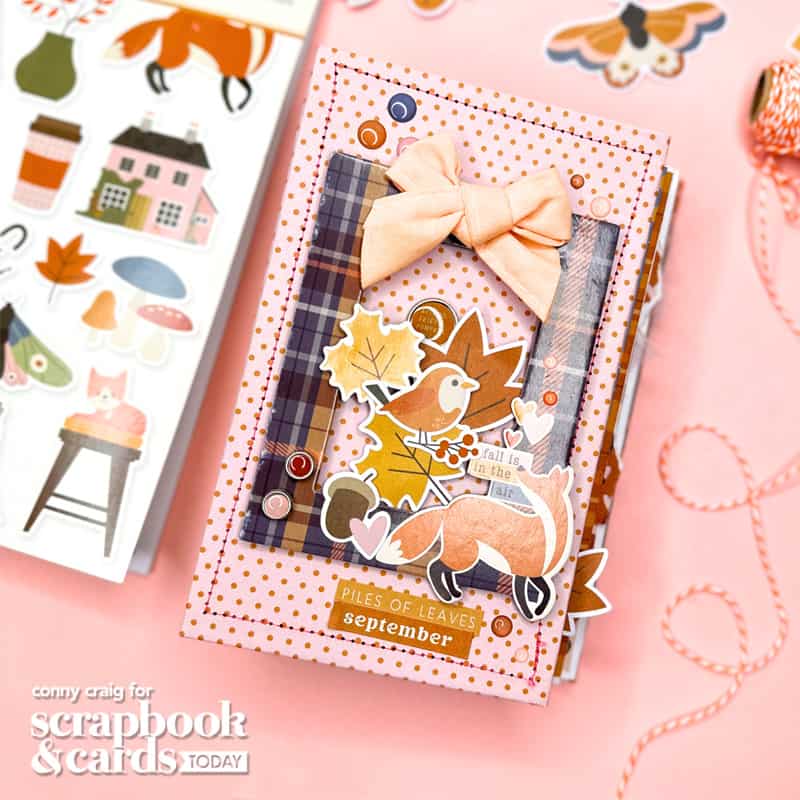
Hello, crafty friends! It’s Conny here from @thedailylifeofcreativity sharing a 4 x 6.5-inch mini album that I made using the gorgeous Acorn Collection by Simple Stories. It was such a fun project to create and I’m excited to show it to all of you. I think you’ll be blown away by how it turned out!
Supplies | Patterned paper, stickers, chipboard, ephemera die cuts, enamel dots: Acorn Lane collection from Simple Stories
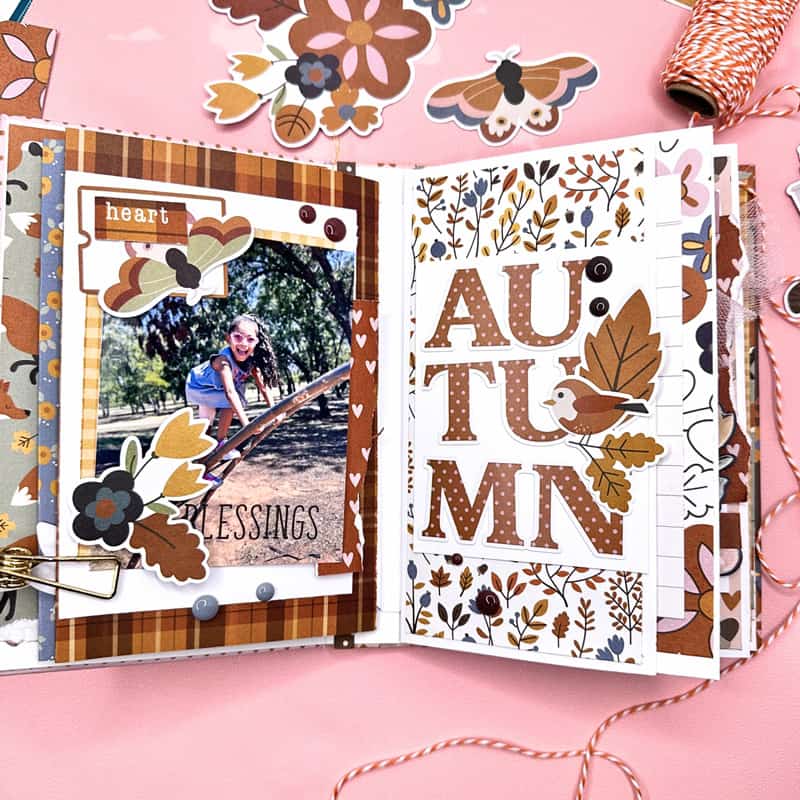
The Acorn Lane collection by Simple Stories is the perfect choice for any fall-themed project. The warm and cozy colors along with the beautiful patterns truly capture the essence of this beautiful season. Whether you’re creating a mini album like mine or any other fall-themed project, the Acorn Collection will surely add beauty and charm.Let’s get started!For this project, you will need two pieces of chipboard measuring 4″ by 6 1/2″ for the covers, and one piece of chipboard measuring 1 1/2″ by 6 1/2″ for the spine. Once you have your chipboard pieces, you can cover them with warm hearts and Fall Ellujah papers. I recommend adding stitching using a sewing machine to give it a more polished look. I focused the embellishments around the chipboard frame with the fox, as the theme is “fall in the air.” You can add chipboard, foam, enamel dots, and brads from the collection to the cover. To add texture, you can also add a cloth bow.
Inside the AlbumYou’ll need a piece of cardstock measuring 5 1/2″ by 6 3/4″ for the hinges. Score the longest side at 1″, 1 1/2″, 2″, 2-1/4″, 2-3/4″, 3-1/4″, 3-1/2″, 4″, 4-1/2″, 4-3/4″, 5-1/4″, and 5-3/4″. This will leave about one inch at the beginning and the end. Apply double-sided tape to every half-inch segment on one side and adhere it, leaving 1/4″ of an inch in between every hinge. Finally, add double-sided tape or liquid glue to the hinge and adhere it to the spine of your album.
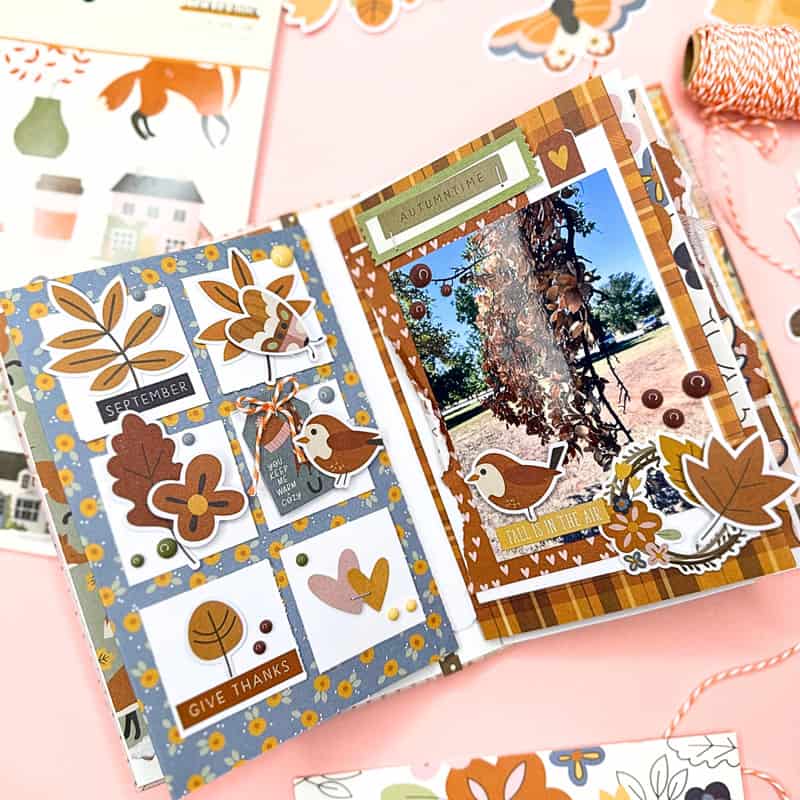
 To make the pages, you will need three pieces of paper measuring 6″ by 7 3/4″. Score each page at 3-7/8″ and leave a pocket open at the top. Adhere the bottom of the pocket to the side you are attaching to the hinges. You can use these pockets to add extra photos or private little notes. For one of the pages, you will need a piece of paper measuring 6″ by 11″. Score it at 3 7/8″ and 7 3/4″ to create a flip, signature page.

You don’t need a lot of photos to create a beautiful mini album. In fact, in this mini, I only used five photos of a trip to the park. To add interest and dimension, I created clusters using embellishments from the Acorn Lane collection. For example, on one page, I used six white squares that measure 1.5″ by 1.5″ and added the smallest embellishments from the Bits and Pieces, floral bits, stickers from the sticker book, and enamel dots.
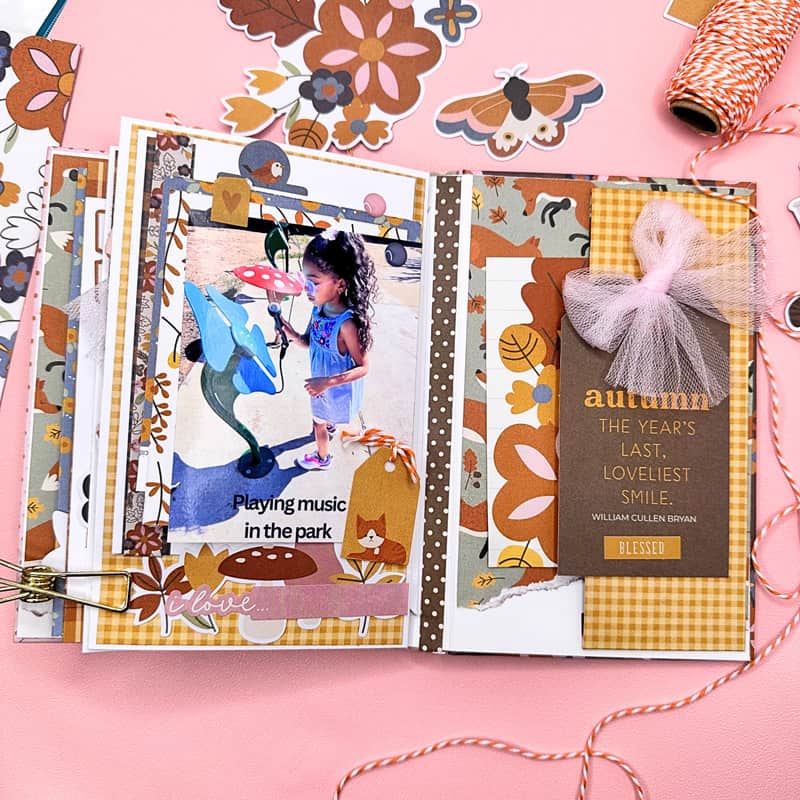
I also created clusters around the 3″ by 4″ photos and used some of the 3″ by 4″ cut-apart cards with tulle to add extra texture. Adding ribbons, tulle, or threads can enhance the overall look of the album.
We are excited to see how you will document your gratitude this fall, and if you put together an album, be sure to share it with us on social media! See you all soon, and it has been a pleasure to be here once again!

Find more of Conny’s work here: Instagram | Blog | Gallery
![]()
What a beautiful mini album that Conny shared with us! You can create the same to document what you’re grateful for this year, or a cherished memory!

To continue to show you how thankful we are for you, we’re hosting another giveaway for one lucky commenter—a seat in our year-long sketch class in 2024!
Click HERE to learn more about Sketches 2024!
We are so excited about this year-long class with Allison Davis that will inspire us with monthly sketches and layout inspiration, and we want one of YOU to join us in class! To enter to win your seat, leave a comment on this post, telling us about one PERSON in your life who you are grateful for. Comments will close at midnight Eastern time on Wednesday, November 22nd, and a winner will be announced on November 24th.
We look forward to sharing a beautiful card project from Dilay Nacar here tomorrow, so be sure to stop by to get inspired, and enter to win another giveaway!


I am grateful for my parents. They have encouraged me to create a business being a maker.
I’m grateful for my best friend and husband!
I am grateful for my son. Since I’m a
widow, there are so many things aroung
the house that I don’t know how to take
care of (electricity, changing filters, etc).
He’s always on call and gracefully takes
care of my problems. Takes after his
father. Love the album idea and the
classes would be fun. thanks for sharing.
Other than my family, I am most grateful for my friend, Donna, who has been my BFF for over 30 years. I truly do not know what I would do without her!
It’s really hard to pick just one person, but as of the moment, the one person I am picking is my mom!
I am grateful for my husband and his patience.
This album looks so awesome! Thank you for the exact measurements on the hinges. I am going to try this one!
I am grateful for my beautiful family. I am a proud mom of 3, and everyday I am just so thankful to be their mom because they are awesome kids <3
Very cute! I love mini albums!
I am so very grateful for my husband of 47 years. I almost lost him in 2021 and I often read posts from women who have lost their husbands. My heart goes out to each and every one of them. I would be so lost . . .
I will forever be grateful to my mother and the sacrifices she made after the divorce from my father, raising me and my brother on a teacher’s salary and ensuring we were taken care of and had a bright future.
What a lovely album – it really captures fall in all it’s glory! I’m most thankful for my best friend – I really don’t know what I would do without her!
I am grateful for my son Austin. He is the biggest help.
I am grateful for my beautiful friend Grace who always has time for me and the two of us share so much! We love to sit and chat, share a cup of tea and have even enjoyed many crafting adventures!
Only one? My handyman H. He mows the grass. Fixes whatever is broken and checks on me during storms etc. He is the reason I didn’t have to sell my home and move into a small apartment.
I am truly grateful for my husband. He is my rock and the love of my life.
I am grateful for my daughter who balances work and children just like I did. Can’t wait to be with them in a few weeks!
I am thankful for my new supervisor at work, who is so willing to jump in and help with whatever needs to be done.
I am most grateful for my family… especially my husband Mark!!
Love the album! I am grateful for my mom every day. She supports me and my family no matter what.
I am grateful for my husband, daughters and son!
Hands down, I’m thankful for my husband! He’s just the best.
I am always grateful for my family and friends. But there was a really nice gentleman who was walking out of the store recently, and he handed me his Kohl’s cash because he wasn’t going to use it. There are those random acts of kindness that always remind me to be thankful for the people we encounter every day. A simple smile can brighten someone’s day.
Besides my wonderful family, I am truly grateful for my best friend, Debbie. Love our Starbucks get-togethers!
I am grateful for my husband and his encouragement and patience.
I’m so grateful for my wonderfully kind, generous & loving husband, Rick. He continuously amazes me with his parenting skills, his generosity and his love for his children and me.
What a beautiful mini album! Thank you for sharing.
I am grateful for my freedom.. everyday we see the news about some country suffering at the hands of others. I am grateful I live where I live and can provide my family with freedom and choice. I of course am also grateful for my family and the ability to scrapbook and craft whenever I want to. LOL!
I am so grateful for my husband. He makes everything in my life possible!
I am grateful for my husband who is kind and helpful to all those around him.
I am grateful for my husband, he’s an amazing Dad!
I’m thankful for my family and friends, who have supported me these last 15 years .
I am most grateful for my dear husband. I love Allison’s sketches so it would be awesome to win this class!
I’m grateful to my parents for always encouraging me.
I am grateful to have my husband in my life. He fully supports my paper crafting obsession, okay, addiction, lol.
I’m grateful for my husband & his encouragement and support as I enjoy the on-line classes to learn new skills & collect projects to try and of course purchasing the needed supplies… so blessed!
A beautiful layout! Looking forward to documenting my gratitude for my husband & kitty.. thank you!
I am so grateful to have a husband that supports and encourages my creativity.
I am grateful for my husband.
I love mini albumns, this one looks so fun and the fall papers are perfect.
I was blessed to have the most wonderful parents. I am grateful for every single day I had with them and so thankful to be able to share their wisdom with my kids.
What could be a better gift for this bday than winning one seat for this amazing class???
I’m grateful for all those ewho have been by my side during tough times, specially my bests , amma, sister and my ♥️.
I’m grateful for my scrapbooking/counted cross stitch BFF. She has been sooooo supportive during my breast cancer journey as she’s a six year survivor. So so grateful to Lora S.
I am grateful for my crafty bestie, Donna who is always available with inspiration when I get stuck and to help rescue cards that I’m about to give up on! She’s the best!
Thanks for the chance to win a spot in the class!
Love this mini inspiration Conny.❤️
Grateful for my sister, Krystal, she is a constant in my life. We just get each other. no need to explain things. She just gets it :)
I am so thankful for my mother. She was my best friend during a time in my life when most teenagers don’t like their parents. She is a remarkable role model. In fact, I followed in her footsteps by working as an English teacher for 31 years. Now she has dementia. She knows me, just not my name, but I see her every day, and I’m grateful for that.
I am grateful for my best friend!
I am grateful for my husband! Thanks for the chance to win.
Would love this class!
I’m grateful for my little family ❤️