
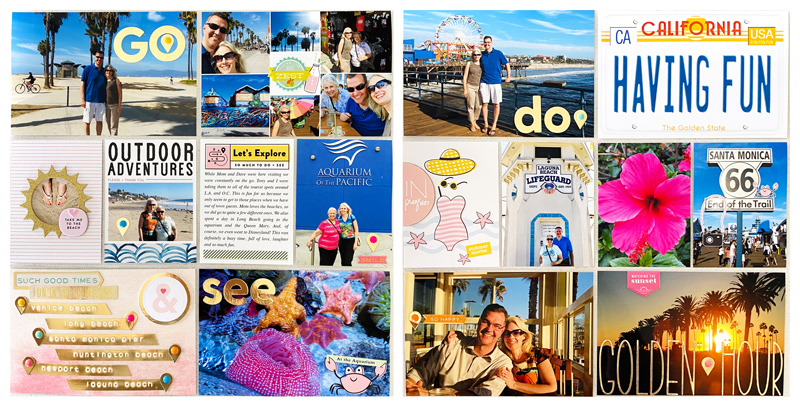
Hi everyone! My name is Lisa Soares and I’m delighted to be a guest designer on the SCT blog. Today I’m sharing a pocket page spread to capture some travel memories. In this case, my husband and I had family visiting us here in Southern California and we didn’t actually go away on a vacation. But whenever people come to visit us we wind up doing all of the touristy things we don’t normally do in our day-to-day life, so in many ways, this did feel like a vacation to us!
Although I have been a papercrafter and scrapbooker for over 20 years, I am most interested in pocket-page scrapbooking. I started doing weekly 2-page spreads of my everyday life more than a decade ago and I can’t see myself ever stopping. I still love to do other projects (both inside and out of pockets) in different sizes, so when I travel I usually document in a Traveler’s Notebook or other smaller type of scrapbook. These scrapbooks are where I document more of the stories and details of my trip. But, I ALWAYS include an overview of a vacation in my weekly pocket-page album and this is what I am sharing with you today.
Supplies | Patterned paper: We R MemoryKeepers (Wildflower); Michaels Recollections (Gold Foil Paper); Alpha Dies: Scrapbook.com (Tall Skinny and Bold Basics); Geotag Die: Art-C; Puffy Stickers: PaperPerson (Change of Scenery) Pink Paislee (Citrus Bliss); Chipboard: Ali Edwards (CRAFT Story Kit), A Beautiful Mess; Pocket Cards: Studio Calico, Ali Edwards (July Stories By The Month), In A Creative Bubble (Adventure Bound Digital Prompt Cards); Paislee Press Digital (4×6 Photo Templates Vol.5); Embosser and Tape: Motex; Enamel Dots: My Mind’s Eye
For my layout, I started with the SCT Magazine Summer 2021 Issue Before We Go printables and let the colors guide me in choosing my extra embellishments.

Download this FREE printable HERE!
Although there are a lot of colors and different places highlighted in my pictures, I find that when I keep to some sort of color palette with my cards and embellishments, everything comes together in the end. It’s surprising how many things you can find in your stash from different companies that can all work together. For instance, when I printed out that adorable pocket card with the bathing suit, sunglasses and beach hat, I found a pink colored piece of chipboard from my stash just to give it a little more dimension.
If you’re a digital or hybrid paper crafter, you could incorporate more of the colors from the pocket cards and add them to other digital files. I added the pink, yellow and green from the free printables to my digital journaling card by using the eyedropper tool to select the colors from the cards. Also, while you’re in your digital editing app, you may want to grab some of the digital designs off the cards and add them to your pictures like I did with the crab, camera and the drink.

The other thing I wanted to do to tie everything together between my two pages was to incorporate gold metallic throughout. Don’t just use your metallics like gold, silver, copper, etc. for holiday projects. I want to encourage you to incorporate metallics throughout the year. Gold is especially perfect to use for the summer because it evokes the feeling of warm, sunny days.

To get that splash of gold on my pages, I used my metal dies to cut the title “GO SEE DO” out of some gold metallic paper and placed each word on a separate picture in a visual triangle to lead your eye from the top of the page to the bottom and back up to the top again on the next page. I then finished off my gold letters on my last picture “GOLDEN HOUR” so that your eyes follow back down the page to the end.
To have a little fun with this layout, and to identify each place we visited without writing it on the picture, I used another metal die to cut out gold metallic geotags. Then, using coordinating patterned paper, I created a pocket card with the name of each location. I added a different colored enamel dot on each geotag and matched up the same colored geotag to the picture. This adds a little more interest to my spread as the viewer tries to match the name and the picture together.

Also, a fun thing I did to create my list was to use my hand-held label embosser with a clear tape. Then I placed the tape over some more of that metallic gold paper and cut out the strips. The clear tape is definitely fun to use over any color or pattern you choose to coordinate with your project. A tip I have for transferring the tape as smoothly as possible to the paper is to slowly peel the backing off the tape as you go, starting at one end and smoothing down the tape onto the paper using a bone folder.
Whether you are documenting a “staycation” like me or a vacation somewhere far from home, I hope you found some inspiration here today for your own pockets! Have a great summer!

My name is Lisa and I’ve always been interested in anything artistic. I remember my love of picking out that new coloring book (always fresh from the back of the pile) when I was really young, and I still remember how thrilled I was with a brand new box of crayons. As I grew, I tried many different crafts/hobbies and became an avid sewer for many years. But along the way I always had a love for stationery and paper, which led me to become interested in rubber stamping and card making. Eventually I discovered scrapbooking and fell totally in love with this hobby. It’s been over twenty years now and I can’t ever imagine doing anything else. It brings me so much joy to work on my projects and connect with others who share the same passion.
Find more of Lisa’s work here: Instagram


Lovely, bright, cheerful pages. Great use of those free PDF’s. I’m traditionally a 12×12 layout scrapper but since attending the Crop & create events, I enjoy the pocket pages mixed I. With my layouts. Always learning, love it!
I love the way Lisa used the different-colored geotags to denote location. Love the mix of pocket pictures and designs too. I’m especially appreciative because I recently visited LA this summer too. Awesome layout!
Beautiful I especially love your picture of the golden hour. Just love everything.
Very cute printable!
I liked the geo tag idea. I can see myself using it as travel is one of my main topics of scrapbooking.
Fantastic pages!
Some great tips. My favourite is definitely the geo tagging idea. I can see that one making its way into my projects. Thanks!
Love the printables, Thankyou
Great pages and ideas!
Adorable……
Love the layouts.
Very cute! Thanks for the chance!